
Patients Section
Selecting Patients/Groups on the left navigation bar will take you to the Patients List of the Bells application with a second tab available for the Groups.
Your Bells administrator will configure the name of this section to match what your organization calls a 'Patient.' Bells administrators configure this via the Organization preferences substitution that is set up for the Patient label. The label that shows on the tooltip of the section should match the plural setting of the label. The same preference setting controls the text in the search bar for the list, the Patient Id label of the display grid as well as the header label and My Patients toggle.
The Patient section of Bells is split into two tabs. The first tab (which you will always start on by default) is the Patients tab. The second tab is the Groups tab.
Patients List
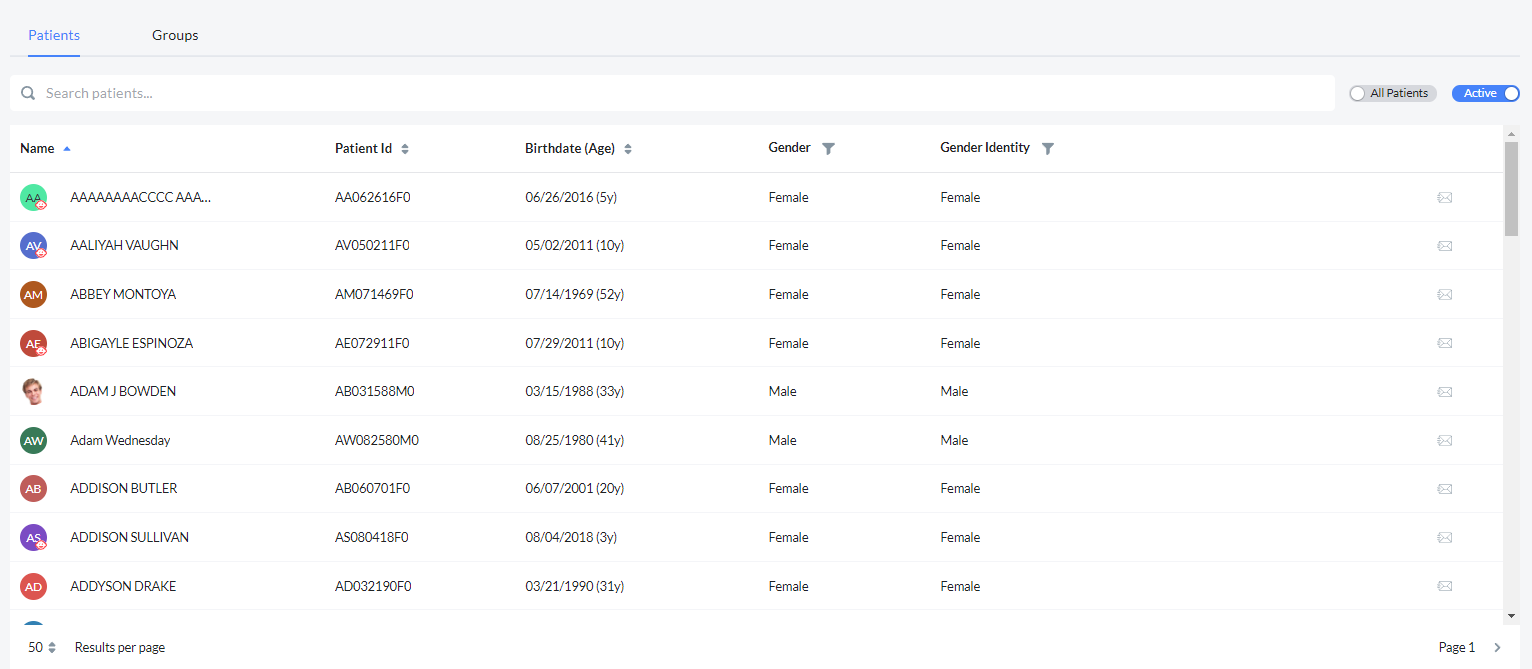
This display shows you a list of all patients with the ability to toggle to just your patients and just active or inactive patients. Additionally you can filter/search by an address, gender or gender identity.
Important: This list respects any Client Restrictions that are configured in the EHR.
 There are additional patient limitations from myAvatar that are supported in Bells. Check out the myAvatar FAQ article for more information.
For myAvatar users, organizations with User Sub-system Codes enabled Bells filters patients based on the sub-system code associated with their active episodes. Patients not tied to a program associated with the selected system code will not be visible.

Toggles
Above the Patient List, you will see a toggles for filtering the patient list. These toggle allow you to filter the list of patients based on if they're your patients vs all patient, active vs. inactive patients and further filter based on address, gender or gender identity.
The My Patients toggle is additionally controlled by a toggle on the User Management display for Bells Administrators to allow you to only see your patients, or all patients in your organization. The toggle for My Patients will not display if the User Management setting is set to only allow you to view My Patients.
There is also a toggle for Active. This toggle allows you to switch the display of the grid to show all patients, or just the Active (not closed) patients.

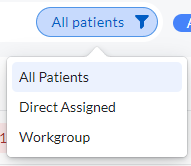
 myEvolv users Patients toggle will present a selectable menu to filter the patient list display. Users will be able to filter based on All Patients, Direct Assigned and Workgroup.
- When toggled to All Patients, users will see all patients for the organization. This is limited to administrators.
- When toggled to Direct Assigned, users will only see the patients that are assigned directly to them.
- When toggled to Workgroup, users will see patients that are associated to them via the workgroup in myEvolv.
Additionally, myEvolv patient access can be configured to respect Workgroups from myEvolv. This means if you do not have access to a patient in myEvolv, you will not be able to search and find them in Bells. This is configured by the Bells team, just reach out to your Solution Consultant or Support Specialist to have it enabled.
Patient Search Bar
To the left of the toggles is a search bar that lets you narrow down the patient list. The search bar works in combination with any filters you have applied on the patient list columns. As part of this search and other patient searches in Bells, you will see a pill-style toggle for Bells and your EHR. When toggled to Bells you'll search for patients in Bells. When toggled to your EHR you'll be searching for patients that haven't synced to Bells that are part of your EHR. Clicking the patient in the EHR side of the search will pull that patient and their data into Bells and launch the Patient Chart.

 myAvatar users can only search by the last name when toggled to myAvatar due to the functionality available from myAvatar. When toggled to Bells you can search by the criteria below.
The search field allows you to search by:
-
Name
- Formats supported include
- First Last
- Last, First
- Formats supported include
- Partial name search such as Sm, Jo for John Smith
- Patient Initials in all directions
- Patient ID or MRN
- Date of birth
-
Phone
-
Formats supported include
- ##########
- ###
####### - (###)###-####
- ### ### ####
- (###) ###-####
-
Formats supported include
The patient ID/MRN search is case sensitive. Searching for ut010180f0 for example will not pull return results, instead searching UT010180F0 if it aligns with a patient would return a result.
The patient's date of birth is required for the patient to be accessible in Bells.
Depending on settings in Bells for patient search/access limits you may struggle to find a patient. The settings that drive which patients you can see in Bells are:
- Toggle setting on Bells User Management for All Patients
- Client Lookup Limits from CT|One (staff limit, not the agency limit)
- Whether you are a member of that patient's Care Team or case load (from the EHR)
- Whether you the patient's Managing Therapist (from CT|One)
- Whether the patient is active or inactive
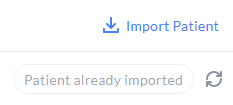
On the right side of the patient search results you'll find an import icon or an indicator that the patient was already imported followed by a refresh icon.
Clicking the import icon will pull the patient information from the base EHR into Bells. If the patient has already been imported, you can click the refresh icon to resync the patient's data to Bells.
Patients List
The Patient List displays the Name, PatientID, Birthdate and age, Gender and Gender Identity of the patient.
Sorting
Column names that are followed by an arrow are sortable. Simply click the arrow t...
Column names that are followed by an arrow  are sortable. Simply click the arrow to sort.
Filtering
Column names that are followed by a funnel are filterable. Bells uses two differe...
Column names that are followed by a funnel  are filterable.
Bells uses two different types of filters - List filters and Search filters.
List Filters
List filters are used when there is a very small set of options for your filter. Simply select the options you want and filter.
Examples:
- Billable/Non-billable
- Show/No Show status
To use a List Filter, click the funnel and
- Check the boxes for the filters you want
- Uncheck the boxes for any filters you do not want
- Select All: Checks all checkboxes
- Clear: Clears out any checkmarks you've made
- Filter: Filters the Note Type List so that it only displays the items you've checked
Search Filters
Search filters are used when there is a large set of options for your filter. Search for and select the options you want and filter.
Examples:
- Location Roles
- Note Types
To use a Search Filter, click the funnel and
-
Initially, you'll see 'No Note Types selected'. That means no filters are selected and active.

-
Search for items to add to the filter
-
Enter search text to find items to add to your filter.

-
Click to select an item to add to the filter.

-
Enter search text to find items to add to your filter.
- To remove any individual items from the filter, click the X for the item
- Clear: Removes all items from the filter.
- Filter: applies the filter to the list behind it so that it only displays the items you've selected.
The Name column displays the patient avatar (not supported for myAvatar) as well as First Name + Middle Initial + (Nickname) + Last Name + Suffix.
If the patient is under 18, you will also see an indicator that the patient is a minor: 
 myAvatar and myEvolv users: Patient avatars (the image for the patient) will not show their photo as this is not supported in myAvatar and myEvolv today. Instead, the patient's initials will show in a colored circle.
By default, the list is sorted by first name.
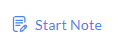
Hovering on the row in the display will shows action icons for the patient.
- The start note icon - clicking the Start Note button will launch the start note display for a progress note and the patient chart for the clicked patient.
-
3 dot Patient Options menu - depending on your EHR and user role the values in this menu will be different.
-
Here is an example

- Clinical Pathways lets you set the clinical pathway for the patient, this is for myAvatar and myEvolv users.
- Set as Confidential and User Exclusions are only available to Bells Administrators and lets you adjust the confidentiality for the patient
- Patient Refused Recording - this setting is Bells Virtual Scribe only and lets you set for the patient if they allow recording or not and drives Bells Virtual Scribe functionality.
- Exclude from Audits can be set by Bells Administrators and lets patients be configured to not be included in Audit/Quality Audit runs.
-
Here is an example
 For myAvatar users, the start note button on the patient card is determined by an organization preference. If set to default to Start Note a standard progress note will be started for the patient. If set to default to Start Documentation Note a simplified support documentation note will be started and doesn't include setting the Location or Service Code in the session details.
Groups
Clicking on the Groups tab shows you a list of all groups including the Group ID, Group Name, Patients in the group, and Staff for the group.

Note: All of the configuration for ID, name, patient, and staff for the group is done within the EHR.
Group Search Bar
At the top of the Groups display there is a search bar to allow you to filter the list of Groups by the text you type.

To the right of the search bar is the Patients and Configured filters. The Has Patients toggle will filter out groups that do not have patients assigned to them from the display. The Groups selection will allow you to filter the display between the groups configured with note types, groups not configured and all groups. Configured groups are the groups that have been configured with note types for all three show statuses and therefore can have notes written for the group.
Additionally, the display can be filtered by Program and Practitioner.
The display grid may be split up into different sections if the user who accessed the display has recently written group notes. Recent Groups will show at the top of the display prior to the All Groups section. If the signed in user has not written any group notes the display will not be split up.
When you hover on a row in the list of groups, you will see additional buttons/icons on the right side of the grid.

 Clicking the Start Note button will start the note for the group and take you to the Group Session Information screen. Refer to Group Notes for information on writing Group Notes.
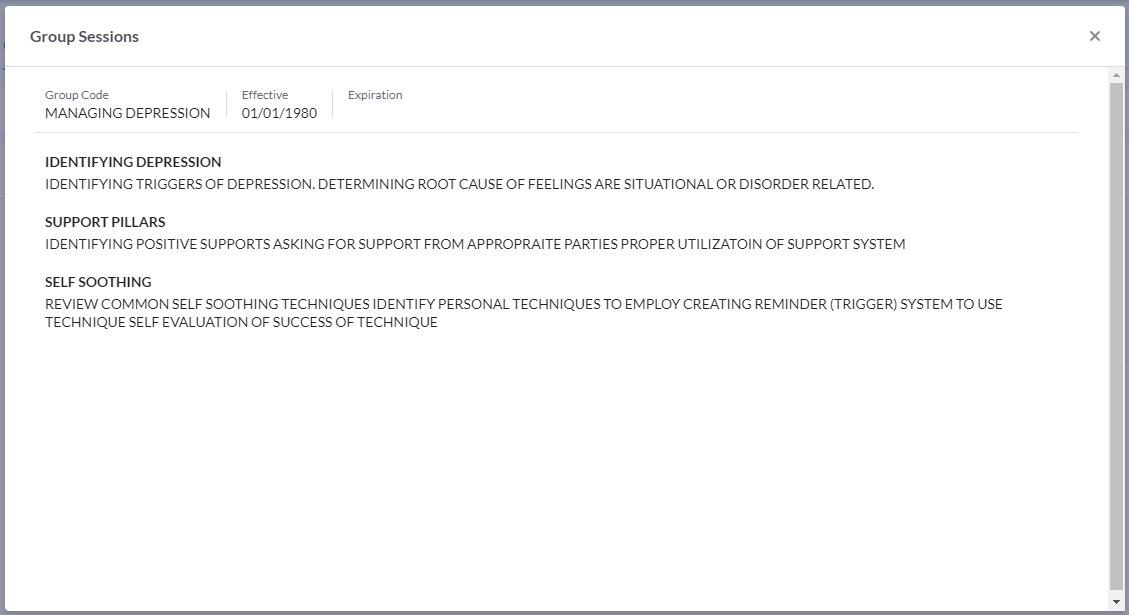
When you hover on a row in the list of groups, the other button/icon you see on the right side of the grid is to Preview Sessions.
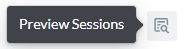 Clicking the Preview Sessions button will display the Group Session Topics for the selected group and will also include the Name, Effective date, and Expiration date for the group (configured in CT|One).
Configuring Group Notes
Before you can start a group note, each Group must have a note type associated with each status for the group. Without this crucial piece of configuration (performed by your administrator), the application will not let you start notes for the Group.
This configuration is done under the Organization Settings that can only be accessed by Bells Administrators. For more details on configuring Group Notes, refer to Configuring Note Types.
Patient Population Management
Bells administrators can set up additional access restrictions on individual patients. On hover of a patient in the patient list, a new ellipses menu will show to set restricted access configurations. Please refer to the Patient Population Management article for more information.