
Group Notes
Group notes are used when a practitioner sees several patients at one time and then needs to write a note for each individual who attended the group session.
Configuring Group Notes
Before you can start a group note, each Group must have a note type associated with each status for the group. Without this crucial piece of configuration (performed by your administrator), the application will not let you start notes for the Group.
This configuration is done under the Organization Settings that can only be accessed by Bells Administrators. For more details on configuring Group Notes, refer to Configuring Note Types.
Writing Group Notes
Group Notes can be started from a group appointment in the agenda section, or from the Groups tab of the patients section.
To start a Group Note from an Agenda appointment,
- Click Agenda in the left navigation bar.
- Click on an appointment.
- The appointment detail panel appears on the right.
- Click on Start Note at the bottom of the Group Appointment detail.
To start a Group Note from the Patient,
- Click Patients in the left navigation bar.
- Click on the Groups tab.
- Point to a group to see the Start Note button on the far right.

- Click Start Note.
Groups list on the Groups tab of the Patient section:
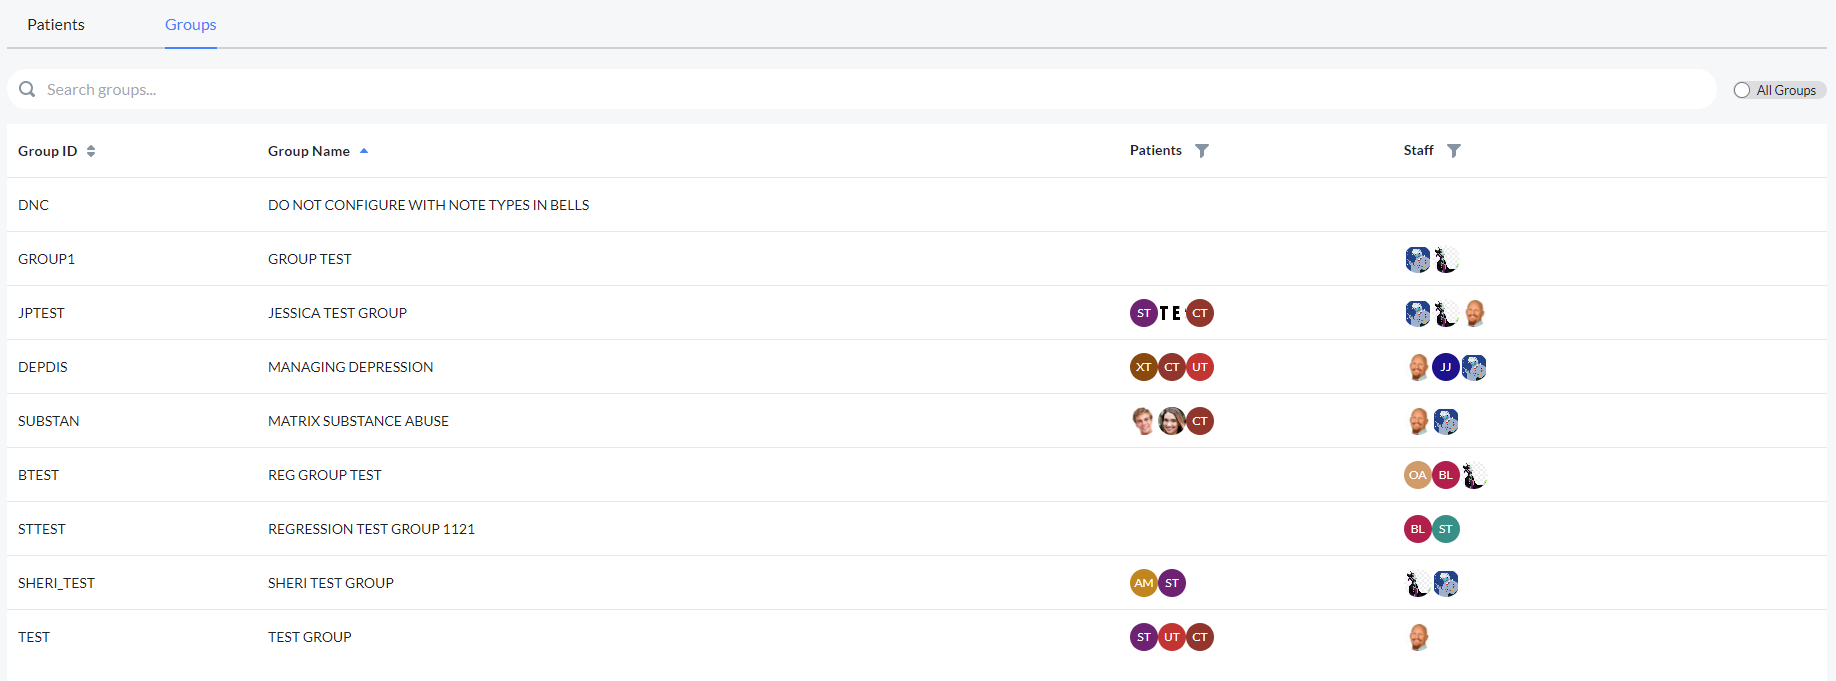
This display can be filtered via the toggle in the top right to show only the configured groups or all groups. Notes may only be written for configured groups. Additionally, the groups can be filtered by Patients or Staff via the columns in the display.
 myAvatar users: The Staff column of this display will not show since Staff are not associated to groups for myAvatar.
Setting up the Group Note
When you click start note, the Group Session display for the group opens. All details that can be defaulted from either the appointment or the group configuration will auto-populate.
myAvatar users will not be able to change the date for the group when the note is started from an appointment.
When a group is not started from an appointment, the Group Session Information will pull forward from the last signed note for the group. The information that pulls forward includes the session details, practitioners and patient assignments in the group.

The Group name will default for the group from the appointment or the group selected on the patient section when the start note button is selected. This field is not editable.

If the group note is associated to an appointment, the agenda icon will show to the right of the group name.
Clicking on the icon shows the details for the appointment

Session Date/Time will default to either
- the date/time of the appointment when the group note is started from the agenda
- the current date/time when the group note is started from the Groups tab
Session date/time is required to start the group note.
Location may or may not default, depending on appointment and settings within Bells.
 For CT|One users, your Bells administrators can set a default Place of Service when the Location is selected. This configuration is done via the Location display.
Details from appointments (where applicable) will also default.
Location and Place of Service (where applicable) are required to start the group note.
If the group note is started from an appointment, the Location will be filtered to only show the Location Roles based on the appointment Location and Service Type.
Service Type will default based on the selected appointment or default for the group.
Note: When the Location is selected from the list on the Group Session and the selected Service Type is not configured for that Location, the Service Type will clear out. An alert to the user will display "The location selected is not configured for the original service type for the group. Please select a new Service Type."

Service Type is required to start the group note. For myAvatar and CT|One users, the services available to select for the group note may be filtered to only the services available for the group note's note type(s). This is based on configuration on the group note type. Additionally, no show and cancelled group note services may be forced to be overridden from the show status service. This is driven by a organization preference.
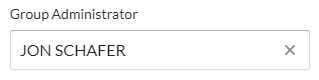
Group Administrators
A practitioner or a non-practitioner can administer a Bells Group Note.
To set the Group Administrator, simply
- Start a group note.
- Type to search the name of the staff that will administer the group
Group Administrators can
- Start a group note
- Set the date, time, location and service type for a group
- Modify the group summary
- Assign practitioners to the group
- Remove practitioners from the group
- Assign patients to the group
- Remove patients from the group
- Reassign the practitioner assigned to a patient in the group
- Change patient show status
- Delete incomplete notes in the group via the Unsigned Notes Report
- Delete an entire group note if none of the notes in the group have been signed
- Edit patient notes within the group (if the organization preference is configured to on)
Bells Administrators have the same permissions as the Group Administrator. Bells Administrators can also make changes to the Overridable fields in the individual patient notes including the Service Type, Location, Session Time, Group Topics and Program/Enrollment.
 For myAvatar, the myAvatar Note Type selection shows after the Group Administrator selection.

This gives users the ability to set the myAvatar Note Type selection at the group level instead of per individual note in the group. For groups where only one myAvatar note type is configured the selection will default in the group session information. If there is more than one note type configured or more than one practitioner for the group, the Assign Practitioner display has been updated to include the myAvatar Note Type selection.

The myAvatar note type is not required to be set at the group or practitioner level, if you choose it can still be selected per patient. What is selected at the group level will auto-populate in each patient note for the group and can be overridden.
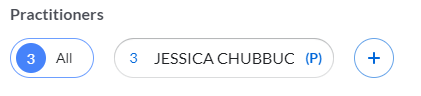
Practitioners
The Primary Practitioner will default to the user who started the note.
 If the group has staff assigned to it in CT|One, the staff for the group will show for selection in the drop-downs for the practitioners. If the group does not have staff assigned to it in CT|One, the practitioners drop-downs will show all staff for the organization.
At a minimum, a primary practitioner is required to start the group note. The primary practitioner is indicated by the blue (P) next to the first position practitioner in the display. The primary can be set to any practitioner for the group by clicking on the non-primary practitioner and setting it to Mark Primary.
Additional practitioners can be added to the group note via the + button to the right of the primary practitioner.
The blue number to the left of the practitioner name in the display indicates the number of patients for the group assigned to that practitioner.
Inactive users will not display for selection in the Practitioner drop-down.
Group notes can have up to eight (8) practitioners added.
All of the data up to this point may have already been set if you've had previously signed group notes. There is remember functionality in place that will pull in the Session Information and Practitioners based on the last signed notes for the group.
Patients
In addition to the patients already assigned to the group, you can add additional patients to the group note. Simply enter text in the Patient field to start a patient search. Only patients with active enrollments that are not already a part of the group note can be added. As part of this search and other patient searches in Bells, you will see a pill-style toggle for Bells and your EHR. When toggled to Bells you'll search for patients in Bells. When toggled to your EHR you'll be searching for patients that haven't synced to Bells that are part of your EHR. Clicking the patient in your EHR side of the search will pull that patient and their data into Bells.
Patients are automatically added to the Show status.
Patient Search Display
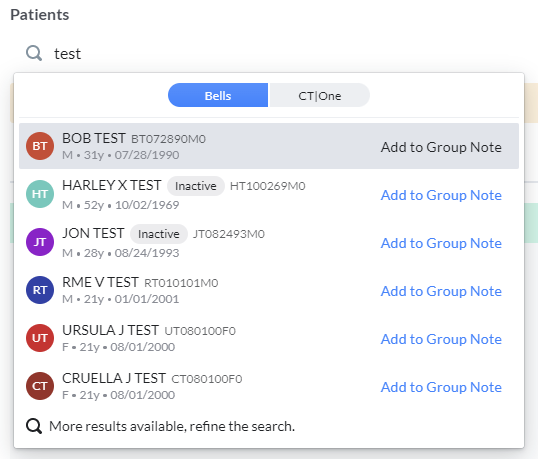
 myAvatar users can only search by the last name due to the functionality available from myAvatar.
Note: Adding patients here ONLY adds them to this group note, it does not add the patient permanently to the group. All patients can be removed from the group note by hovering on the patient card once the patient is in the group and clicking on the X in the right corner.
For myAvatar, when a patient is added/removed from a group note that is started from an appointment, Bells will make a call to myAvatar to add/remove the patient from the appointment. If this call fails, Bells will alert the user.
myEvolv users can add or remove people from the group note or the group entirely via the Group Note display. When you search for a patient in the group note flow, you will have the option to add them to the group. Same thing when you click the X on a patient card in the group note, when clicked you will be prompted if you want to remove them from the Group Note or the Group. Examples:
Adding Group Members:

Removing a patient:

Patient Assignment Display

The patient section shows a grid row display, with a row per patient.
First column is the patient card showing the pertinent patient details for each patient in the group.
The Practitioner column shows the assigned practitioner for each patient in the group. The practitioner can be changed in bulk using the action buttons in the bottom right corner, or can be changed per patient row in the grid.
In the row there's a check box for each status.
- Present - previously “Show” - marks the patient as present for the group note.
- No Show - marks the patient as no show for the group note. Shows in an orange highlight when marked.
- Cancelled - marks the patient as cancelled for the group note. Shows in a red highlight when marked.
- Note Not Needed - means a note is not needed for the patient, the patient will not show in the group note editor in any status. Shows in a gray highlight when marked.
The grid also shows the practitioner assigned. To make edits to the selections, check the check box to the left of the patient, a Reassign Practitioner and Change Status menu button show in the bottom right corner above the Start Note and Cancel buttons.

The Practitioner menu shows the practitioners assigned to the group to edit what practitioner the selected patients are assigned to.
The Change Status menu shows the statuses to bulk change the selected patients in the group.
Users can make changes per patient row, or bulk change through the menu buttons at the bottom.
Additionally, you can filter the patients by practitioner.
When the group note is started, the patient filter is set to All. All patients for the group display.
When a practitioner filter is applied, by clicking the number circle to the left of the practitioner's name, the display of patients will filter to just the patients assigned to that practitioner.
For myAvatar users, when the group note is started from an appointment, if you find that your group note does not show all the patients for the group, you can click to Refresh from Group Registration. When clicked, the patients for the group note will refresh from the group registration in myAvatar.
![]()
Starting the Group Note
Once all patients are assigned a practitioner and moved to a show status, you are ready to start the note.

Clicking the Start Note button creates notes for all patients in the group note.
Note: If patients are assigned to a secondary practitioner and one is not selected for the group note, a popup will occur to alert you.
For myEvolv users, when the Start Note button is clicked, a check is done to verify that each patient in the group has an active program enrollment for the group program.
Clicking Cancel will bring you back to the previous screen where you selected to start the group note, either the agenda or the group tab of the patient section.
If your Bells Administrator has configured your group with more than one Group Note Type set you will see a pop up when you start the group note.
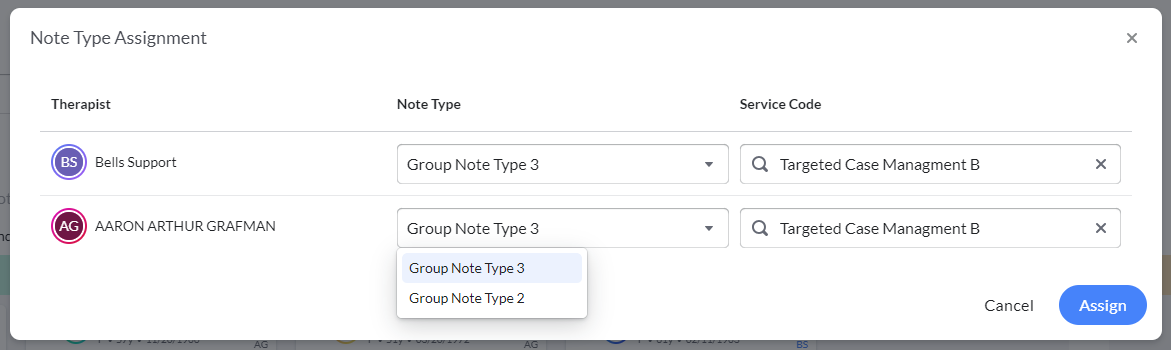
The Note Type Assignment pop-up allows the user who is starting the group note to change what Note Type set and Service is used for the group per practitioner in the group.
At this point, before the individual notes for the group display, a check may occur. For Group Notes that are not started from an appointment, if you have an appointment on your agenda that is for a group note that occurs at the same time as the group appointment, Bells will prompt if you want to tie the group note to the group appointment.

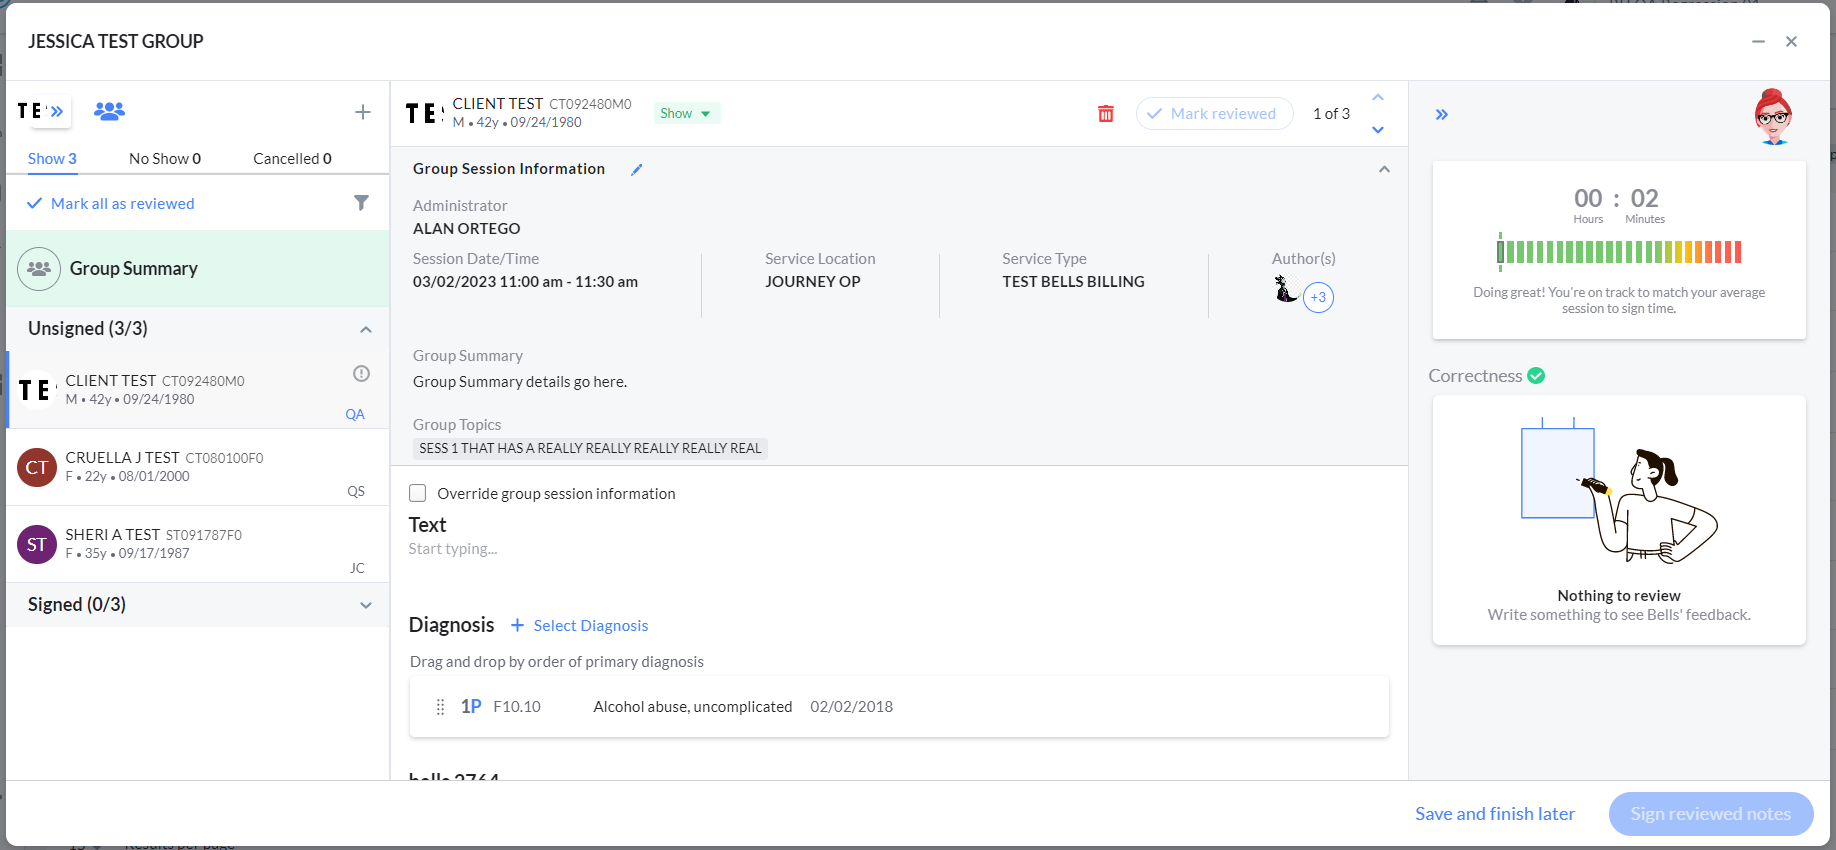
Bells' group note editor is very similar to the standard progress note editor.
The display is split into three sections.
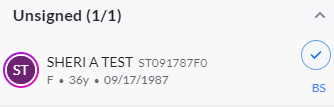
The left pane shows the patients in the Present status for the group note. You can select the No Show and Cancelled tabs as well to view and write the group notes for patients set to those statuses. This pane is further broken down to display notes for each show status that are signed and unsigned, each category will show a counter for the number of notes that are signed relative to the total number of notes for the status and all the notes that are unsigned relative to the total number of notes for the status.
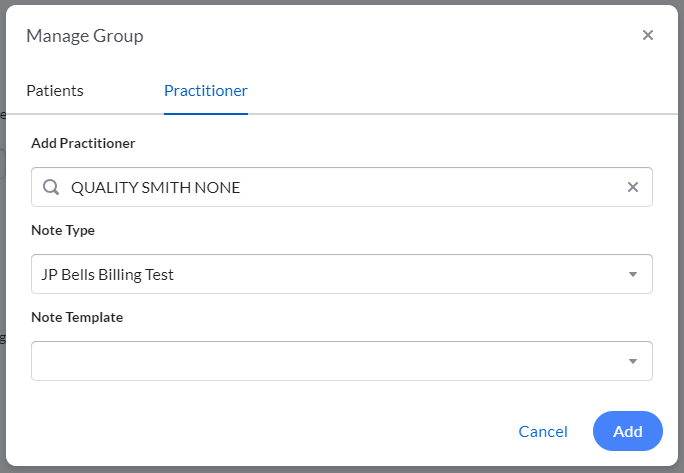
In the top right corner of the left pane, there is a + icon to add additional patients or practitioners to the group on the fly. The practitioner who adds these patients is the assigned practitioner for the newly added patient in the group note, but this can be adjusted in the display or via the initials in the patient's card in the left pane. The display is separated into two tabs, one to add patients and one to add practitioners.
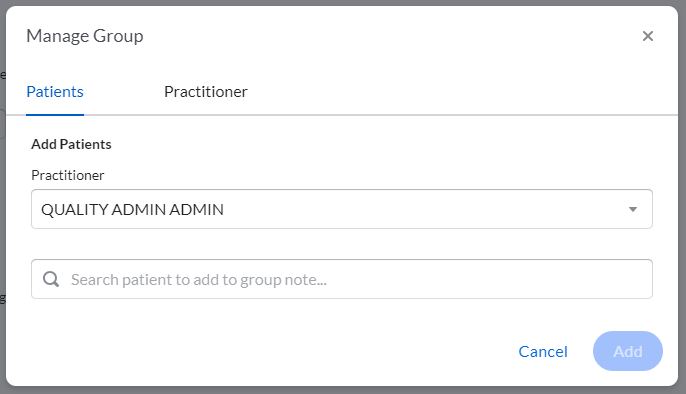
 myEvolv does not allow you to add additional patients to the group note. Groups and associated patients are configured in myEvolv. As a result, you will not see the Patients tab in this display.
myAvatar users have the ability to add “Number of patients in group” to their group summary. This entry is available if the myAvatar form is configured to include it and the service is set to be a group service. myAvatar users may also need to configure the group Facility Location within the group summary if required by myAvatar. The Facility Location address will include the 4 digit zip code suffix.

By default, the group summary for the show status will be selected and highlighted in green. Changing the tabs will take you to the different show statuses to write the notes for the patients in the No Show or Cancelled statuses.
Additionally, patients can be moved to different statuses via the status dropdown next to the Group Session Information label in the header of the middle pane of the note. The header also includes a note counter and navigation arrows for the show status you're in.
The middle pane shows the group summary and the note editor for the patient note.
The right pane shows the standard Bells pane including the session to sign display and the correctness and grammar suggestions.
Once a note is started you are able to edit the Group Session Information by clicking on the Note Header at the top of the note.

When clicked, the editable fields show to adjust as needed even after the group note is started.

Group Session Information
The Group Session Information will be included in every patient's group progress note. It includes the Group Session Date/Time, Group Summary, and Group Topics. The group session date/time and group summary are required for signing the notes. This header will be pinned to the top of the group progress note editor, so as you scroll through the note those important details will always be available. This header can be collapsed or expanded.
 The Group Topics drop-down lists the session topics from CT|One group maintenance. This is a multi-select drop-down so you can select one or more session topics for the group.
myAvatar and myEvolv session topics are configured by the Bells administrator.
Session date/time and session topics can be overridden at the individual note level.
If no topics are configured, the Group topics label and field will not display.
 When you are writing the note for an individual patient you can click the >> icon next to the selected patient's avatar in the top left corner to access their patient details sidebar as well as the patient's scribbles.
The Group Summary can be different for each Show Status and allows up to 50,000 characters to be entered. The group summary can be defaulted by your Bells administrator based on the note type for the group. The group summary may be a text field or a form of fields configured by your Bells Administrators. The “Copy Summary to all statuses” button allows users to copy the summary for the Show Status to the No Show and Cancelled show statuses.
Note: Depending on your organization setting for “One summary for all session statuses” it determines if you will be able to set different summary text for each show status in the group or if they will be the same across all statuses.
- When toggled off, the group summaries across show, no show and cancelled (where applicable) will be separate and the copy summary functionality is available.
- When toggled on, the group summaries across all statuses will be the same and changes to the summary will reflect in all group summaries. The copy summary functionality will not be available.
Note: Once any of the notes for the show status are signed, the Group Summary for that show status is locked down and cannot be edited.
Service Type Override
The No Show and Cancelled show status group notes can have their Service Type overridden. This means the service type on the show note doesn't have to be the service type for the no show or cancelled notes in the group.

Toggling the Override Service Type toggle  on the Group Summary display for No Show or Cancelled notes will display an additional drop-down to select a different service type from the one selected when the group session was started. This overridden service type will apply to each patient note for the status.
For myAvatar users, if the note type for the group is configured for Missed Visit, the Missed Visit Service Codes will show when overriding the Service Code.
Filling out the Patient Note
The note pane in the middle displays the group summary when the group summary is selected in the left pane. When an individual patient is selected in the left pane, the note for that patient will show in the note pane.
The patient note includes the Group Session Information at the top. The Group Session Information is not editable in the patient note. The Primary practitioner can edit the Group Session information by either clicking the pencil icon in the Group Session Information section of the patient note or by clicking on the Group Summary section of the left pane. The Group Session Information for the show status remains editable until the first patient note for the show status in the group is signed. After that point, the Group Session Information for the show status cannot be edited, even by the primary practitioner.
The Group Session Information is followed by a check box to "Override group session information." 
This check box allows you to override the group session information for the individual patient. You can override the Session date/time, Service Type, Location, and session topics. This can be done for any of the statuses - show, no show or cancelled. The Session Time will not be available to override for the no-show or cancelled status since it is not available in those statuses.
For myAvatar, if a group note originates from an appointment, if the individual on the appointment already has an episode assigned, the episode will not be visible or editable. If there is no episode for the individual on the appointment, you will be allowed to select an episode and then it will be hidden thereafter.
myAvatar users will see an additional field for myAvatar Note Type and Program. These selections are much like the myAvatar Note Type and Program selection for individual patient notes. This is a required selection per individual patient note for the group.
myAvatar users will also see the Session Time section in the override section when the note type for the group includes the session time section when the note is for the No Show or Cancelled statuses. A session time duration of zero is not allowed and will prevent the sign of the note.
myEvolv users will see the Place of Service can be overridden on the individual note in the group.
Finally, the Note Type configured for the group is shown, determined by the Show Status.
If the patient has more than 1 program in their enrollment, the user will see a program selection field in the note. Additionally, your Bells administrator might have configured the group with a preferred program.
- For CT|One users, if the patient doesn't have the preferred program for the group, the patient's program will be defaulted to their program.
- If the patient is in the configured preferred program it takes priority, otherwise the patient's program will be defaulted to their configured program.
- For myAvatar users, if the patient doesn't have the preferred program, and the patient only has one program, the patient's program will be defaulted to their only program.
The same field requirements and behavior that are used for standard progress notes will be respected in the group note.
Just like in the standard progress note, the Bells pane will display on the right side. The Bells pane displays your session to sign metric and any corrections and grammar suggestions as well as Clinical Recommendations and validations (if configured for your organization).
Signing Group Notes
Once the note is complete and all required fields are supplied, you can mark the note as reviewed. This functionality mimics the behavior of Bulk Sign.
If there are missing required patient/guardian/additional signatures, the note is considered incomplete and cannot be marked as reviewed. These signatures must be included prior to the author signature.
You can sign group notes for one patient at a time or you can sign several patients in the group at once.
There are two ways to mark a note as reviewed
- Hover over the patient card in the left pane and click the checkmark in the upper right side of the patient card
- Click Mark All Reviewed at the top of the left pane

When one or more notes are Marked as reviewed, you can click the Sign reviewed notes button.

When one of the group notes for a show status is signed, the group summary for that show status is locked down. Example: If a note in No Show is signed, the No Show group summary can not be edited beyond that point. However, the user can continue to make edits to the group summaries for the Show and Cancelled statuses.
Group Notes can also be saved and finished later by clicking the button "Save and finish later".
Note - Group Notes do not show in Bulk Sign. They must be signed from within the Group Note editor.
Group Notes can be unsigned just like a regular progress note. When you unsign an individual patient note from a group session after all the notes are signed in that group note, Bells will reopen the group session in the open sessions tab to display until all notes in the group are signed again. (Note - only the unsigned note would need to be re-signed.)
Note - The same rules apply for unsigning group notes as unsigning an individual progress note. For more information check out the Progress Note Basics article section for Unsigning a Note here.
myEvolv Group Notes will sync into myEvolv once all notes for the group are signed.
Deleting a Group Note
Users can delete individual patient notes as part of a group note. This can be useful when a patient's note is accidentally created, or the patient doesn't have criteria that meet the group note requirements such as goals/objectives or diagnosis. This allows the user a workaround to correct the note.
Within the group note editor, there is a delete icon in the top header that follows the same note delete functionality as a standard progress note.
You may delete any of the group notes where you are the author and that are in Draft status. Deleting a draft removes it completely from the group and the system; the draft record will no longer be present in the chart or any of the other draft locations such as the Chart section or the Dashboard.
When you click to delete the progress note, you will be prompted to make sure you want to delete the session.
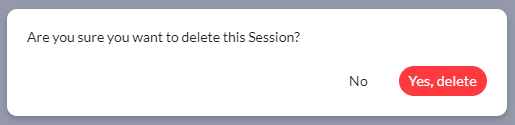
Click Yes to permanently delete the note.
Click No will keep the progress note, canceling the delete.