Text Formatting
Bells gives you several time-saving text features for adding text to scribbles and progress notes.
You can access these features in several ways:
- via a Formatting Bar
- Action commands
Formatting Bar
The Formatting Bar is visible at the bottom of your text editor in
- Drop-Ins
- Scribbles
- Progress Notes

Using items on the formatting bar is easy - simply click the tool and start typing! You can also select text and click the tool to apply the feature to the selected text.
 |
Bold |
 |
Italic |
 |
Heading (larger font, bold) |
 |
Strike-through |
 |
Numbered list |
 |
Bulleted list |
 |
To-Do/Task list |
 |
A T@g, which allows you to select a member of the patient's care team if a patient is associated with the text you're editing |
 |
Drop-ins |
 |
Add to dictionary |
 |
Turn on native language mode |
You can quickly access bulleted and numbered lists by:
- Putting your cursor on a new line
- Typing * (bulleted list), - (bulleted list) or 1 (numbered list)
- Hitting the space bar
Your list will start and if you hit enter you can continue the list on each new line.
When you wish the list to stop, hit your backspace key.
MOBILE: The mobile formatting bar also has an option for selecting Drop-Ins. This will include any drop-ins that have been shared. This includes drop-ins with the options placeholders which allows you to make selections from configured values set up in the web.
Actions
Actions save you time by allowing you quick access to functionality in a few keystrokes.
Use Actions to access
- Drop-Ins
- A Date Picker
- T@gs
- A Bulleted List
- A Numbered List
- A Task List
/ Commands
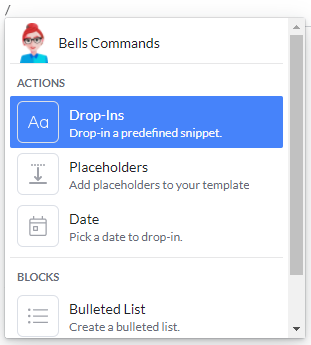
The slash ( / ) command allows you to access Actions.
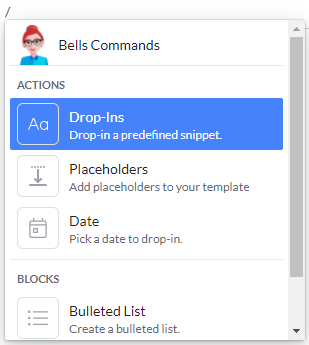
As soon as you type a /, the menu of actions appears:

You can use your arrow keys or click on the action you want.
MOBILE: / Commands are not available on Mobile. Drop-ins are available via the  toolbar.
Drop-Ins
Previously named Text Snippets - Drop-Ins are configured in your User Settings, a Drop-In is a pre-defined set of text that is inserted when you select it.
To use a Drop-In
- Select Drop-In from the Actions list
-
Your list of Drop-Ins appears:

- Select the specific Drop-In you want to insert.
- If you change your mind, you can use ctrl-Z (Undo) to remove the Drop-In.
Tip: You can also access Drop-Ins directly by using the ~ key, located in the top left of your keyboard just under the esc key. Once you type ~, you'll be taken directly to your list of Drop-Ins.
Placeholders
Placeholders allow you to set up parts of a sentence that can be altered by the application based on the patient or user for the progress note template or drop-in being used. Placeholders can also be added into the custom note section configuration.
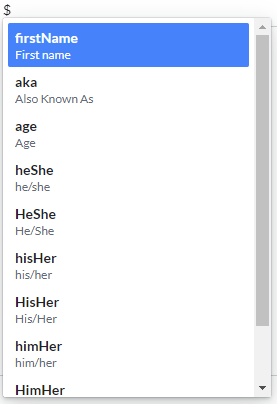
Placeholders can be access by typing $ followed by the placeholder text or via the / command menu.


As part of drop-ins, you can set up a singlechoice or multichoice placeholder. This placeholder lets users configure options to select within a drop-in. These drop-ins can then be used in scribbles, templates and progress notes, as well as on the Mobile application.
Available Placeholders in Bells
- First Name - Shows the patient's first name with the first initial capitalized and the rest of the text lower case
- Also Known As - Shows the patient's AKA or nickname
- Age - Shows the patient's age
- he/she - sets the appropriate pronoun in lower case based on the patient's gender
- He/She - sets the appropriate pronoun in upper case based on the patient's gender
- his/her - sets the appropriate pronoun in lower case based on the patient's gender
- His/Her - sets the appropriate pronoun in upper case based on the patient's gender
- him/her - sets the appropriate pronoun in lower case based on the patient's gender
- Him/Her - sets the appropriate pronoun in upper case based on the patient's gender
- Guardian - shows the patient's guardian
- Single Choice Placeholder - lets users configure options to select within a drop-in.
- Multiple Choice Placeholder - lets users configure options to select within a drop-in.
- Patient Noun - inputs the patient label substitution configured in organization settings.
- User - shows the logged in user.
- User Role - shows the configured User Role for the logged in user.
- Patient Street - shows the patient's street portion of their address.
- Patient City - shows the patient's city portion of their address.
- Patient State - shows the patient's state portion of their address.
- Patient Postal Code - shows the patient's postal code portion of their address.
- Patient Home Phone - shows the patient's home phone (where applicable).
- Patient Work Phone - shows the patient's work phone (where applicable).
- Patient Mobile Phone - shows the patient's mobile phone (where applicable).
- Patient Gender - shows the patient's gender.
- Patient Email - shows the patient's email (where applicable).
- Location - shows the Location selected for the note.
- Place of Service - shows the Place of Service selected for the note (where applicable).
Date Picker
The Date Picker allows you a quick view to a calendar so you can quickly pick a date that is yesterday, today, next week, or whenever you want.
To use the Date Picker:
- Select Date from the Actions list
-
The Date Picker appears:

- Select the date you want or use the arrows to change the month or year as necessary.
- The date shows in colored text and if you move your mouse over it, the pointer changes to a hand. That is your cue that it's from the date picker.
- You can click on a date from the Date picker and the Date picker will appear.
- If you change your mind, you can use ctrl-Z (Undo) to remove the Date you inserted.
T@gs
Previously named Mentions - T@gs allow you to quickly select a member of the patient's care team. If your text field is not associated with a patient, T@gs will tell you that you have to have a patient to see T@gs.
To use T@gs:
- Select T@gs from the Actions list
-
The T@g list appears:

- Select the person from the list.
- If you change your mind, you can use ctrl-Z (Undo) to remove the T@g you inserted.
Tip: You can also access T@gs directly by using the @ key. Once you type @, you'll be taken directly to your list of T@gs.
Note: T@gs will not display on notes that sync to CT|One as part of the progress note, or in the printout of the note in CT|One.
MOBILE: T@gs are not available in Mobile.
Bulleted List
Select this option to start a Bulleted List.
To use Bulleted Lists:
- Select Bulleted List from the Actions list
- Start typing your list.
- If you change your mind, you can use ctrl-Z (Undo) to remove the Bulleted List you inserted.
- Every time you type return to start a new row, your list continues.
- When you are done with your list, press return followed by the backspace key to end the list.
Tip: You can also access Bulleted Lists directly by typing a * or - on a new line. Once you type * or - and hit your tab key, the list begins.
Numbered List
Select this option to start a Numbered List.
To use Numbered Lists:
- Select Numbered List from the Actions list
- Start typing your list.
- If you change your mind, you can use ctrl-Z (Undo) to remove the Bulleted List you inserted.
- Every time you type return to start a new row, your list continues.
- When you are done with your list, press return followed by the backspace key to end the list.
Tip: You can also access Numbered Lists directly by typing a 1 on a new line. Once you type 1 and press your tab key, the list begins.
To-Do/Task List
Select this option to start a Task List.
To use Task Lists:
- Select Task List from the Actions list
- Start typing your list.
- If you change your mind, you can use ctrl-Z (Undo) to remove the Task List you inserted.
- Every time you type return to start a new row, your list continues.
- When you are done with your list, press return followed by the backspace key to end the list.
Tip: You can also access To-Do/Task Lists directly by typing [ and ] on a new line. Once you type [] and press your tab key, the list begins.
Text Expansions
Configured in your User Settings, Text Expansions are a way to automatically expand a few letters into longer text.
Some examples:
- IPO = In the presence of
- BP = biological parent
- RH = Remarkable Health
- FH = Foster Home
Key features:
- Automatic
- Can be enabled/disabled
- Available in Scribbles and Progress Notes
- Available on the Mobile app
To use a Text Expansion,
- Type the name of the expansion (such as IPO, BP, etc)
- Once you type a space after the last character of the name of the Text Expansion, your text is automatically expanded to the full text of the Text Expansion (such as In the presence of)
-
If you want to undo the Text Expansion,
-
Click the dotted lines under the Text Expansion and click Undo.
 -OR-
-OR-
- Type Ctrl-Z to Undo the Text Expansion.
-
Click the dotted lines under the Text Expansion and click Undo.