
Configuring Expansions
Expansions are a way to automatically expand a few letters into longer text. Some examples:
- IPO = In the presence of
- BP = biological parent
- RH = Remarkable Health
- FH = Foster Home
More examples follow at the end of this topic.
Key features:
- Automatic
- Can be enabled/disabled
- Administrators can set up Organization-Level Expansions
- Can be used in the Bells Mobile Application (even without connectivity!)
Differences between Expansions and Drop-Ins
- Expansions: Automatic, can be enabled/disabled
- Drop-Ins: Access via the / command or via typing the ~, can be multiple lines, can include formatting
Viewing your Expansions
-
Click the Settings Gear in the left Navbar:

-
Click Expansions in the left navbar:

- You now see a list all of the Expansions you have configured:

Adding an Expansion
To add an Expansion.
- From your Expansions list, click

- Non-Admins will have the ability to
- Create user-level expansions
- Import expansions to their personal expansion set
- Admins will have the ability to
- Create organization-level expansions
- Create user-level expansions
- Import expansions to their personal expansion set
-
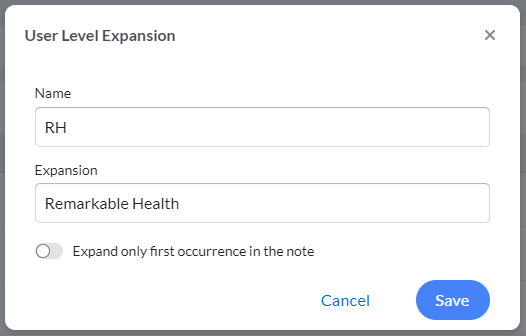
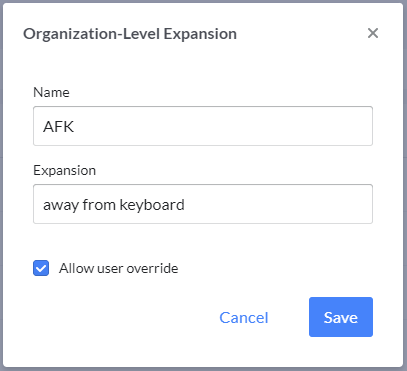
Type a name for your Expansion in the Name field:

-
Type your Expansion in the Expansion Field:

- If you'd like the expansion to only expand on the first occurrence in the note, toggle the setting on

-
Click Save to save or click Cancel to discard your changes:

A couple of notes about your Expansions
- The name must be unique
- The name is limited to 10 characters
- The name cannot include a space or any of these symbols: @ ~ : #
- The name is not case-sensitive
- Try to avoid names that are also a word on their own so that you don't have expansions popping in unexpectedly.
- Expansion text cannot exceed 300 characters.
- Expansions can be configured to expand each time or only once in the note.
That's it! Your new Expansion looks like this:
 Expansions can also be created while writing Scribbles or Progress Notes by highlighting text you wish to configure as an expansion. A pop up menu will occur. Select Make expansion to add it to your expansions.
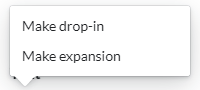
Expansion Import Library

Clicking the "Import from Library" button under the + Expansion button will open a new display to choose expansions to import and use for Scribbles or Progress Notes in Bells.
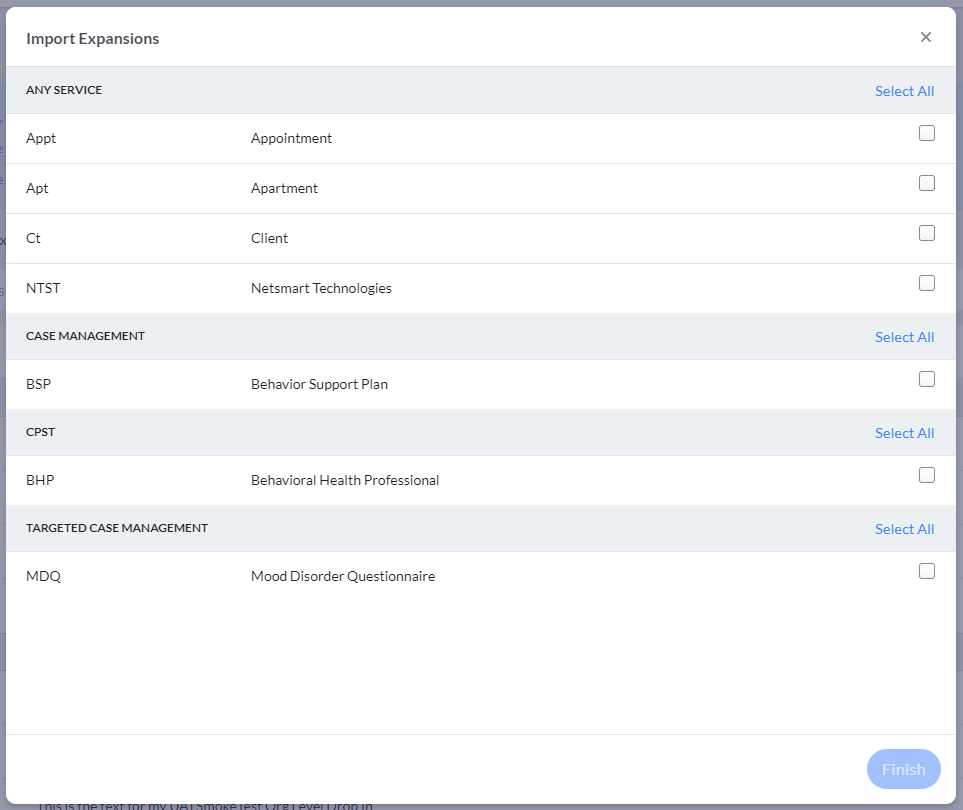
In the new display - Import Expansions you will see available expansions grouped by categories (headers in gray) followed by the expansions for each of those categories. You can select all the expansions in the category or select one or many expansions to import across multiple categories. The categories are examples of types of services the expansions might be associated with and the "Any Service" category can be associated across all the services.
Once an expansion is imported, it will show amongst the other configured expansions for your organization and can be further edited for use in progress notes or Scribbles just like any other expansion. Imported Expansions will import as a user-level expansion. If you're an administrator you can convert the imported user-level expansion to an organization-level expansion.
Editing an Expansion
When you find you need to tweak the wording in an Expansion, making changes is very simple.
-
From your Expansions list, click on the Expansion in the list or click the pencil icon on the right side of the Expansion in the list:

- Edit the Expansion Name.
- Edit the Expansion Text.
- Click Save to save your changes or click Cancel to discard your changes.
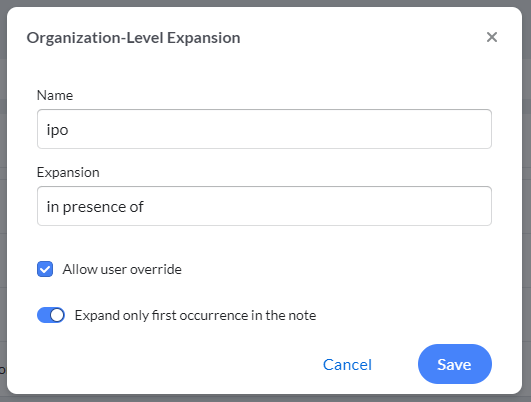
Organization Level Expansion
When an administrator creates an Organization-Level Expansion, they can set the expansion to allow user override or not. Setting the Expansion to allow user override allows users to have a user-level Expansion with the same name as the organization-level Expansion. If the expansion is not set to allow override, then only the organization-level expansion with that name will be used.
Organization-Level Expansions are usable by all users across the organization.
Administrator Review
Bells Administrators, Supervisors and Quality Assurance roles can review user expansions to have oversight that they're appropriate for the organization and allow expansions to be copied to be used by the whole organization. Bells administrators will have a toggle at the top of the display to switch between Manage and Review. The Manage view is the original expansion display, the Review view shows the user level expansions for the organization. Administrators can also export the display.


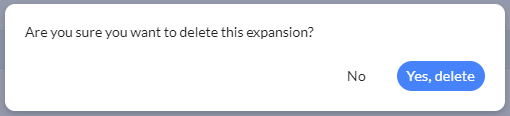
Deleting an Expansion
When you no longer need an Expansion and want to remove it,
-
From your Expansions list, click the trash can icon on the right side of the Expansion in the list:

- At the prompt, click Yes to delete your Expansion or No to keep your Expansion.
Bulk Import
If you already have a list of expansions that are commonly used, your Bells administrator can import them in Bulk. Administrators will see the bulk import option under Add Expansion:

Clicking Bulk Import opens the import display: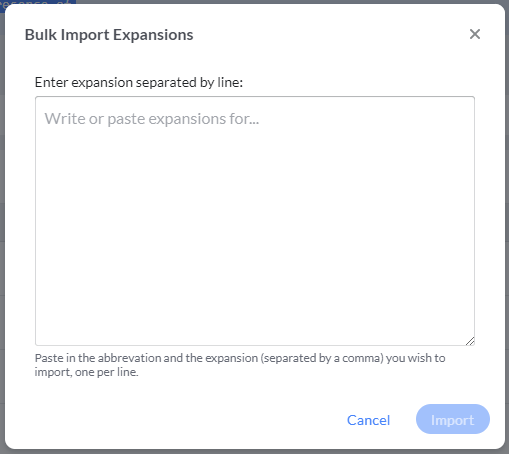
The Bulk import uses the following comma-separated convention:
Name,Expansion text <Enter>
Name2, Expansion text 2 <Enter>
Where <Enter> represents pressing the enter key
Keep in mind that the same rules as far as expansion name and length apply in bulk that apply to individual expansions.
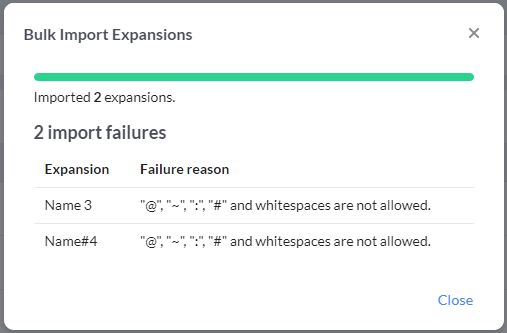
After you click Import, you will get a confirmation of how many expansions were loaded. Any expansions that are unable to import will show in a list. You will need to review and correct them.
Example Import and resulting success/error display: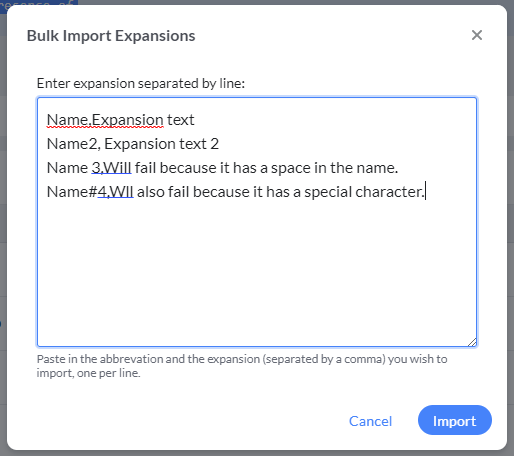
Using Expansions
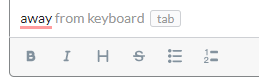
Once an Expansion is set up, all you have to do to use it is to type the name of the expansion in your progress note or scribble and hit your space key. The text will expand and show the full expansion text.
Additionally, expansions can auto-complete when used in a scribble or progress note. When you start typing the text of the expansion (not the name but the text for the expansion and a minimum of 4 characters), placeholder text will appear in the display for the remaining expansion text. Hitting your Tab key will auto-complete the expansion for you. Please refer to the example below.
Configured Expansion:
Behavior in the Scribble or Progress Note:
Additional Examples
| Appt | Appointment |
| Apt | Apartment |
| BHP | Behavioral Health Professional |
| bx | behavior |
| CM | Case Manager |
| CO | Creative Options |
| Comm | Communication skills |
| comp | Comprehensive Assessment |
| CS | Community Services |
| CS | Coping Skills |
| Ct | Client |
| DHH | DHHS/OADS |
| dx | Diagnoses |
| FB | Food Bank |
| FCFH | First Call For Help |
| FM | Foster Mom |
| FSP | Family support partner |
| HS | Home Services |
| HV | home visit |
| LI | Living Innovations |
| mtp | medical treatment plan |
| neuro | neuropsych |
| PCP | primary care physician |
| PS | Peer Support |
| RC | Resource Coordinator |
| ROI | Release of Information |
| Skills | Writer arrived at client's foster home for a skills session |