Reports
Accessing Reports
 To access the reports section of the Bells - Assisted Documentation application, click the reports icon in the left navigation bar.
Within the reports section of the application, you will find the individual reports. These reports are shown in alphabetical order in the left pane. When you access the report section, the application remembers the last report you accessed and will put you on that report.
Report View Rules
| Role in Bells | Can see their own notes |
Can see their supervisees' notes | Can see all notes |
|---|---|---|---|
| Bells User |  |
||
| Bells User and Supervisor |
|
|
|
| Bells Administrator |  |
||
| Bells Admin and Supervisor |  |
 |
 |

Bells reports support the supervisor hierarchy. Supervisors will see the notes and report data for the full supervisor hierarchy.
 myAvatar users: Service Type is called Service Code and Enrollment is called Episode. myEvolv users: Service Type is called Services.
Report Filters
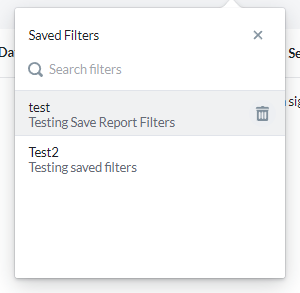
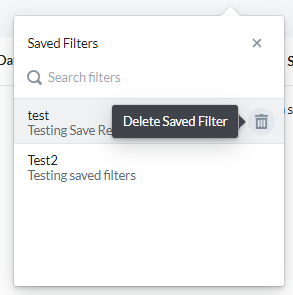
When a report includes filter logic, you can filter the report based on Staff, Patient, Service, a specific date range, etc. These filters can be saved for future use on the report they were created on. For example, if a filter was created on the Signed Note report, it can only be used on the signed note report.
Filters applied to the report show in the header of the report export and email attachments.
Appointments Without Notes Report
Your organization may need to ensure that all notes have an appointment associated. The report for Appointments Without Notes is available to provide this insight.

The Appointments Without Notes report includes report filters that allow you to narrow down your display based on the filters applied. The report filters for the Appointments Without Notes report include a date which can be a relative date like today, yesterday, or a range. You can also choose a custom date range. Additionally, the report can be filtered by Practitioners as well as Patients. There is also filters to only see the Service, Program or Location. These filters can be saved and reused each time you access this report as well as deleted if you no longer need them.
The Appointments Without Notes Report can be scheduled to be sent via email by clicking the Email Report button in the top right of the report. Once the report has been scheduled, you will see 'Report email scheduled' underneath the report title. For more information on Scheduling a Report, refer to Scheduling a Report.
You have the ability to export this report with the Export button in the top right of the display.
Audit Summary Report
As part of the Audit Review workflow for Bells Administrators and Supervisors, the Audit Summary Report shows the Notes that were tagged as Similar or Overlapping.

In this report are the note records tagged as Similar or Overlapping via the Audit Review workflow. You can find more information in the Audit Review article.
The Audit Summary report includes report filters that allow you to narrow down your display based on the filters applied. The report filters for the audit summary report include a date which can be a relative date like today, yesterday, or a range. You can also choose a custom date range. Additionally, the report can be filtered by Practitioners as well as Patients. There is also filters to only see the Similar Notes or Overlap Notes, Program, Location and Service. These filters can be saved and reused each time you access this report as well as deleted if you no longer need them.
If the note in the report is started from an appointment or is tied to a Virtual Scribe session a calendar and/or microphone icon is included on the row.
Clicking a row in the report will expand the right hand pane to show the details of the similar notes and overlapping notes for the clicked note row.

The Audit Summary Report can be scheduled to be sent via email by clicking the Email Report button in the top right of the report. Once the report has been scheduled, you will see 'Report email scheduled' underneath the report title. For more information on Scheduling a Report, refer to Scheduling a Report.
You have the ability to export this report with the Export button in the top right of the display.
Audit Logs Report
Audit events including patient access, report emailing and exporting can be found on the Audit Logs Report. Access types included in the report are Data Access, Restricted Access, Data Changes and Other Activity.
As part of Patient Population Management, Bells administrators can set up additional patient access restrictions at the Organization Level, User Level and for individual patients. Please refer to the Patient Population Management article for more information.
Patient Service Usage Report
The Patient Service Usage report allows users (admin and non-admin alike) to see the services provided per Patient, broken down by Service.
As an admin, you will see all patients across the organization. As a supervisor, you will see your direct supervisee's patient services as well as your own services. As a non-admin user, you will only see your patient services.
The patient service usage report includes report filters that allow you to narrow down your display based on the filters applied. The report filters include a date, which can be a relative date like today, yesterday, or a range. You can also choose a custom date range. Additionally, the report can be filtered by a service type. These filters can be saved and reused each time you access this report as well as deleted if you no longer need them.
The display includes the Patient for the services, what services were provided, the time duration of those services, and the Trend/Previous Period percentage comparison for those services.
The services included in the report are based on the Signed Notes as part of Bells. Notes that include as well as do NOT include a Session time section show in this report. If the note does not have an end time it will show as zero time and does not count toward the time shown in the report..

You have the ability to export this report with the Export button in the top right of the display.
Recommendation Summary Report
The Recommendation Summary report helps you determine the effectiveness of your organization's documentation recommendations. You can see if there is no action taken on a recommendation, whether the recommendation was confirmed or dismissed, which rules are used the most, and how staff are using them. This report is available to all users.

Documentation Recommendations

The top graph of the report shows Documentation Recommendations over time. This line graph shows the Documentation Recommendations made for the previous period across 3 categories - No Action, Confirmed, and Dismissed. The period *in the upper-left corner of the graph) can be selected from several relative dates (today, last 3 days, etc) or a custom date range.
In the top right corner of the graph, you will see a button for "View Data." Clicking this button will open a window displaying the detailed data behind the graph. In this view, you can see the issue encountered, along with its context, so you can better understand the driver of the recommendation.

In this raw data view, you see the staff that triggered the Documentation Recommendation, the relevant rule, the action taken by the staff, the issue that triggered the recommendation, the suggestion given, the textual context from the note, the service and when the recommendation was given.
This view can also be exported.
Rule Distribution
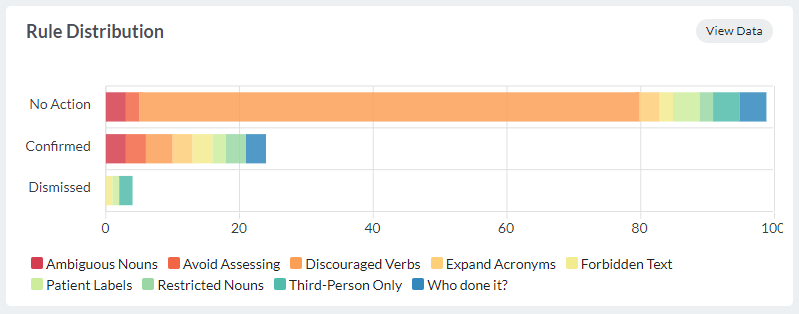
The Rule Distribution graph is shown on the left side under the Documentation Recommendation graph. This stacked bar chart shows which rules had no action taken/confirmed/dismissed most often. The graph shows the previous 12 weeks across the nine rule type categories and how often those rules were No Action, Confirmed, or Dismissed.
In the top right corner of the graph, you will see a button for "View Data." Clicking this button will open a window displaying the detailed data behind the graph. In this view, you can see the rule applied, along with whether your staff accepted, dismissed, or if there was no action taken, so you can better understand the driver of the recommendation.
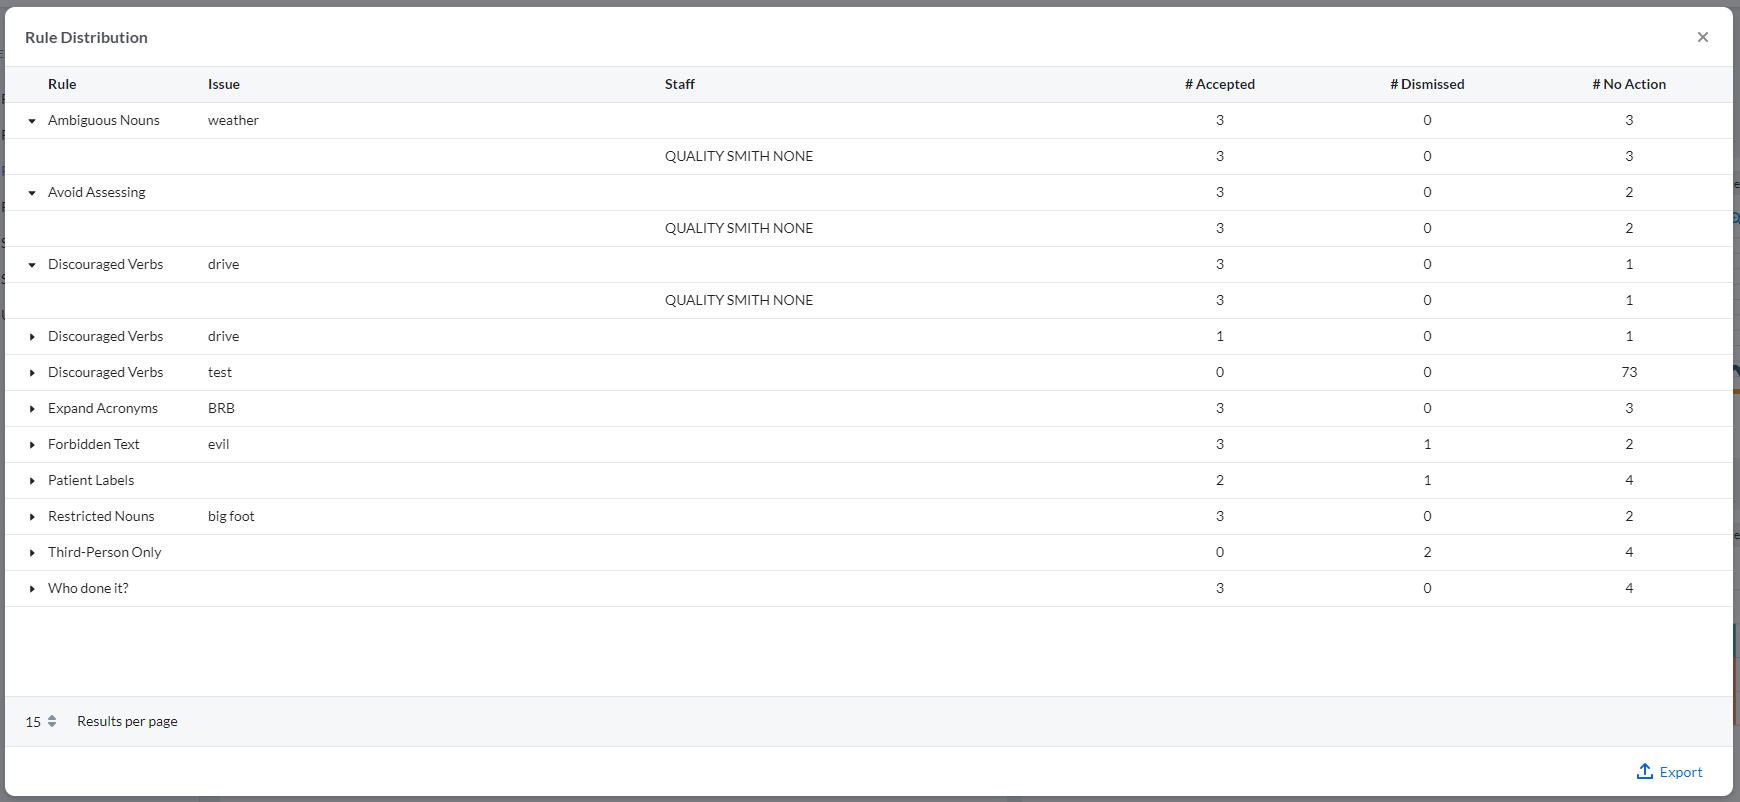
In this raw data view, you see the rule, the word (issue) causing the recommendation to alert, the staff that triggered the documentation recommendation, and the number of times it was accepted, dismissed, or if there was no action taken.
This view can also be exported.
User Distribution
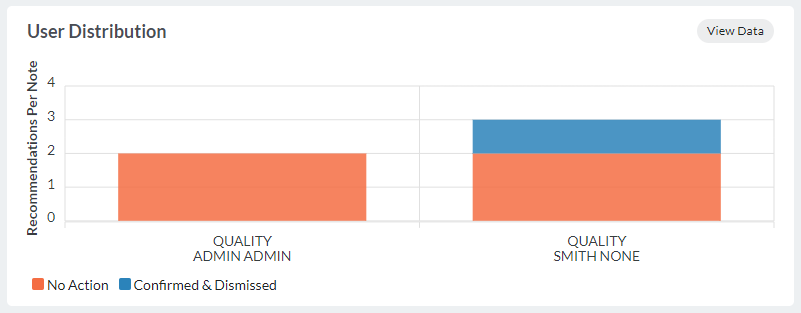
The User Distribution graph is shown on the right side under the Documentation Recommendation graph. This graph shows the number of recommendations that had no action taken vs. confirmed/dismissed per note. This column graph contains data for the previous 12 weeks. Only staff that have taken no action for 5 or more recommendations in the period will be included in the graph.
In the top right corner of the graph, you will see a button for "View Data." Clicking this button will open a window displaying the detailed data behind the graph. This allows you to see how your staff are triggering and accepting/dismissing/ignoring the rule so you can better understand the driver of the recommendation.
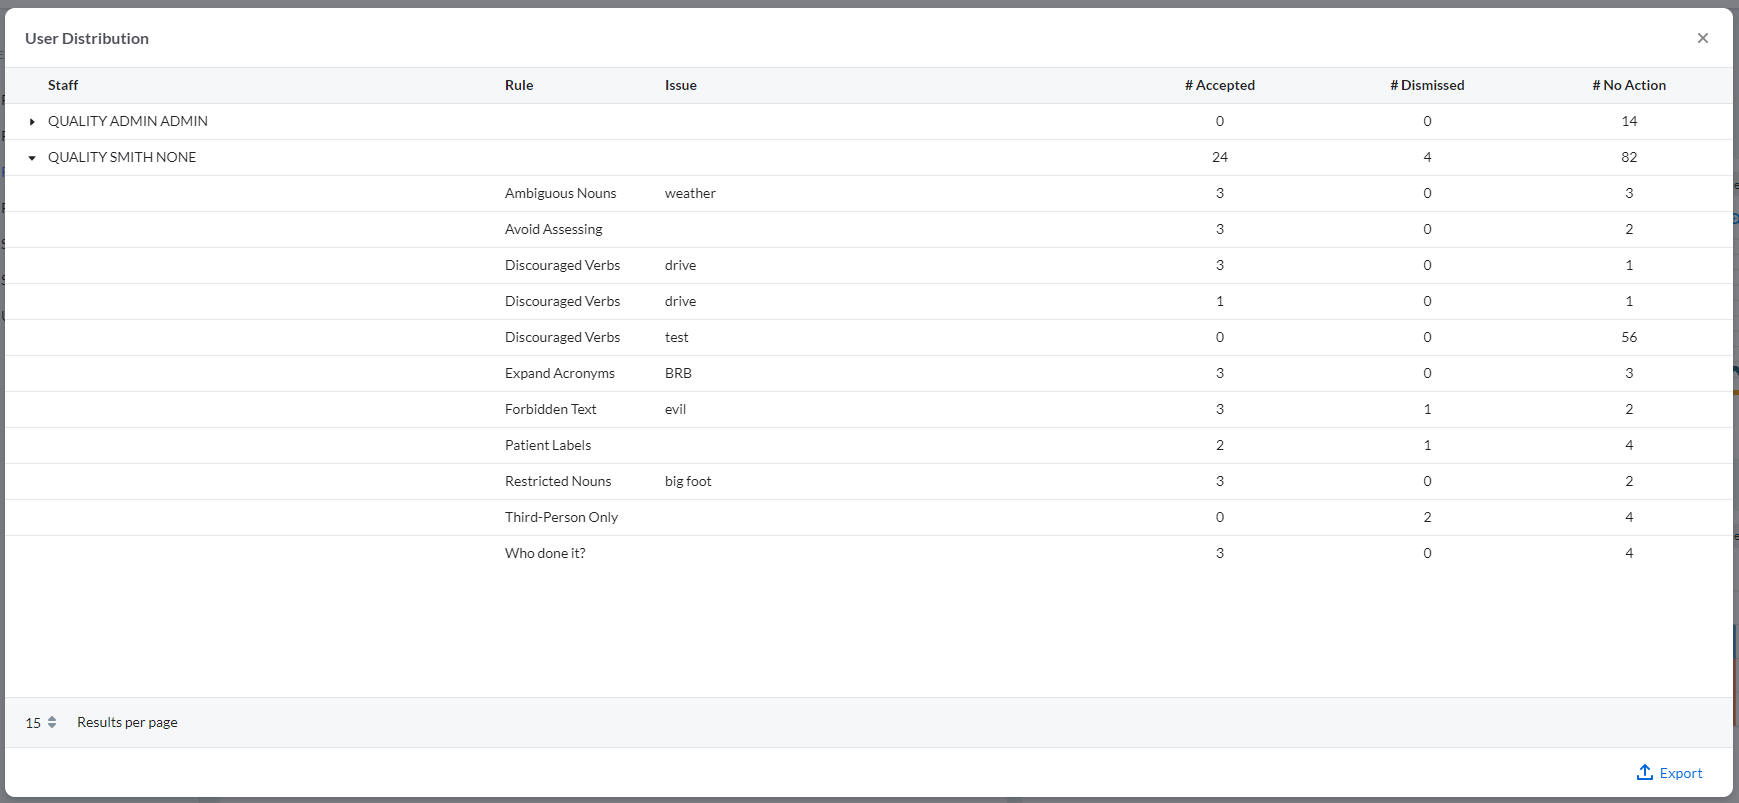
In this raw data view, each staff row can be expanded to see a breakdown of the data. Once expanded, you can see each rule, the issue, and the number of times the recommendation was accepted, dismissed or if no action was taken.
This view can also be exported.
The Recommendations Summary Report can be scheduled to send via email by clicking the Email Report button in the top right of the report. Once the report has been scheduled, you will see 'Report email scheduled' underneath the report title. For more information on Scheduling a Report, refer to Scheduling a Report.
You can export this report with the Export button in the top right of the display.
Report Delivery Schedules Report
In organization preferences, the Bells Administrators can enable the Email Report functionality. When turned on, Bells Administrators will see Report Delivery Schedules in the list of available reports. This report shows all scheduled reports that are configured for email delivery. 
In the report, you see the staff, the name of the report that has been scheduled, any filters applied to the report, the schedule for sending the report, and the recipient email addresses for the report.
The Report Delivery Schedules report can be filtered by staff and/or report name.
To delete a report delivery schedule, click the trash can icon that appears on the far right when you hover over the report row. An administrator has permission to delete any scheduled report.
Signed Notes Report
The Signed Note report allows you to see signed notes. Your Bells Role determines what you can see in the report. The Bells Administrator can see all signed notes in the organization. A supervisor can see their own signed notes, as well as their direct supervisee's signed notes. A user can see their own signed notes.
The signed note report includes report filters that allow you to narrow down your display based on the filters applied. The report filters include a date, which can be a relative date like today, yesterday, or since previous month. You can also choose a custom date range. Additionally, the report can be filtered by a staff or multiple staff (as well as their supervisees with the Include Supervisees). These filters can be saved and reused each time you access this report as well as deleted if you no longer need them.
If the note in the report is started from an appointment or is tied to a Virtual Scribe session a calendar and/or microphone icon is included on the row.
 For myAvatar Quality Coach users, an Origin and Quality Audits filter is also available.
- Origin filters allows you to narrow the results to just Bells notes, just myAvatar notes or both. If the note in the display is imported from myAvatar, an import icon will show on the row in the display.
- Quality Audits filter narrows the results by if the notes were audited, not audited or if the audit for the note could not complete.
There is a search bar under the filters to be able to search the content of the signed notes.

The display grid shows the Patient Card, Session Date, Author, Signed Date including time and session to sign time, Note Type and Session which includes Enrollment, Service Type and Location for the notes and sessions that are signed.
If the note is started from an appointment, a calendar icon will display. Hovering on the icon will show the appointment details.
If a signed note was late, the orange late icon and orange banner will show. The orange banner shows on the left; the icon shows on the right of the note card in the display.


If a signed note has a sync issue, the red sync issue icon and red banner will show. The red banner shows on the left, the icon shows on the right of the note card in the display. Clicking the red icon will take you to the sync issue tab of the chart.


The Signed Notes Report can be scheduled to send via email by clicking the Email Report button in the top right of the report. Once the report has been scheduled, you will see 'Report email scheduled' underneath the report title. For more information on Scheduling a Report, refer to Scheduling a Report.
You can export this report with the Export button in the top right of the display.
Staff Service Usage Report
The Staff Service Usage report (similar to the Patient Service Usage Report) allows users (admin and non-admin alike) to see the services provided per Staff broken down by Service. Your Bells Role determines what you can see in the report. The Bells Administrator can see all staff in the organization. A supervisor can see themselves as well as their direct supervisee's services. A user can see their own services.
Similar to the Signed note report, we've included the filter functionality to allow you to view various date ranges or break the report down by Staff or by Service. The Staff Service Usage report can only be filtered to show a maximum of 30 days of data.
The display includes the Staff that provided services, what services were provided, the time duration of those services, and the Trend/Previous Period percentage comparison for those services.
NOTE: Group services are not included in this report.
The services included in the report are based on signed Notes written in Bells. Notes that include as well as do NOT include a Session time section show in this report. If the note does not have an end time it will show as zero time and does not count toward the time shown in the report..

You can export this report with the Export button in the top right of the display.
Sync Issues

The Sync Issues report is available to Admin and Non-admin users. Your Bells Role determines what you can see in the report. The Bells Administrator can see all notes in the organization that encountered a sync issue. A supervisor can see their own notes as well as their direct supervisee's notes that encountered a sync issue. A user can see their own notes that encountered a sync issue.
Users can filter and search the note content for sync issues.
The display grid shows the Patient Card, Session Date, Author, Signed Date, the issue encountered and if the note needs EHR resolution for the notes that ran into sync issues when signed.
An ellipse menu shows on hover of the row. In the menu users can Add Comment or Preview the note. If a comment is added, additional menu options for Edit and Delete show to further manage sync issue comments.

If the note in the report is started from an appointment or is tied to a Virtual Scribe session a calendar and/or microphone icon is included on the row.

The Status column shows the date/time, user and status text from the sync issue. There is a filter on this column to “Include Cleared Issues” which filters the display to show cleared sync issues.
Administrators will see a button for “Clear Issue” instead of “Fixed in EHR”.
This report includes export and email functionality.
The Patient, Session Date and Signed Date columns can be sorted.
Common Sync Issues
There are four (4) common types of sync issues that can occur. The note failed t...
There are four (4) common types of sync issues that can occur.
-
The note failed to sync. Please contact support.
- This issue type happens when the progress note cannot sync to the EHR.
- The only action that can happen for this issue type is to reach out to support. You will have the ability to delete the note that has this sync issue so it doesn't stay in the display forever.
-
There was trouble syncing this note. Please retry.
- This issue type happens due to a small failure in the sync process.
- You will have the ability to retry the sync.
-
This note sync'd successfully, but you may need to follow up in your EHR.
 This issue type was built for the myAvatar EHR.
- When possible, the status from myAvatar will be included in the Issue description.
- You will have the ability to dismiss the record in the display so it doesn't stay in the display forever.
-
Disassociate the note from the appointment and retry the sync.
-
 This issue type was built for the myAvatar EHR.
- This issue occurs when the appointment associated with the note in Bells already has another note associated with it in the base EHR.
- You will have the ability to delete the note that has this sync issue so it doesn't stay in the display forever.
-
OR You will have the ability to Resolve the sync issue.
- Clicking Resolve in the display will display a confirmation prompt - "The appointment linked to this note was already tied to a different note. Would you like to unlink the note from the appointment?"
-
Unsigned Notes Report

The Unsigned Note report allows you to see unsigned notes. Your Bells Role determines what you can see in the report. The Bells Administrator can see all unsigned notes in the organization. A supervisor can see their own unsigned notes as well as their direct supervisee's unsigned notes. A user can see their own unsigned notes.
The display grid shows the Patient Card, Session Date, Author, Deadline including the date and the time before the note is considered late, Note Type, Session which includes Service, Location, Episode and Program, and Status for the notes and sessions that are not started, in draft statue, or not signed. The Session column can be filtered based on Service Type or Location. Clicking the filter will show a togglable search display.
Note status tags as well as the Sign Note Warning displays for the draft note. Status tags include Not Started or Draft as well as the Mobile Signature tag. Additionally for Group or Multi-Service notes there is a counter for the incomplete vs. total notes. You can filter the status column to only show Draft or Not Started notes in the display.
If the note in the report is started from an appointment or is tied to a Virtual Scribe session a calendar and/or microphone icon is included on the row.
This report allows you to see what notes or sessions are left incomplete to then be able to finish them.
If the note is started from an appointment, a calendar icon will display. Hovering on the icon will show the appointment details.
 Clicking a note record in the display will open the note. If you're the note author, you can edit or complete the note from within the report preview. Additionally, you can access the patient's chart from within the note preview.
 If a Group Note record is clicked in the report, you can navigate through the notes for the group in the report via the arrow buttons in the bottom right corner.
The Unsigned Notes Report can be scheduled to be sent via email by clicking the Email Report button in the top right of the report. Once the report has been scheduled, you will see 'Report email scheduled' underneath the report title. For more information on Scheduling a Report, refer to Scheduling a Report.
You also can export this report with the Export button in the top right of the display.
A Group Note Administrator can delete any notes the Administrator is assigned. A Bells Administrator can delete any notes, including group notes.
Scheduling a Report
When your Bells administrator has allowed it, you can email a report to any email address - whether the person is a Bells user or not. All that is required is a valid email address.
The following reports can be scheduled
- Audit Summary
- Patient Access
- Signed Notes
- Sync Issues
- Unsigned Notes
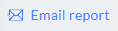
To schedule a report, click the Email report button in the upper-right corner of the report. If you don't see the button, contact your Bells administrator to confirm if your organization allows reports to be emailed.
When the Email report button is clicked, you'll be presented with 3 options.
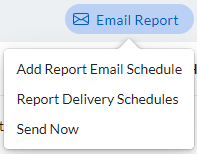
Add Report Email Schedule opens the dialog to allow you to set up a Report Email Schedule.
- Schedule Email Report - allows you to configure parameters for the report to be delivered repeatedly via a schedule. These parameters are then saved and can be updated at any time.
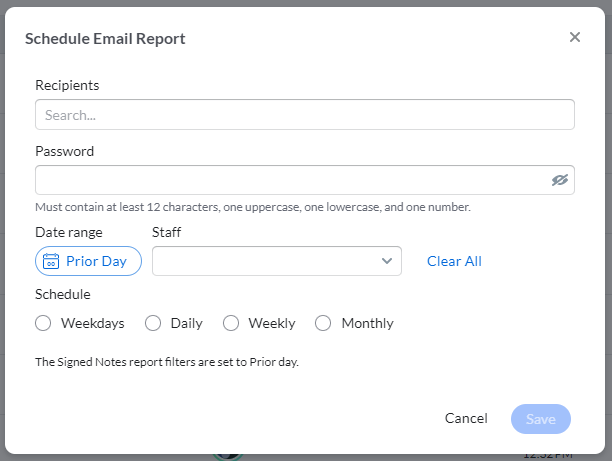
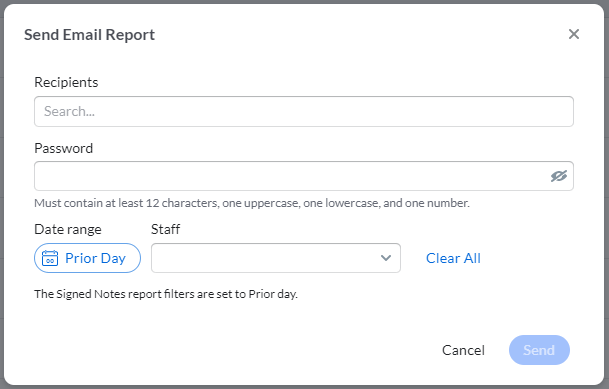
Recipients
You can send reports to anyone with an email address, whether that person is a Bells User or not. Simply type the person's name or email address and hit Enter or click on the user to add them to the Recipient list. Click the x to remove any Recipients.
Password
Each report is sent securely as an encrypted zip file. The Password field here sets the password that will be used on the emailed zip file. Note that the password must be at least 12 characters and contain one uppercase letter, one lower-case letter, and one number. Click the eye icon on the right side of the password field to view the password you have entered. You will need to let each report recipient know the password you've configured for the report.
Filters
The report filters in place on the report when the Email Report button is clicked default in the Schedule Email Report display. These filters can be adjusted.
Date Range
The date range allows you to select how many days of data will be included in your report. The dates will be evaluated on the day the report is executed. For example, if the report is scheduled to run for the last 7 days, when the report runs on August 1st, it will pull data from 7/25 - 7/31.
Staff
You have the option to filter the report by one or more staff. Simply type the name of the Bells user and hit enter to add the staff to the filter list. Click the x to remove any staff.
Clear All
Clicking Clear All will remove all date range and staff filters.
Schedule
You have several scheduling options for how often the report will be emailed:
- Weekdays - the report is sent Monday through Friday, but is not sent on Saturday or Sunday.
- Daily - the report is sent every day of the week.
- Weekly - Selecting Weekly will cause a dropdown to appear so you can select which day of the week for the report to send.
- Monthly - the report is sent on the first day of every month
Once your filters are set, you will see a text recap of the filters you have selected.
Clicking Delete in the lower left of the window will delete the schedule and it will no longer send the report.
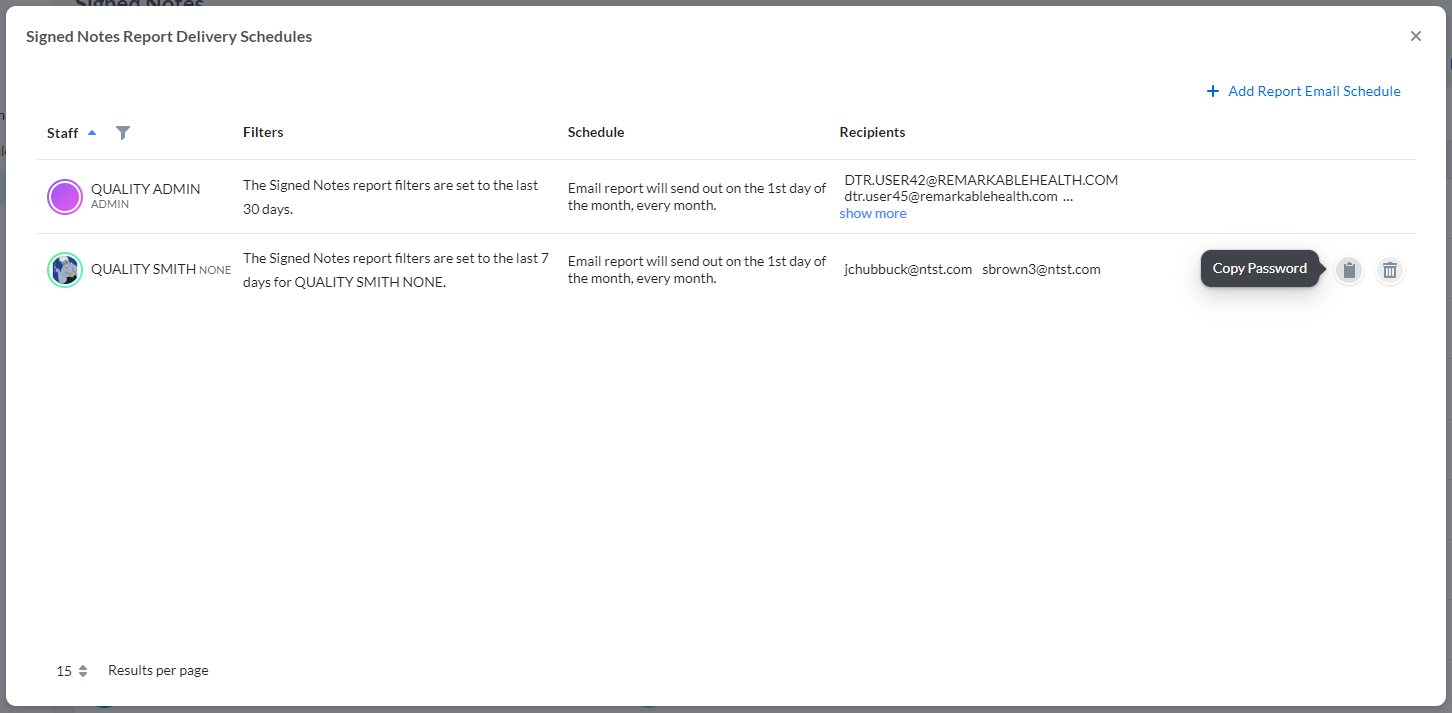
Report Delivery Schedules opens the Report Delivery Schedules for the report you're on when you clicked the Email Report button. The display shows all the schedules set up for that report depending, on your role. If you're an administrator, you will see all scheduled email reports for the report. If you're a supervisor, you will see your staff's and your own email reports. If you're not an administrator or a supervisor, you will only see your own email schedules. The copy password clipboard icon is available on the hover of a row in the display.
Send Now opens the dialog to allow you to send an email report instantly.
Send Now - allows you to configure parameters for the report and send it immediately. These parameters are not saved for future use.
Recipients
You can send reports to anyone with an email address, whether that person is a Bells User or not. Simply type the person's name or email address and hit Enter or click on the user to add them to the Recipient list. Click the x to remove any Recipients.
Password
Each report is sent securely as an encrypted zip file. The Password field here sets the password that will be used on the emailed zip file. Note that the password must be at least 12 characters and contain one uppercase letter, one lower-case letter, and one number. Click the eye icon on the right side of the password field to view the password you have entered. You will need to let each report recipient know the password you've configured for the report.
Date Range
The date range allows you to select how many days of data will be included in your report. The dates will be evaluated on the day the report is executed. For example, if the report is scheduled to run for the last 7 days, when the report runs on August 1st, it will pull data from 7/25 - 7/31.
Staff
You have the option to filter the report by one or more staff. Simply type the name of the Bells user and hit enter to add the staff to the filter list. Click the x to remove any staff.
Clear All
Clicking Clear All will remove all date range and staff filters.
Once your filters are set, you will see a text recap of the filters you have selected.
Receiving the Report in your email Inbox
Once the report has been sent, you will find it in your email inbox. If you do not see the report, check your spam and/or junk mail folders. If you still do not see the report, check with your network administrators to make sure they allow you to receive emails from the bells.ai sender.
The body of the email will have a summary of key metrics related to the email, as well as a summary of the filters applied to the data in the attached file. Here is an example of the Patient Access Report email:

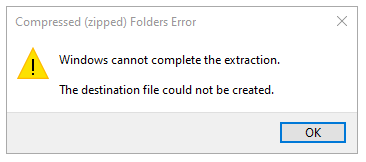
The email link is encrypted and password-protected. To extract the report from the zip file, you will need to use zip file software that allows you to supply the password for the zip, such as 7-Zip. If you do not know the report password, you will need to request it from the report sender.
NOTE: The default Windows zip file extractor does not give you the ability to specify the password and will not work when you double click from the saved location. You will receive the following message.