
Dashboard
Clicking the top icon in the left navigation bar will take you to the dashboard. On the dashboard, you see your note metrics, upcoming appointments, recent scribbles, recent drafts and service distribution data.
If your organization utilizes the Scheduler/Agenda, you see your agenda on the lower left:

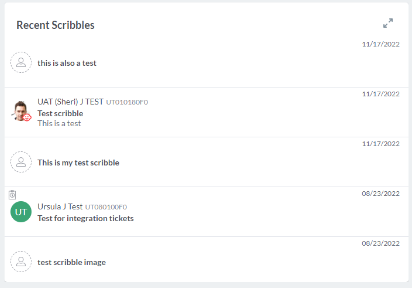
If your organization doesn't utilize the Scheduler/Agenda, you see Recent Scribbles in your lower left.
Patient Search

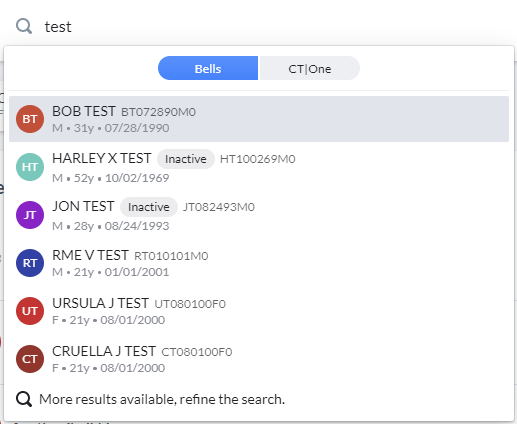
At the top of the Dashboard next to the Bells icon, there is a Search patients field that allows you to search for patients directly from the Dashboard. As part of this search and other patient searches in Bells, you will see a pill-style toggle for Bells and your EHR. When toggled to Bells, you'll search for patients in Bells. When toggled to your EHR you'll be searching for patients that haven't synced to Bells and that are part of your EHR. Clicking the patient in the EHR side of the search will pull that patient and their data into Bells.
Note: This search field allows you to search by name, patient ID, phone number or date of birth. However, the patient ID is case sensitive. Searching for ut010180f0 for example will not pull return results, instead searching UT010180F0 if it aligns with a patient would return a result.
 myAvatar users can only search by the last name when toggled to myAvatar due to the functionality available from myAvatar. When toggled to Bells, you can search by the criteria above.
Depending on settings in Bells for patient search/access limits, you may struggle to find a patient. The settings that drive which patients you can see in Bells are:
- Toggle setting on Bells User Management for All Patients (managed by Bells administrators)
- Client Lookup Limits from CT|One (staff limit, not the agency limit, managed by Bells administrators)
- Whether you are a member of the patient's Care Team or Case Load (from the EHR)
- Whether you are the patient's Managing Therapist (from CT|One)
- Whether the patient is active or inactive
Recently Visited Charts

Along the top of the Dashboard you will find a display of patient cards. These cards represent the patient charts that you most recently visited. Up to six patient cards will display in the list. Clicking the cards in the list will take you to that patient's chart and will add a highlight to the card while you're in the chart.
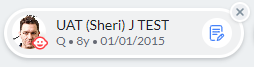
Hovering on the cards will show a start note button and an X button in the top right corner. Clicking the Start Note button will launch the start note display for a progress note and the patient chart for the clicked patient. Clicking the X in the top right corner will remove that patient from the Recent Visit display.
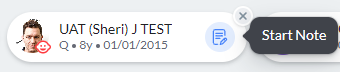
 For myAvatar users, the start note button on the patient card is determined by an organization preference. If set to default to Start Note a standard progress note will be started for the patient. If set to default to Start Documentation Note a simplified support documentation note will be started and doesn't include setting the Location or Service Code in the session details.
Welcome and Metrics

Near the top of the Dashboard display is the Welcome and Metrics widget. This widget shows a daily welcome message and four different metrics. At the top right of the widget are filter buttons for the metrics results. The metrics data automatically updates every 15 minutes.
Each metric includes a hover tooltip describing the information shown.
- Lives Impacted displays the number of patients you've provided services to in the selected time period.
- Notes Written displays the total number of notes written for the selected time period.
- Late Notes displays the number of notes that have exceeded the session to sign threshold for the selected time period.
- Session Time displays the total session time for signed notes within the selected time period.
Upcoming Agenda
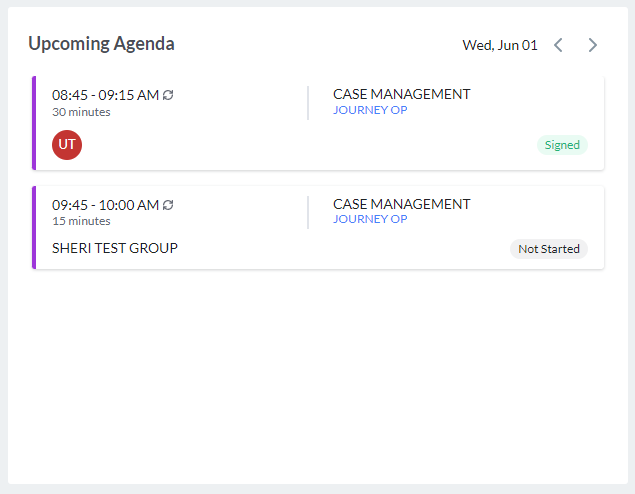
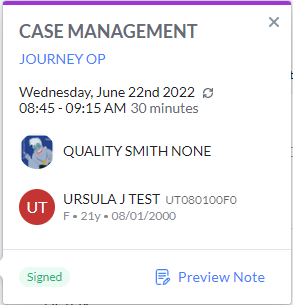
The Upcoming Agenda widget displays your appointments scheduled on a specific day. By default, the current day will display. Clicking the appointment card will open the appointment details to the right. Within the appointment detail display you can review the appointment details and start, edit or preview the note associated with the appointment.
In the top right corner of the widget, you see the date of the appointments displayed as well as navigation arrows to see appointments for dates in the past or future.
For organizations that do not utilize the agenda, the Scribbles widget will display. When a scribble is clicked, the scribble section will open to that scribble.
Distribution of Services

The Distribution of Services widget shows the breakdown of the services you've provided by service. This is based on Signed Notes only. Hovering on a section of the wheel shows total session time for the signed notes for the service you're hovering on. You can change the date range for the widget with the filter buttons in the top right corner of the widget.
Unsigned Notes

The Unsigned Notes widget shows all unsigned notes you have in Draft or Note Started state. When the note is clicked, it will open for you to start, continue to work or review the note.
Note status tags as well as the Sign Note Warning displays for the note. Status tags include Not Started or Draft as well as the Mobile Signature tag. There is also a filter for the status in the top right corner of the display. Additionally for Group or Multi-Service notes there is a counter for the incomplete vs. total notes.
If the note is started from an appointment, a calendar icon will display. Hovering on the icon will show the appointment details.
You may also see a counter in the card for your note. Group notes show a two or three piece counter depending on your involvement in the group.
-
You'll see a two piece counter if you are
- Group administrator but are not listed as a practitioner for the group.
- Bells administrator but are not listed as a practitioner for the group.
- The only practitioner assigned to the group.
- The two piece counter shows the total number of unsigned notes for the group and the total number of notes for the group.
-
You'll see a three piece counter if you are a practitioner for the group and there is more than one practitioner in the group.
- The three piece counter shows the unsigned notes for the signed in user, the total unsigned notes for the group and the total number of notes for the group.
-
The counter color indicates if there is action left for the signed in user.
- When the counter is green, there are no notes left to complete for the signed in user.
- When the counter is blue, there are incomplete/draft notes for the signed in user for the group.
Example:

The Sign Note Warning show when the draft note time (Session Time to current time) exceeds your organization's sign note goal (in hours) or is approaching (within 8 hours) the threshold that is configured by your Bells administrator.


If your organization is set to show sync issues on the User Dashboard they will show under the Unsigned Notes on the right. Example below:

Clicking a note in the sync issues will open that note. Clicking the double arrow icon in the top right will take you to the sync issues tab on your chart display.
Dashboard Buttons

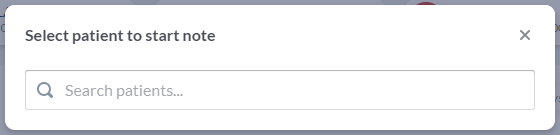
Clicking the Start Note button will allow you to select a patient to begin the progress note. Clicking continue after a patient is entered/selected in the field will open the Start Note window.
Clicking the Create Scribble button will take you to the Scribbles section of the application. There you can start a new scribble, review existing scribbles and various other functions.