

CT|One Home Base
Remarkable Health Home Base (formally known as the I/DD Dashboard)
Both the Home Base and the original Staff Home windows are available for users to work from. To learn more about the Staff Home, see the Staff Home User Guide.
Home Base Access, Navigation, and Configuration
Accessing Home Base
There are 2 ways to access the Home Base. Users can click on the Home Base - I/DD icon in the Toolbar, or the Home Base window will open as the default window when a Site is selected at the Message Center. See instructions below.
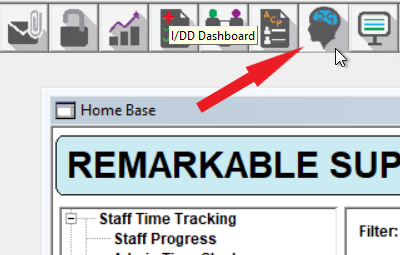
Home Base Tool bar Access
To access the Home Base, click on the brain icon in the tool bar.
Default Access from Site Selection
The Home Base window can be configured to be the default window that appears when staff select a Site form the Site dropdown at the Message Center. This configuration is done at the Staff Master.
Go to Staff Master click Find and search for the applicable Staff.
On the Facility – Site Tab, select Yes for the Open I/DD Module after closing Message Center option and click Save.
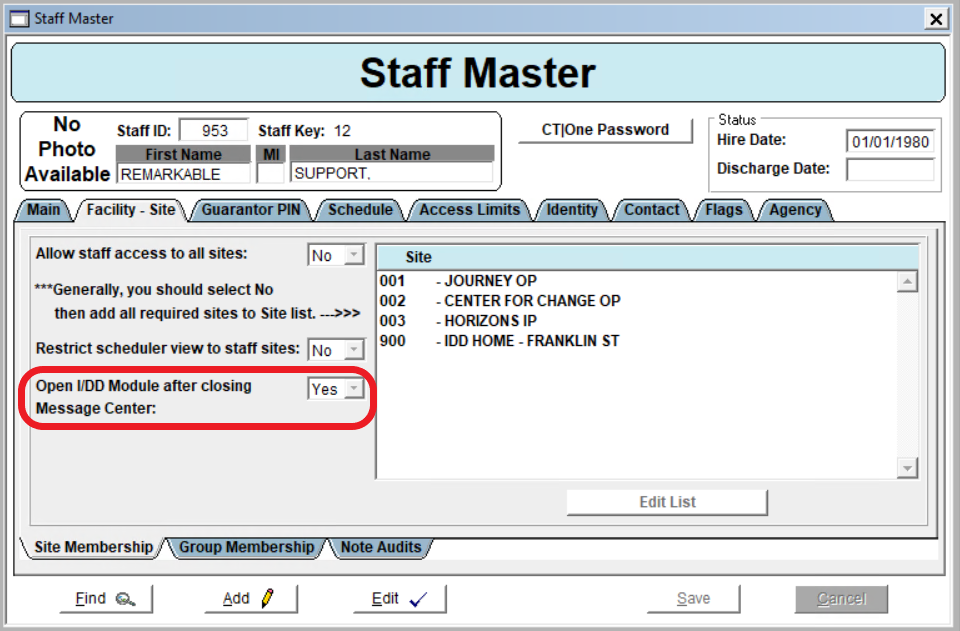
This setting will make the Home Base window the default window to open after selecting a Site at the Message Center and then closing the Message Center.
Note: if No is selected for the Open I/DD Module after closing Message Center option, the Inpatient Display window will open when staff select an Inpatient Site at the Message Center. If an Outpatient Site is selected at the Message Center, the Staff Home will open by default after closing the Message Center.
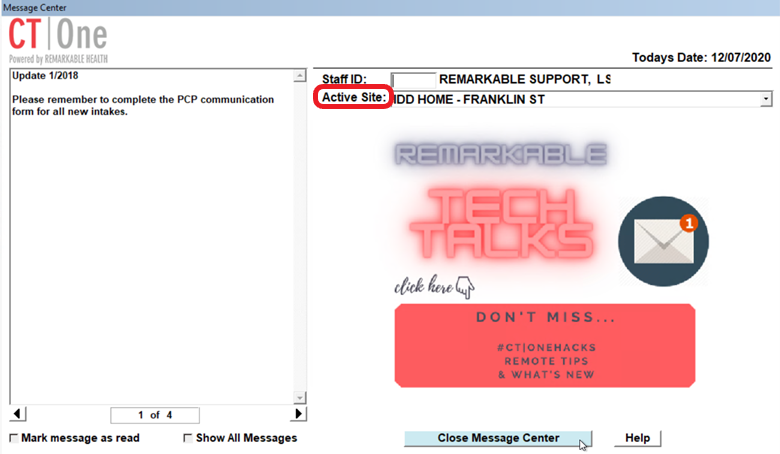
The Home Base window will open after selecting a Site from the Active Site dropdown of the Message Center and then clicking Close Message Center.
Home Base Navigation
Staff Time Tracking
The Staff Time Tracking tab is used to track time for the Staff. Time Tracking allows the staff to Clock-in and Clock-out for various activities throughout the day. This tab also shows the Total Time of the time tracking entries for the day, and entries can be exported to Excel.
Click on Clock In to begin a Time Tracking record, and click on Clock Out to stop the Time Tracking record. When you click Clock Out, the total time of the Time Tracking entry will populate in the Total Time column.
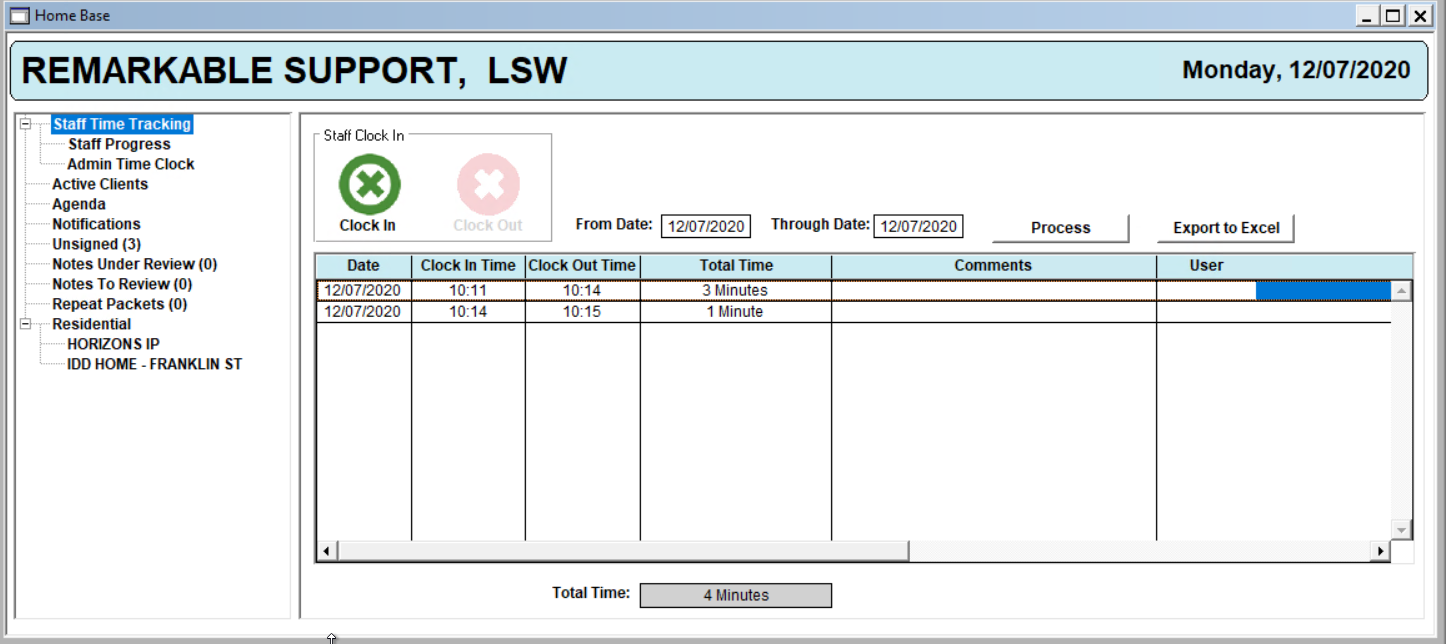
The total amount of time for all entries for the day will populate to the Total Time field at the bottom of the window.
To see entries and Total Time for a range of days, enter the applicable dates in the From Date and Through Date Fields and click Process. This will refresh the window with entries from the entered time frame.
To export the data to excel, click on the Export to Excel button.
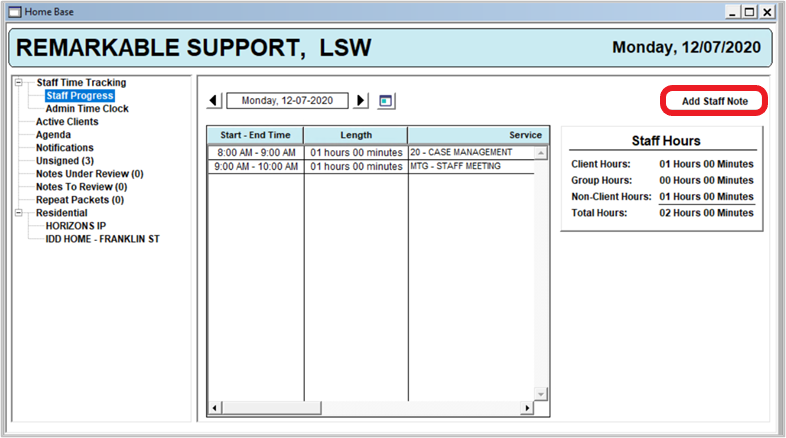
Staff Progress
The Staff Progress tab shows all notes the Staff has entered for the day - Client Progress Notes, Group Progress Notes, and any Staff Notes (Non-Client hours). Staff can also enter here any Staff Notes to capture Non-Client time and see the Total Hours calculated for all note types for the day.
Click on Add Staff Note to add a note to document non-client hours.
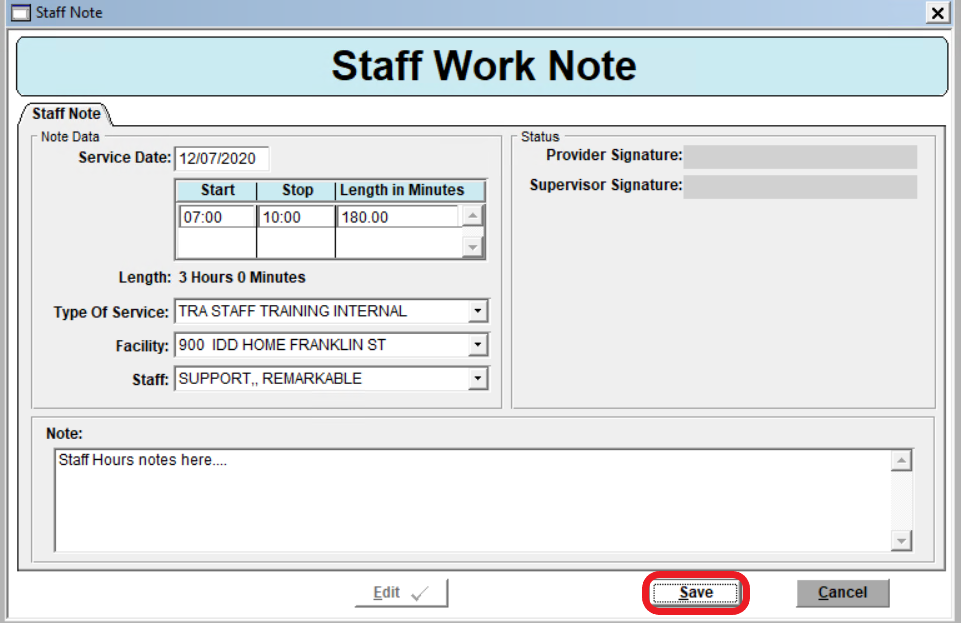
On the Staff Note window, fill in the Service Date and select the Type of Service, Facility, and Staff. Complete the Notes field and then click Save.
Note: Service Type set up is needed to create the non-client, Indirect Services that will be used for the Staff Note - Types of Service dropdown.
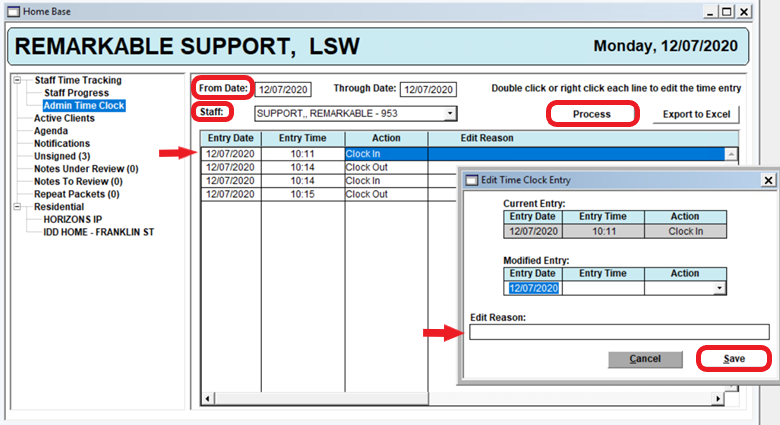
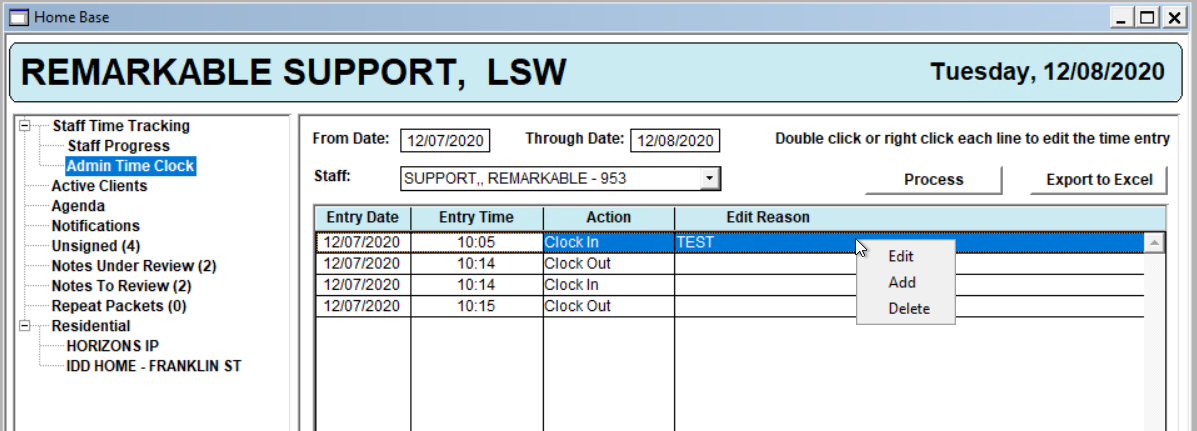
Admin Time Clock
The Admin Time Clock Tab will appear when there are entries on staff’s Staff Time Tracking Tab. Users that have been configured, via the Home Base Maintenance window, to be able to edit Time Clock entries can come to this window to view and edit selected staff time tracking entries.
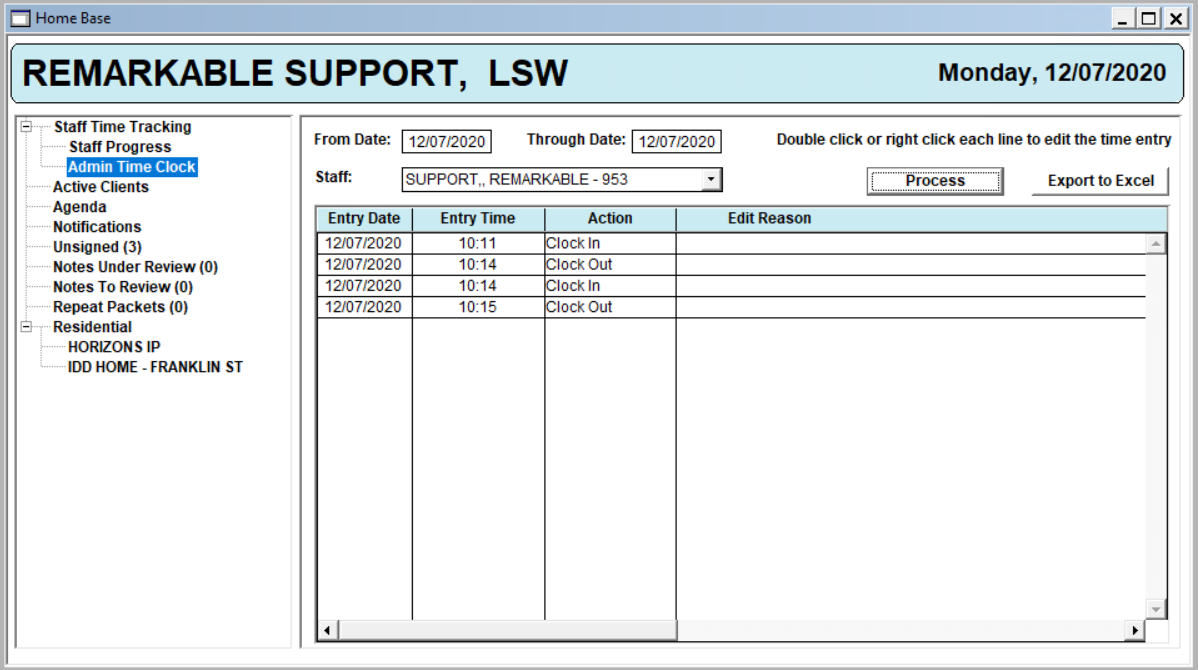
On the Admin Time Clock window, enter the applicable dates in the From Date and Through Date fields, select the staff that you would like to look up from the Staff dropdown and click Process.
The window will refresh with the Staff info from the search parameters. To edit an entry, double click on/or you can right click on the applicable entry row and select Edit.
In the Edit Time Clock Entry window – Modify Entry section, enter the correct Entry Time, select Clock-in or Clock-out in the Action column dropdown, document an Edit Reason and click Save.
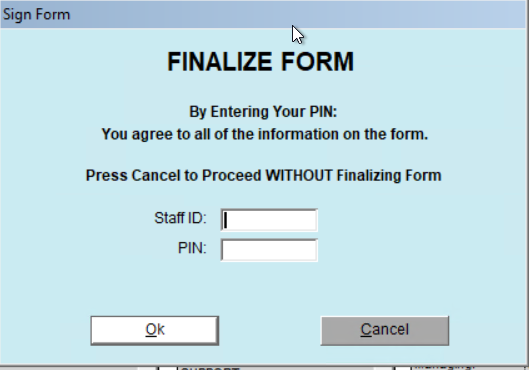
You will then be prompted to enter your Staff ID and Pin and click OK to finalize.
To export the data to excel, click on the Export to Excel button.
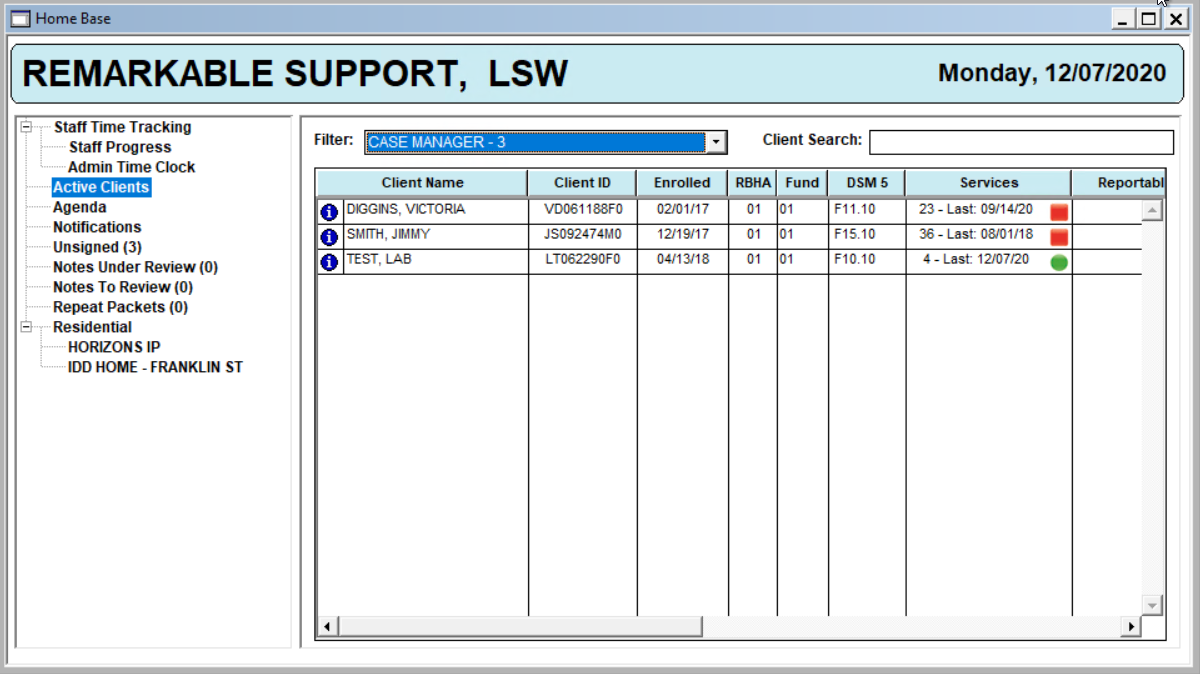
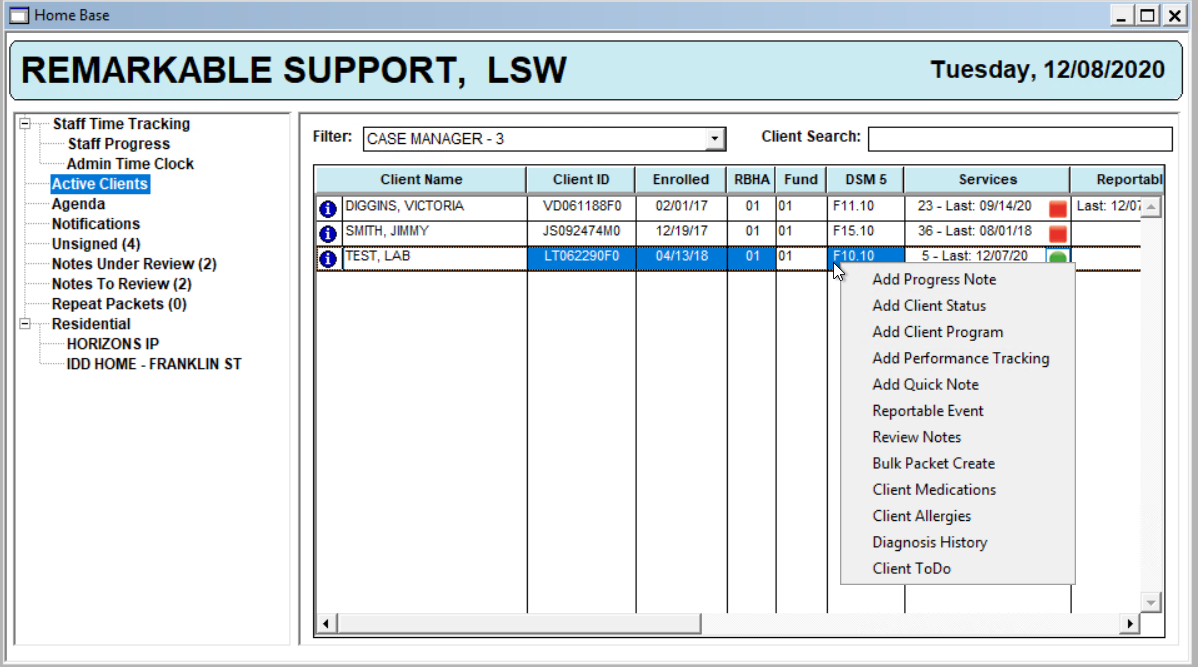
Active Clients
The Active Clients Tab will display the list of Clients associated to the Staff. The default view is the Managing Clinicians list, but any contact type the staff is associated with will be in the Filter dropdown in the top left corner to change the list.
Users can also filter their Active Clients list by typing the client name in the Client Search field.
Double-click on a client to be taken to their Client Chart.
Right-click on a client to get a list of options, including creating a Progress Note, adding a Client Status form to the client chart, open the Client Allergies window, etc.
Click on the blue i circle icon, to the left of the client name, to see basic information about the client, including Date of Birth, Phone Number, and Emergency Contact.
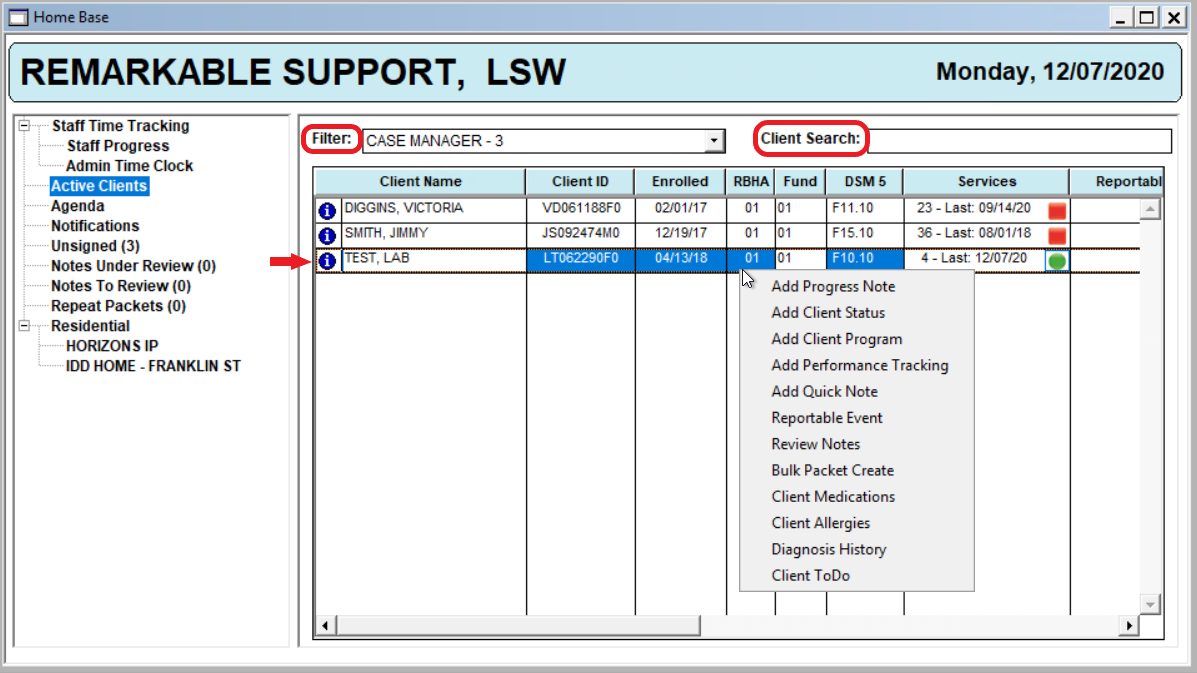
Services Column: The Active Clients list Services column shows the last service provided to the client which is determined by the last Progress Note entered for the client. It is also color coded as Green, Yellow or Red, depending on date of the last Progress Note entered for the client.
Note: The default alert days are: Red = 30 Days and Yellow = 15 Days. Agency admins can control the number of days that will trigger the color coding for the Services column. See Flags: ServiceDateAlert (Yellow) and ServiceDateAlert (Red).
Reportable Event Column: The Reportable Event column of the Active Clients window displays the date of the most recent Reportable Event Packet that was added to the Client Chart.
Note: Configuration in the Home Base Maintenance window is needed – a default Reportable Event Packet must be selected to populate to the Client Chart (when adding a Reportable Event from the Home Base right-click menu) and for the Reportable Events column to reference dates.
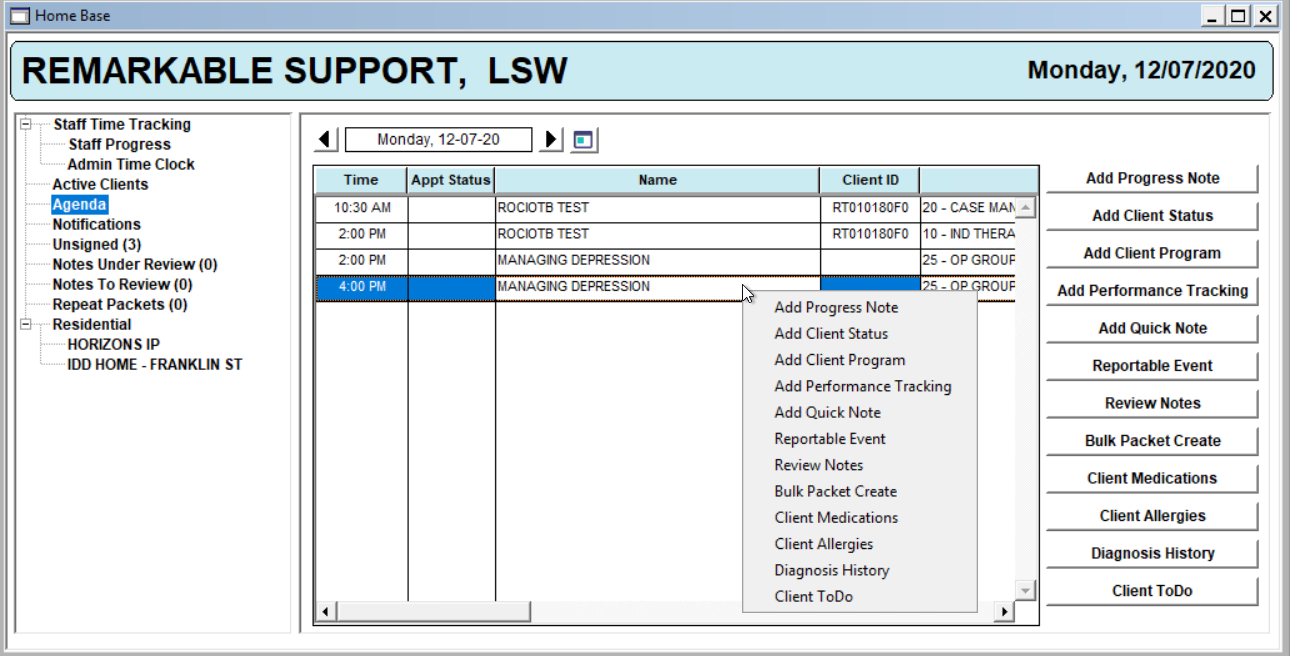
Agenda
The Agenda tab shows the Staff’s Appointments for the current day. From here, the Staff can perform multiple actions by selecting an appointment and using the buttons on the right-hand side of the module or by right clicking an appointment and selecting the applicable option.
Staff can navigate to their agenda for a different day by clicking on the forward and back arrows next to the date field.
Notifications
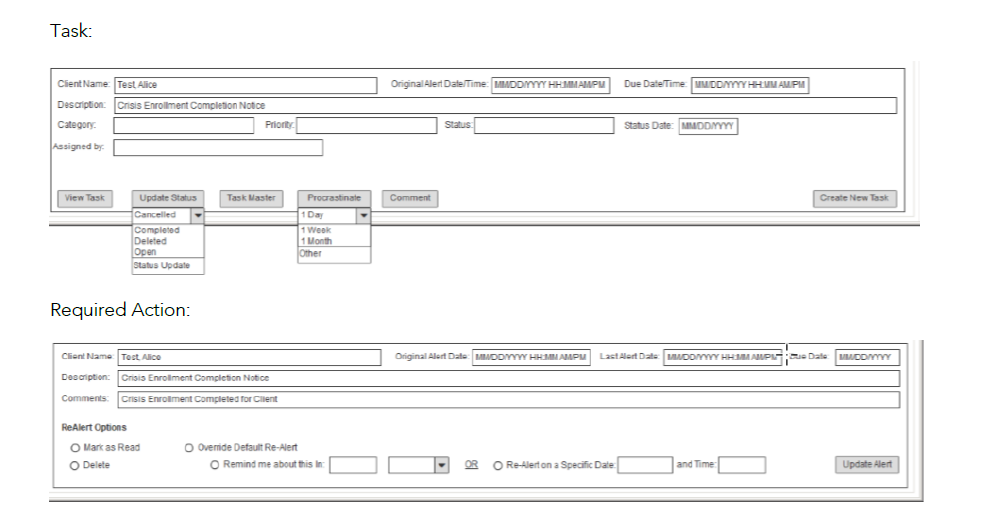
The Notifications Tab will show Staff Notifications including any tasks or required actions (e.g. ePrompts) assigned to the Staff. In addition, if a client has a treatment plan coming due, a “Notification” entry will also display in the grid.
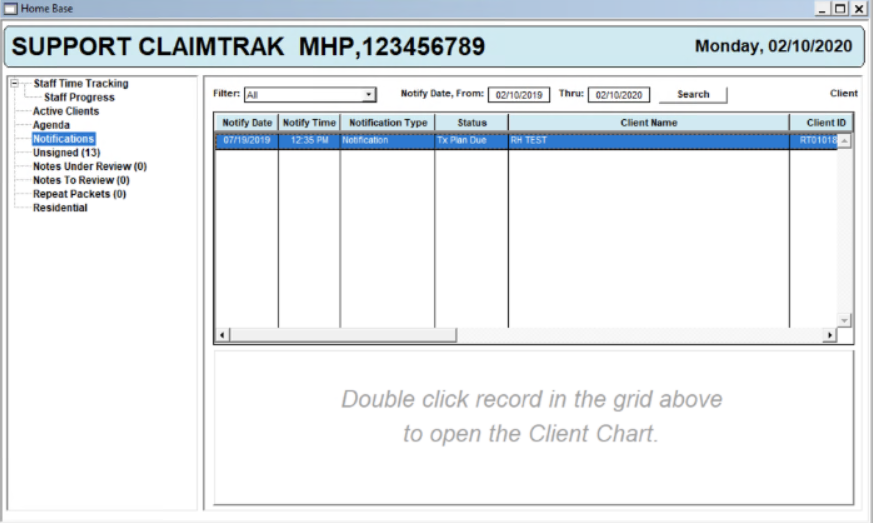
When a row is selected in the list, the bottom section of the window will populate with the applicable information and options to select for the notification.
Unsigned
The Unsigned Tab displays the Notes and Forms for the Staff that have not been signed. Staff can double click on a single item from their Unsigned List to open and sign it or they can also use the Review All option to review and sign off on multiple Progress Notes at one time.
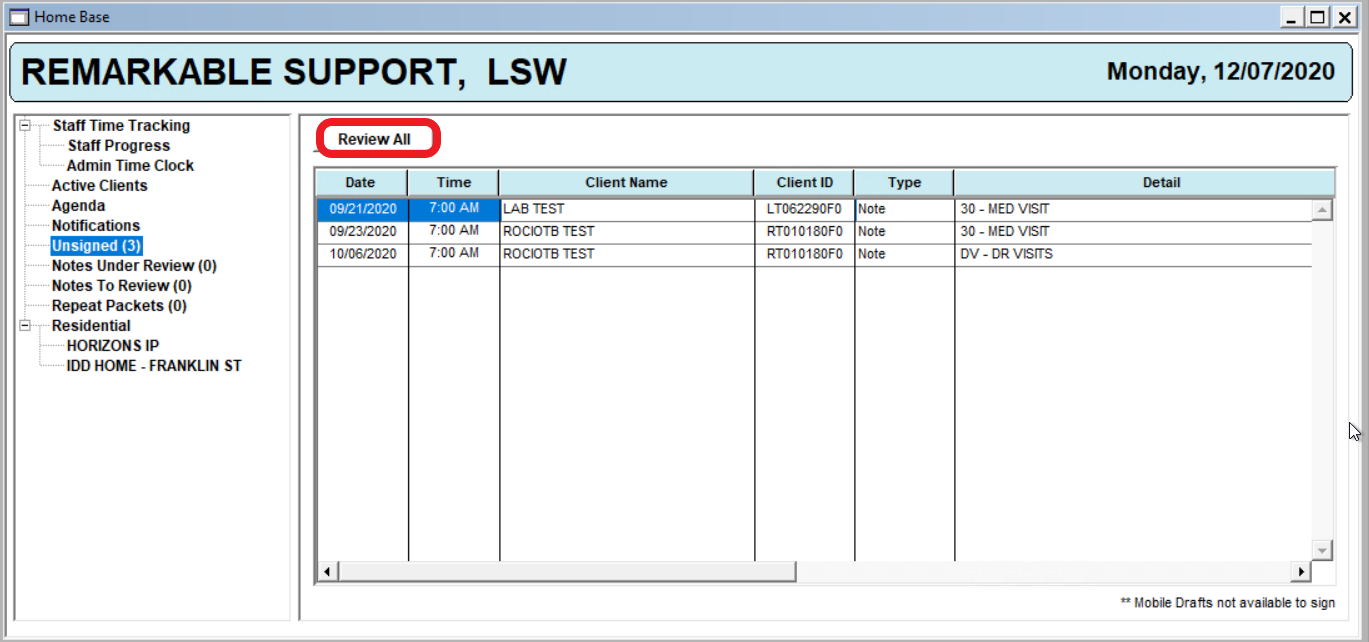
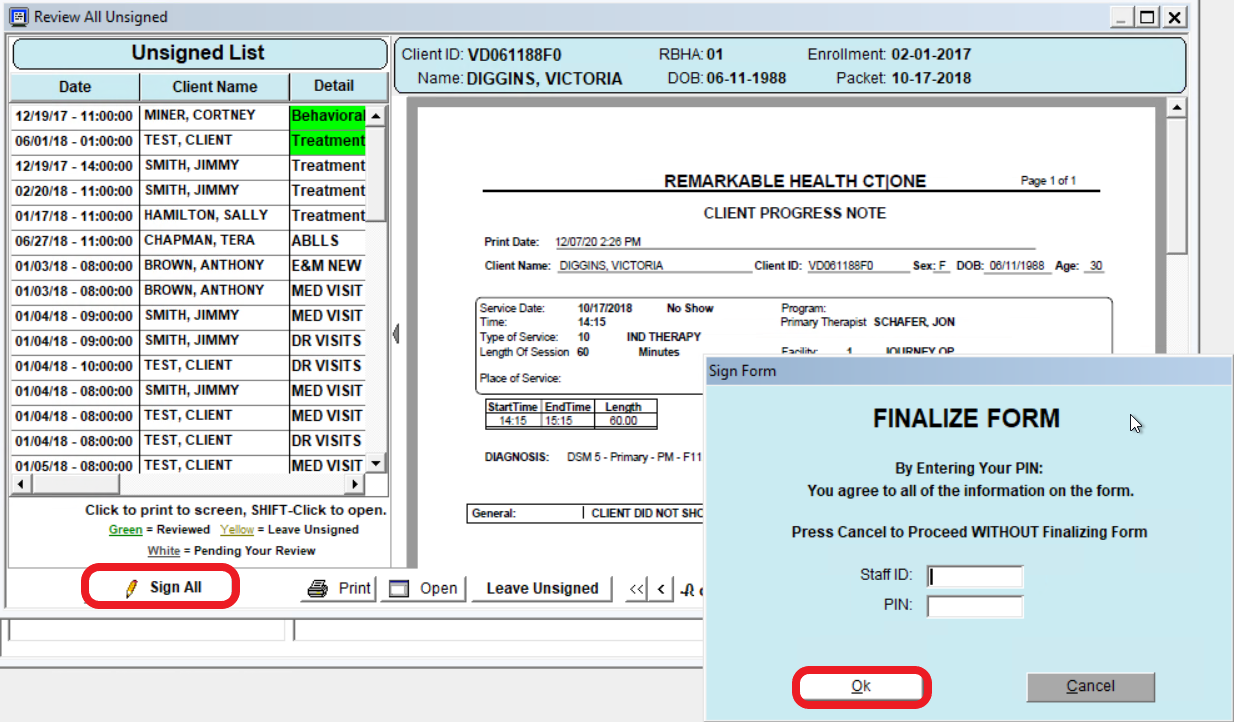
To review and sign multiple notes, click on the Review All option. This will take staff to their Review All Unsigned window.
Staff will need to click on at least one item (Form or Progress Note) on their Unsigned List to review it. This will open the item for Staff to view.
If the reviewed item turns Green in the Detail Column, it can be signed (e.g. meets all required criteria). If not, it will turn Yellow. A message will appear that states what required item/s the Form or Progress Note is missing.
Once a Progress Note or Form has been reviewed and turns Green, click Sign All.
Staff will be prompted to enter their Staff ID and PIN then click OK to finalize. This will sign all the Forms and Notes in the list in one action. Any of the Notes or Forms that cannot be signed will turn Yellow. The staff will need to complete the missing required items of the Form or Progress Note to sign off.
Click Close when finished.
Notes Under Review
The Notes Under Review tab will show the Progress Notes the Staff has entered that are either Pending Review or that have been Rejected in the Note Review process.
From this window, users can double click on the Progress Note in their list to view it.
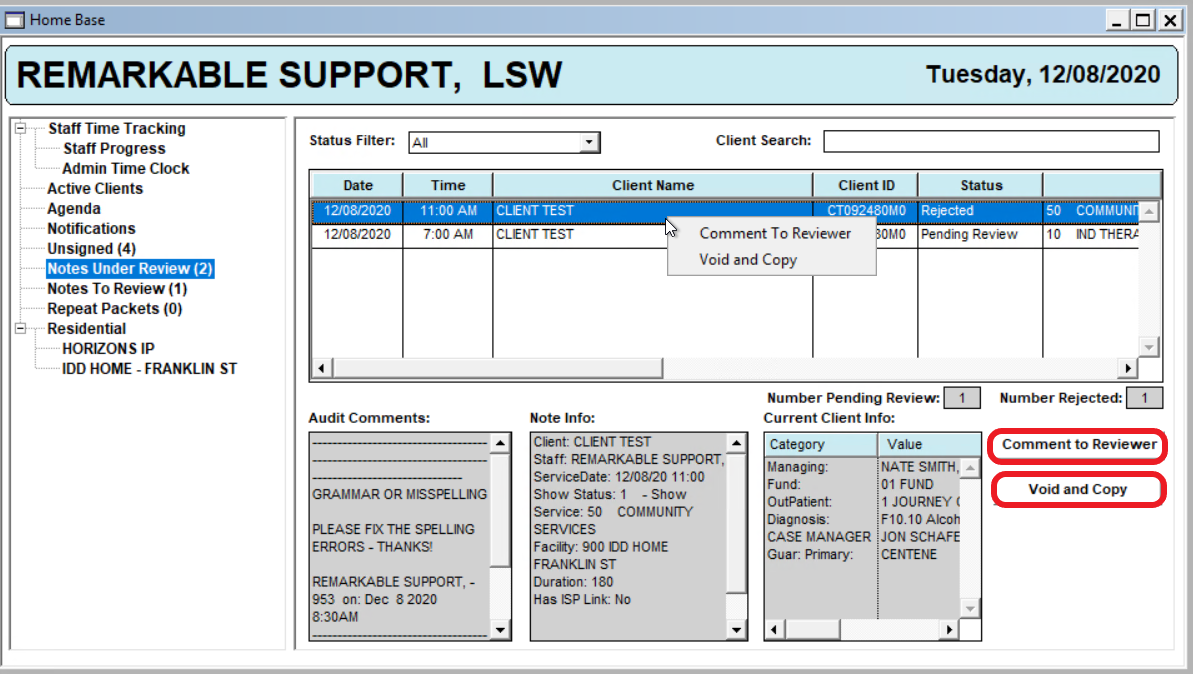
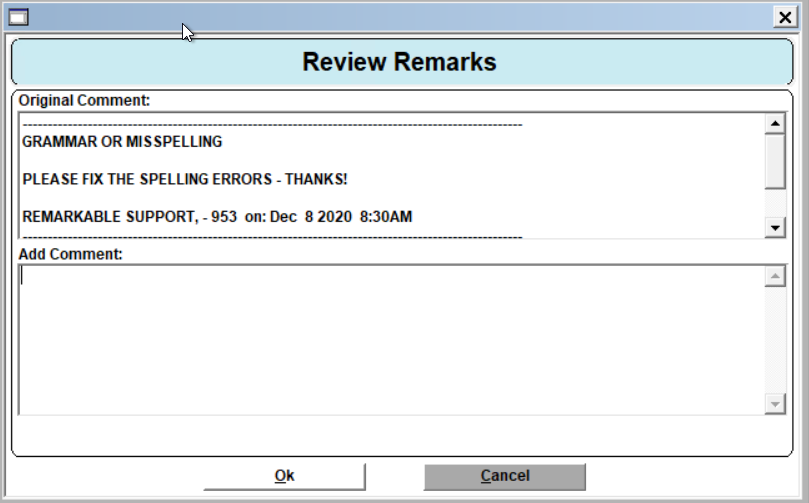
To comment on a Progress Note, click on Comment to Reviewer button on the Notes Under Review window to add a Review Comment in the Add Comment text box and click Ok. This will send the Note back to the Note Reviewer to see and change the note status to Pending Review.
Note: Users can also right click on the Progress Note in the list to see the Comment to Reviewer option.
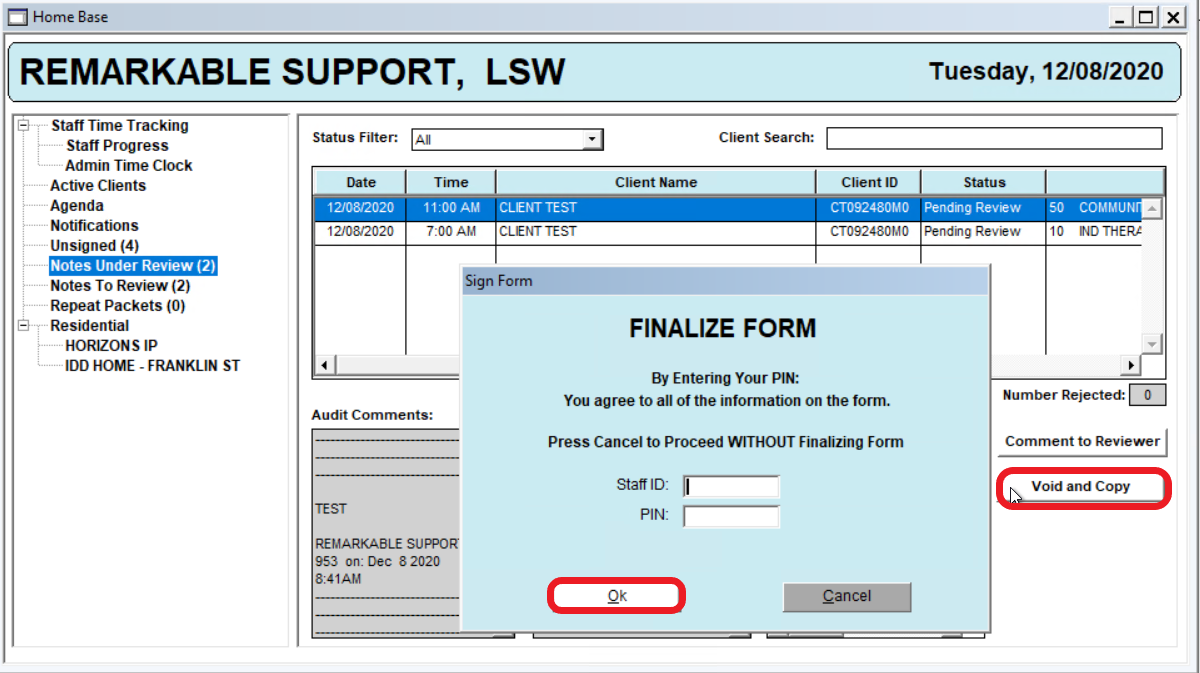
To Void and Copy a Progress Note, select the note from the list and click on the Void and Copy button. On the Sign Form window, enter your Staff ID and PIN and click OK.
A new copy of the Progress Note will open for Staff to complete/edit and sign off on.
Note: Users can also right click on the Progress Note in the list to see the Void and Copy option.
Notes to Review
This tab shows the list of Progress Notes that the Note Reviewer must Approve, Reject, or Forward as appropriate. If the User is not a Note Reviewer, they will not have this tab.
Users can click on a Progress Note to see information populate about the note, including any Comments, the Note Info. and the Current Client Info.
Users can highlight numerous notes on their list of Progress Notes and click Open Multiple Notes to open all the notes for review.
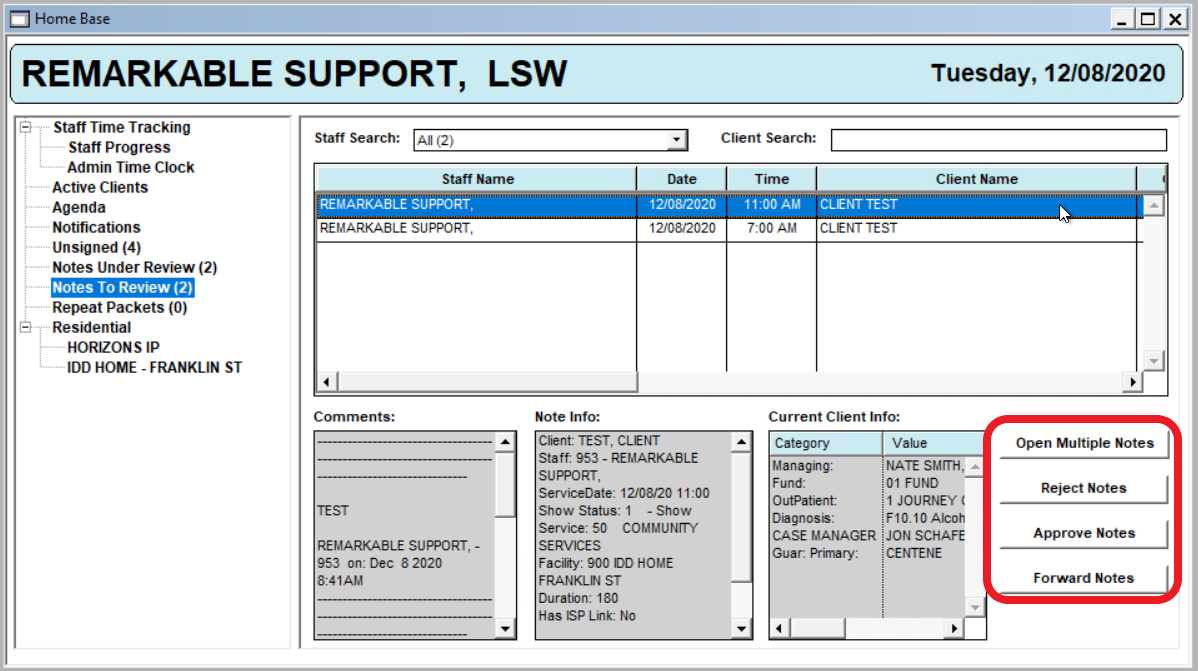
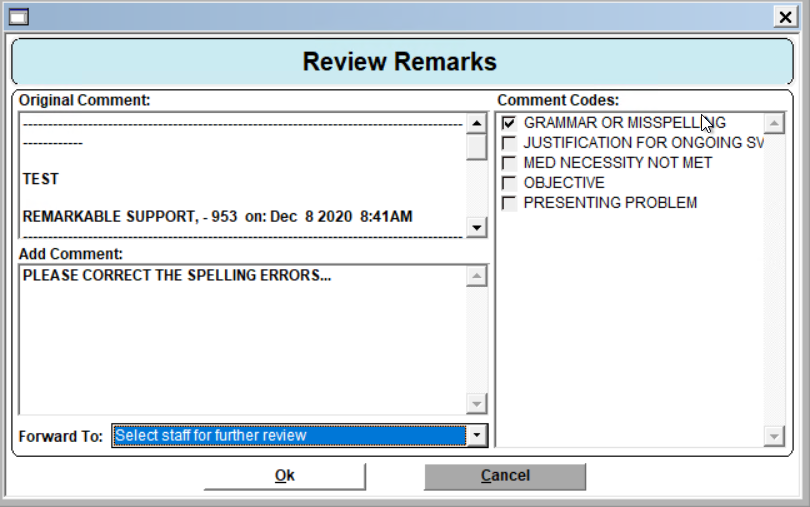
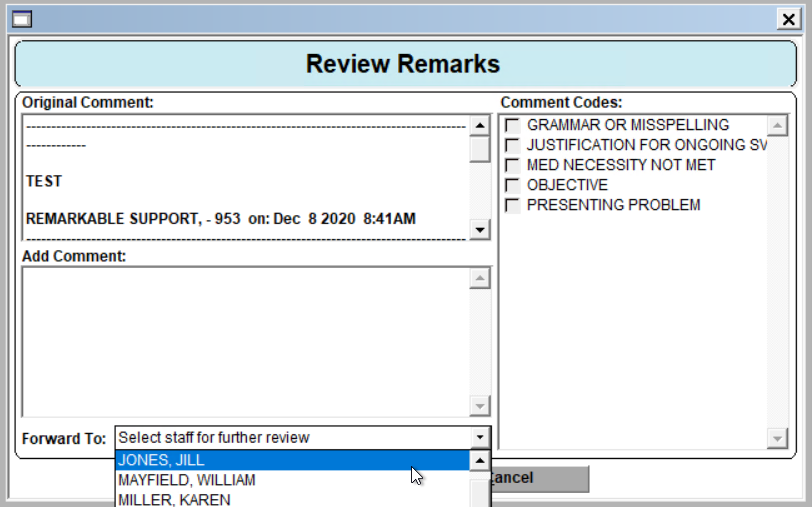
To reject a Progress Note, click on the note in the list and click on the Reject Notes button in the Notes to Review window. In the Review Remarks window, select a Comment Code and document why the note is rejected/what needs to be fixed in the Add Comment field, then click Ok.
To approve a Progress Note, click on the note in the list and click on the Approve Notes button in the Notes to Review window.
On the Sign Form window, enter your Staff ID and PIN and click OK.
Note: User will need to enter their Staff ID and PIN for each Progress Note that is Approved unless the Flag: ReviewNoteAllowOneSign is set to True. If set to True, the Note Reviewer will only need to enter their Staff ID and PIN for the first Progress Note that is Approved during that session. Any subsequent approvals during that session will not require the ID and PIN.
To forward a Progress note to another user to review, click on the note in the list and click on the Forward Notes button in the Notes to Review window.
Select the user to forward the note to from the Forward To dropdown, add comments, if applicable, and click Ok.
This will send the Progress Note to the selected user’s Notes to Review tab.
Repeat Packets
The Repeat Packets tab shows a list of the Packets/Forms that are due. From here, the Staff can open and complete the Forms for the client, which will then save into the Client’s Chart.
Double click on a packet from the list to complete the required packet.
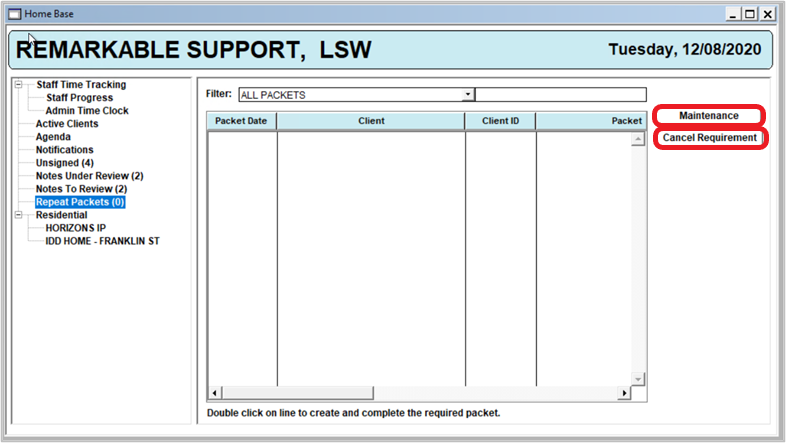
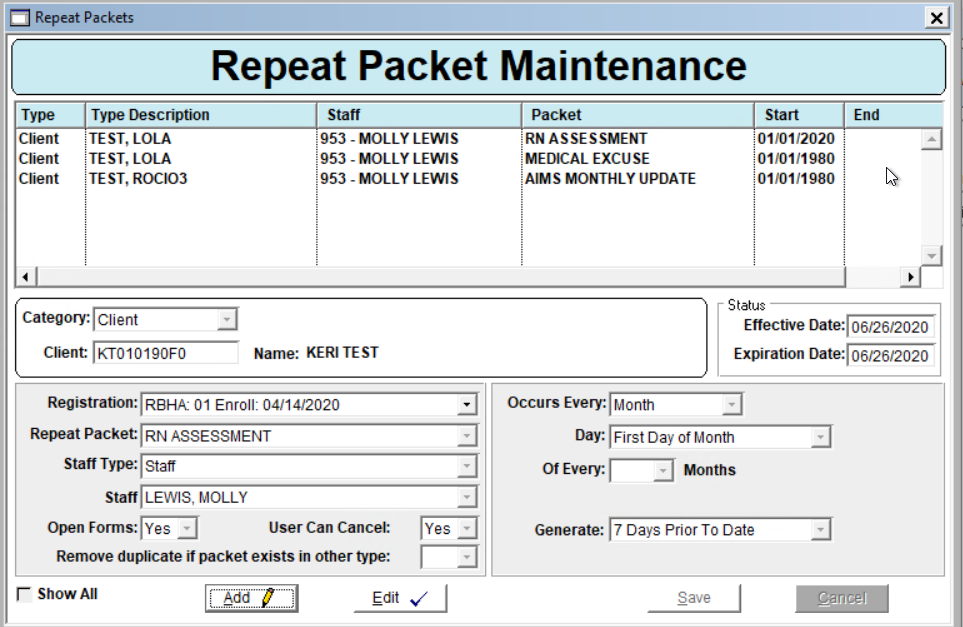
Users can click on the Maintenance button to be taken to the Repeat Packet Maintenance window.
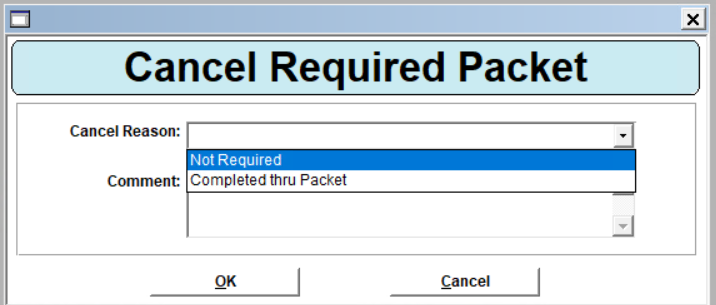
To cancel a packet, click on the Cancel Requirement button.
In the Cancel Required Packet window, select a Cancel Reason, enter any comments in the Comment field, and click Ok.
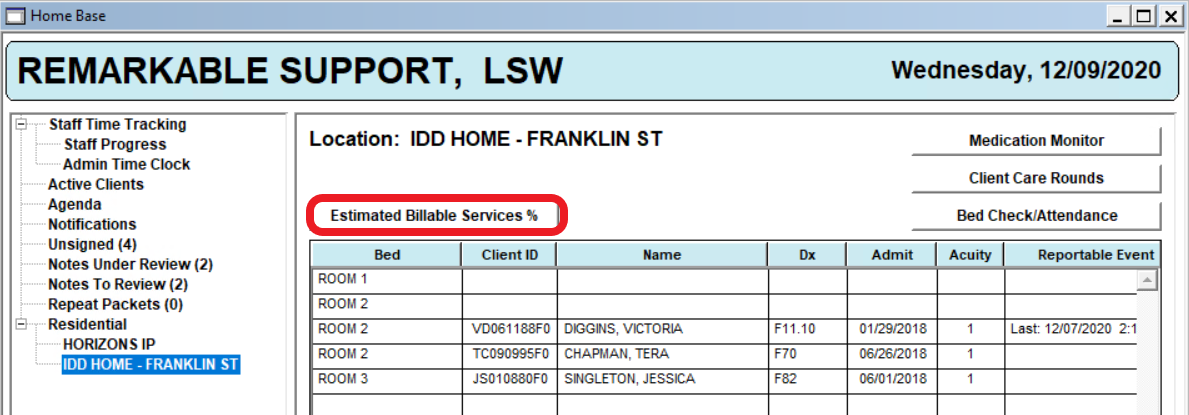
Residential
The Residential Window displays the Sites that have been configured as In-Patient or as a Residential site (Core>Sites>Inpatient Facility drop down).
Selecting a Site from the Residential section will enable the user to see the Clients assigned to the beds designated for the Site and other client information.
Note: Client bed assignments are completed through the Client’s Client Status Update form. Bed creation and set up is done in the Bed Maintenance window.
Right click on a client to get a list of options, including Add Progress Note, Add Client Status Form, Add Client Program, Add Performance Tracking, etc.
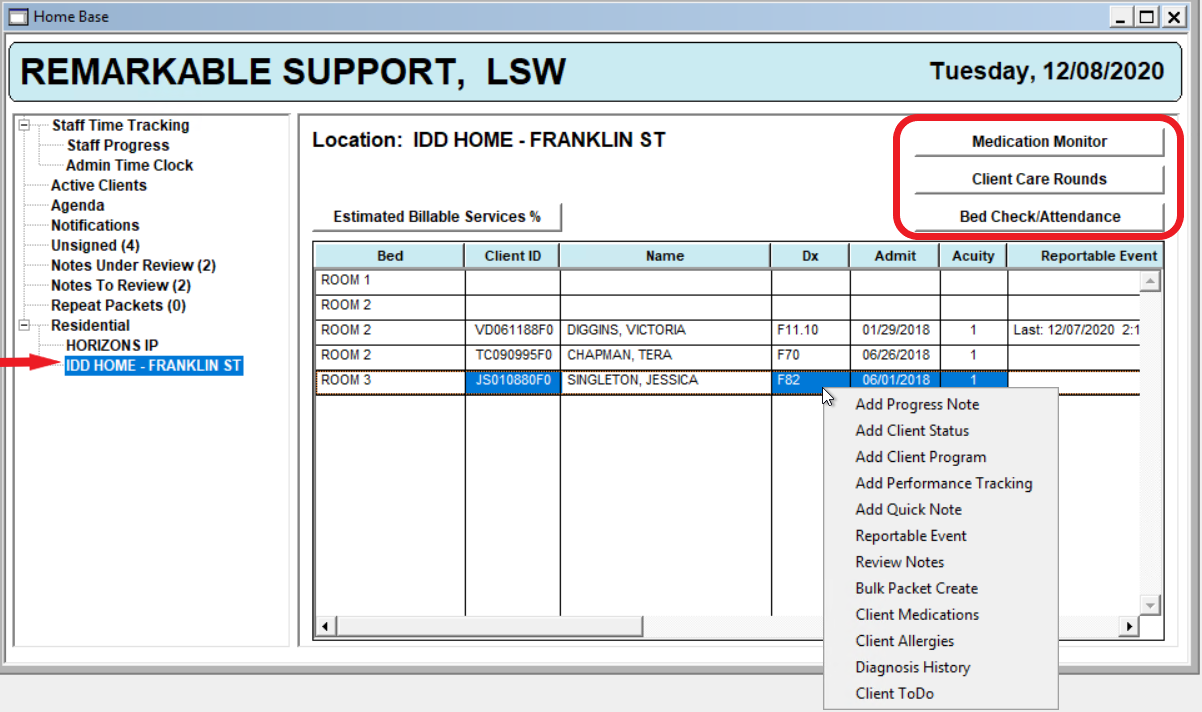
You can also access the Medication Monitor, Client Care Rounds, and Bed Check/Attendance from this screen.
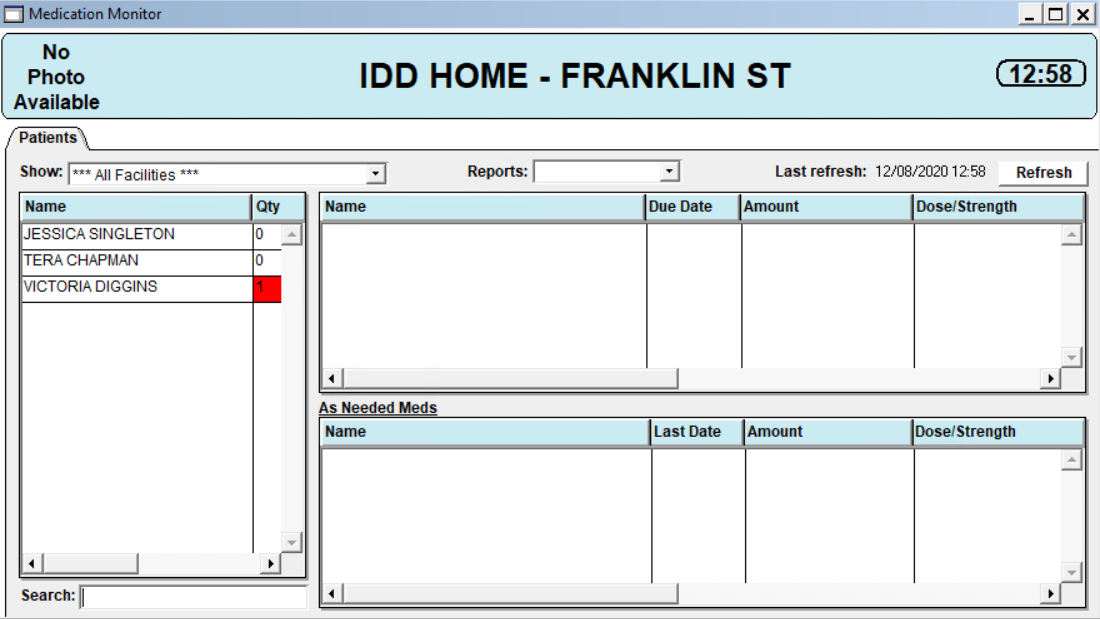
Medication Monitor: Clicking on the Medication Monitor button at the top right of the Residential Site window will take you to the Medication Monitor window.
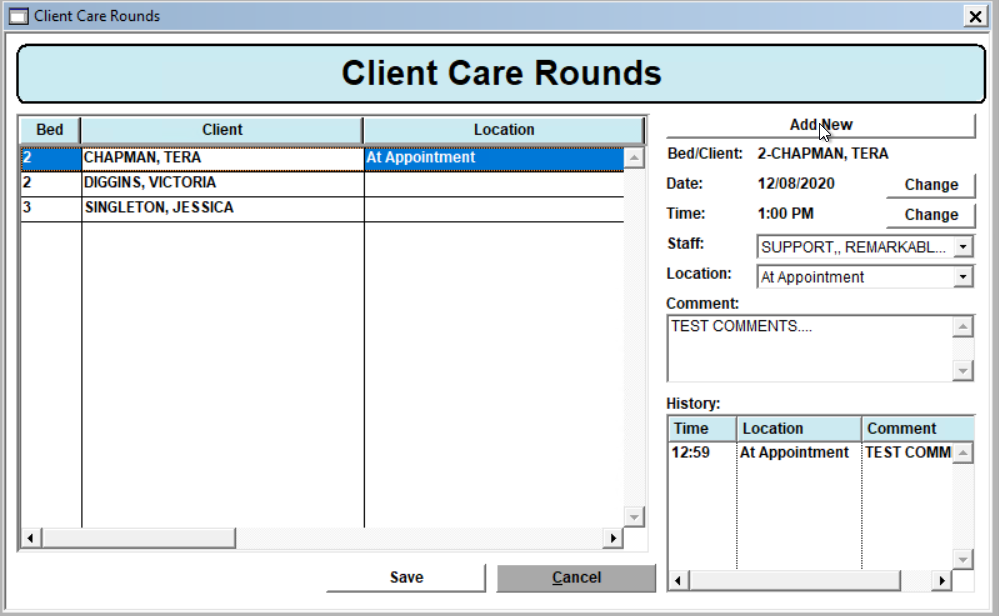
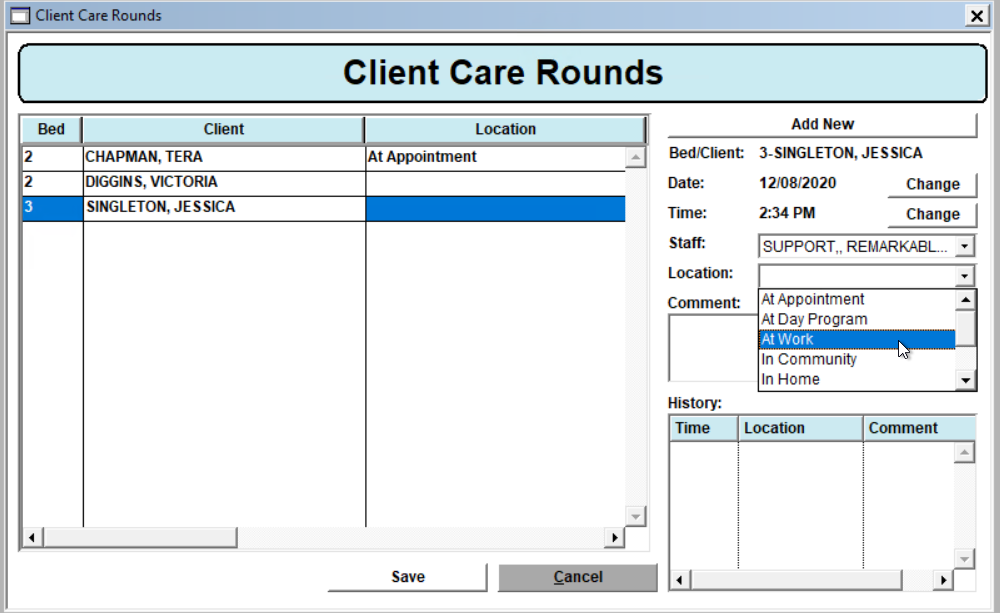
Client Care Rounds: Clicking on the Client Care Rounds button will take you to a window to indicate the date of the Client Care Round.
After entering the date for the entry and clicking Ok, you will be taken to the Client Care Rounds window where you can select a Client and document where the client was during the care round.
Note: Client Care Round Locations are configured in the Home Base Maintenance window.
Bed Check/Attendance: Clicking on the Bed Check/Attendance button will take you to a window to indicate the date of the attendance entry.
After entering the date for the entry and clicking Ok, you will be taken to the Bed Check/Daily Attendance window where you can enter the attendance for the clients at the Site.
Note: Attendance must be entered for all listed Clients at the Site to save the attendance entry.
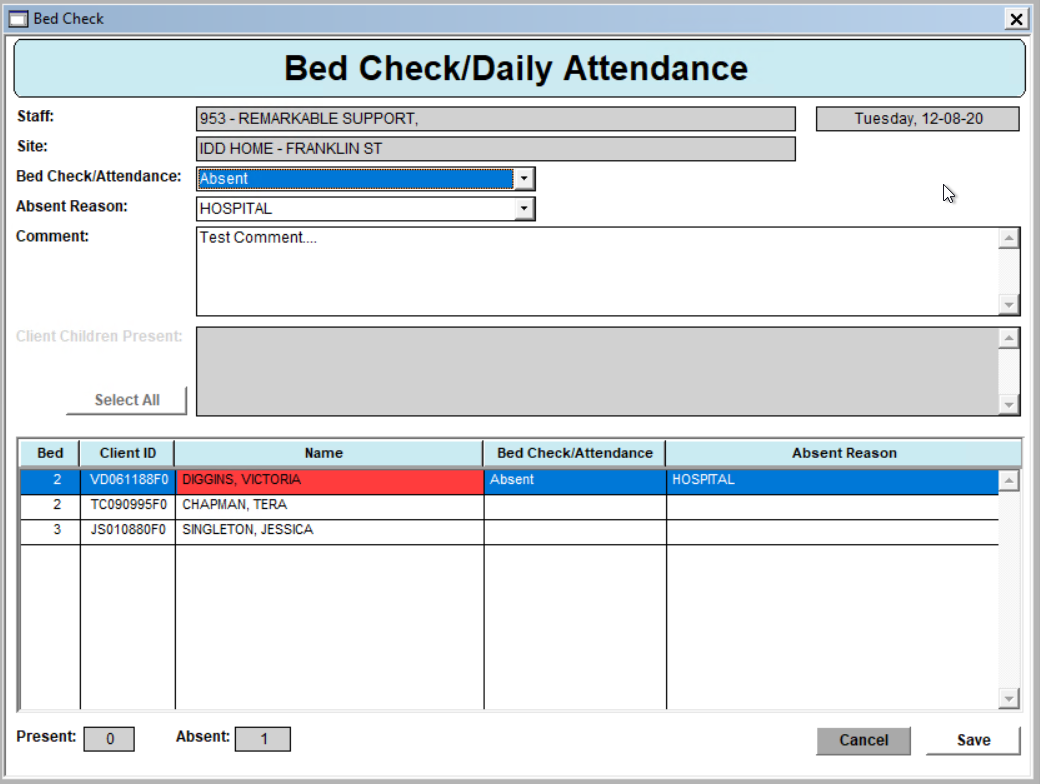
Note: Attendance Absent Reasons are configured in the AutoBill Modifier Maintenance window.
Estimated Billable Services %
The 92.5% calculator – Estimated Billable Services % feature allows you to calculate, at any given point in the month, the number of billable hours your agency is at for applicable services.
For more information on this feature and how to complete configuration, please reference the 92.5% Calculator User Guide in the Knowledge Center in CT|One.
Home Base Configuration
Home Base Right Click Menu Configuration
Configuration for the Home Base Right Click Menu must be completed to associate the correct Packets to the applicable Right Click Menu options.
To access the Home Base Maintenance window, go to the Maintenance option in the Menu Bar and select Home Base Maintenance.
The Right Click Menu Options configuration is completed on the Home Base Maintenance Window – Right Click Menu Options tab.
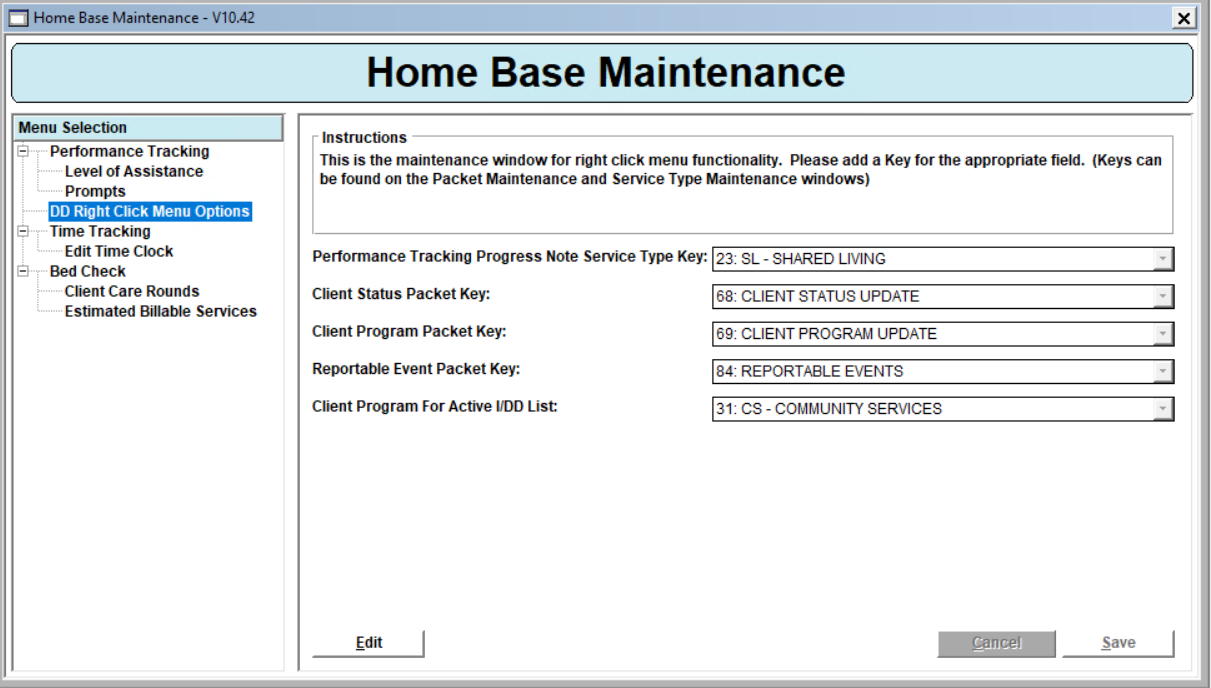
Performance Tracking Progress Note Service Type Key dropdown: The selected Service Type in this dropdown will auto populate in the Performance Tracking Progress Note, when the Progress Note is created via the Right Click Menu option - Add Performance Tracking.
Client Status Packet Key: The selected Packet in this dropdown indicates which Client Status form packet should push to the Client Chart when adding a Client Status form to the client chart via the Right Click Menu option - Add Client Status.
Client Program Packet Key: The selected Packet in this dropdown indicates which Client Program Update form packet should push to the Client Chart when adding a Client Program Update form to the client chart via the Right Click Menu option - Add Client Program.
Reportable Event: The selected Packet in this dropdown indicates which Reportable Event form packet should push to the Client Chart when adding a Reportable Event form to the client chart via the Right Click Menu option - Reportable Event.
Note: Each instance the Reportable Event packet is added to the client chart, the Last Date will update in the Reportable Events column of the Active Clients tab to reflect the date of the last (most recent) Reportable Event.
Client Program for Active I/DD List - The Program selected in this dropdown adds the Program as another filter option to the Active Clients list on the Home Base window. For example, if a Program named Community Supports is selected, staff can filter their Active Clients list by this Program.
Note: Using the Program as a filter pulls in all clients enrolled in the Program, regardless of if the staff are added to the client's - client contact list.
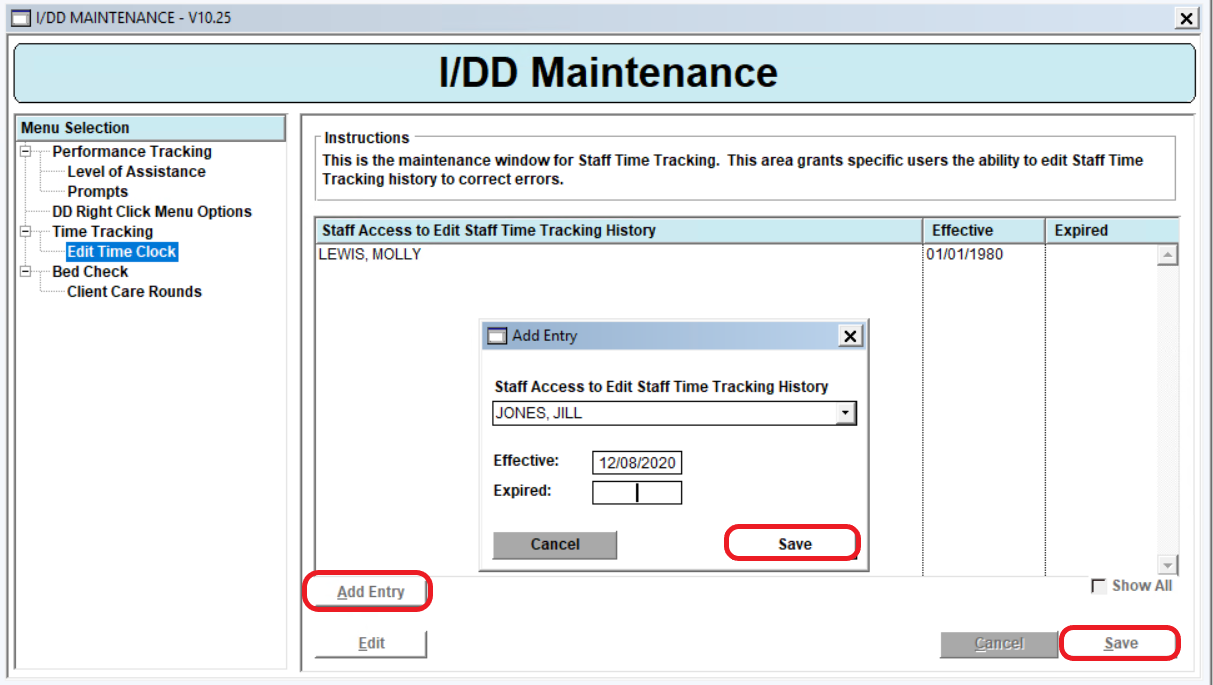
Edit Time Clock Configuration
Configuration for the Admin Time Clock Tab must be completed to indicate the Staff who can Edit staff Time Tracking entries. This configuration is done in the Home Base Maintenance window.
To access the Home Base Maintenance window, go to the Maintenance option in the Menu Bar and select Home Base Maintenance.
To add a Staff who can edit Time Tracking entries, go to the Time Tracking – Edit Time Clock tab and click Add Entry.
In the Add Entry window, select the staff from the Staff Access to Edit Staff Time Tracking History dropdown.
Enter an Effective date and click Save.
Click Save on the Edit Time Clock window.
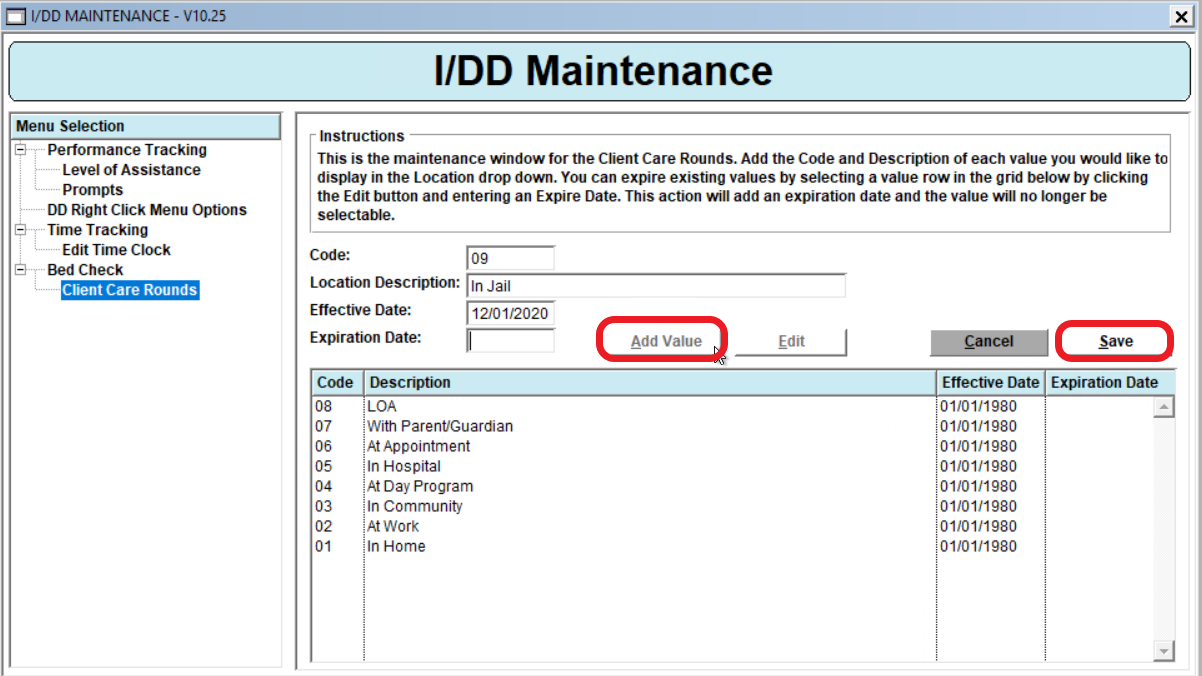
Residential Client Care Rounds Locations Configuration
Configuration must be completed to indicate the Locations users can select in the Location dropdown when entering a Client Care Round entry on the Home Base Residential tab.
To access the Home Base Maintenance window, go to the Maintenance option in the Menu Bar and select Home Base Maintenance.
On the Home Base Maintenance window, go to the Client Care Rounds tab.
To add a location, click Add Value.
Enter a Code and enter the name of the location in the Location Description field.
Enter an Effective Date and click Save.
17
Confidential and proprietary property of Remarkable Health, LLC. Not for distribution, except to authorized persons.