
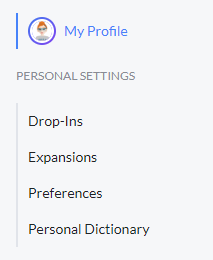
Personal Settings
Personal settings allow you to customize Bells to your personal preference. There are four personal settings sections:
- Drop-Ins
- Expansions
- Preferences
- Personal Dictionary
Additionally, you can access your My Profile from the Settings section.
Configuring Drop-Ins
Configuring Drop-Ins Drop Ins- Previously named Text Snippets allow you to config...
Configuring Drop-Ins
Drop-Ins (previously named Text Snippets) allow you to configure a block of formatted text and then quickly insert that block of text into a Scribble or Progress Note.
Examples:
- Census Note
- Covid Response
- SMART Goals
- Suicide Hotline info
- Common contacts used by your organization
More examples are provided at the end of this topic.
Key features:
- Accessed via the / command or when the ~ is typed in a Scribble or progress note
- Can include formatting
- Can be multiple lines
- Administrators can set up Organization Level Drop-Ins
- Can be used in the Bells Mobile Application (even without connectivity!)
Differences between Expansions and Drop-Ins
- Expansions: Automatic, can be enabled/disabled
- Drop-Ins: Access via the / command or via typing the ~, can be multiple lines, can include formatting
Viewing a Drop-In
-
Click the Settings Gear in the left Navbar:

-
Click Drop-Ins in the left navbar:

- The display shows all of the Drop-Ins you have configured.
-
You can search for a specific Drop-in using the Search bar above the list of Drop-Ins

- The list of Drop-Ins is also sortable by the name, by clicking on the Drop-In column header in the list.
-
Change the Results per page number if you wish to see a larger list of Drop-Ins:

Adding a Drop-In
To add a Drop-in,
-
From your Drop-In list, click + New:

- Non-Admins will have the ability to
- Create user-level drop-ins
- Import drop-ins to their personal drop-in set
- Admins will have the ability to
- Create organization-level drop-ins
- Create user-level drop-ins
- Import drop-ins to their personal drop-in set
-
Type a name for your Drop-In in the Drop-In field:

-
Type your Drop-In content in the Full Text Field:
 Note that your Drop-In content can be as short or as long as you want (up to 15,000 characters). It can include formatted text. Spelling and Grammar Correction is also available in your Drop-In. Any line breaks or spaces added within the drop-in or at the end will be included when used throughout the Bells applications.
For more information, see Text Formatting and Spelling and Grammar. - Tags can be configured for the Drop-In
- Tags making finding your drop-ins faster when you go to use them in the Scribble or progress note.

-
Click Save Drop-In to save or click Cancel to discard your changes:

That's it! Your new Drop-In looks like this:

Drop-Ins can also be created while writing Scribbles or Progress Notes. Simply highlight the text you want to be a Drop-in and a pop up menu will appear. Select Make drop-in to add it to your drop-ins.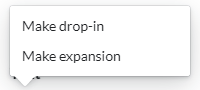
When drop-ins are created from a Custom Note Section type question or a Text section (core progress note section), an additional option is available to only allow the drop-in to be used for the selected question/section.

When toggled on, the created drop-in will only be available for that question/section when available in progress notes.
When toggled off, the created drop-in is available anywhere drop-ins can be used.
Drop-In Tags
When you use drop-ins, organization will make finding your drop-ins easier and more efficient. Here's how:
- Add the Tag to your drop-in
- Use the Tag when adding drop-ins to your scribbles or progress notes.
Add Tags to your Drop-Ins at the bottom of the editor

Tags show in the Drop-In display

Use your Drop-In Tags to find your Drop-Ins

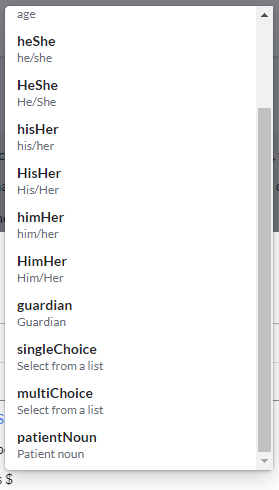
Option Placeholders
Within your drop-ins, you can set up an Option placeholder. Option placeholders allow you to make selections (single choice or multiple choice) within the drop-in to then be used in scribbles, templates, or progress notes. These drop-ins can additionally be used in the mobile application.
To add an option placeholder when configuring your drop-in, use the $ to add a placeholder. In the list of options, you will find options for singleChoice and multiChoice.
When selected, you will be presented with the display to configure the options to select from in the drop-in.
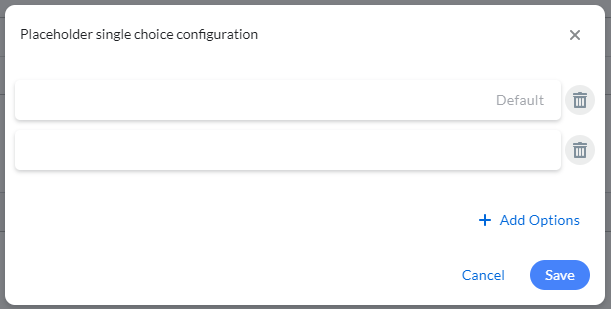
When setting up the placeholder, you will enter option values. These will be the options presented when used in the application. The first field will by default be set to Default. That means the value in that option field will be the defaulted option in the drop-in when used.
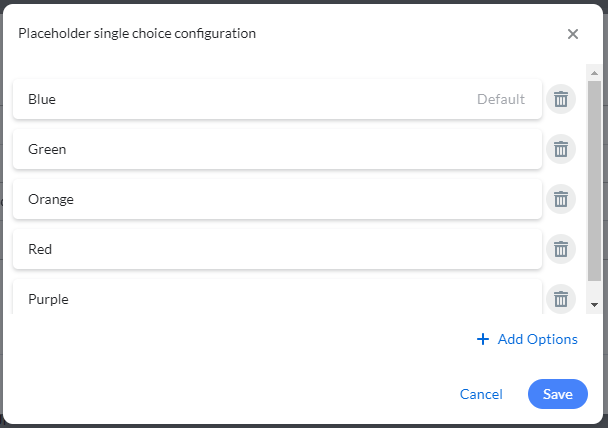

When used in the application, clicking the blue text in the drop-in will present you with the options to select. If set up for single choice, only one value can be chosen. If set up for multiple choice, more than one value can be chosen. 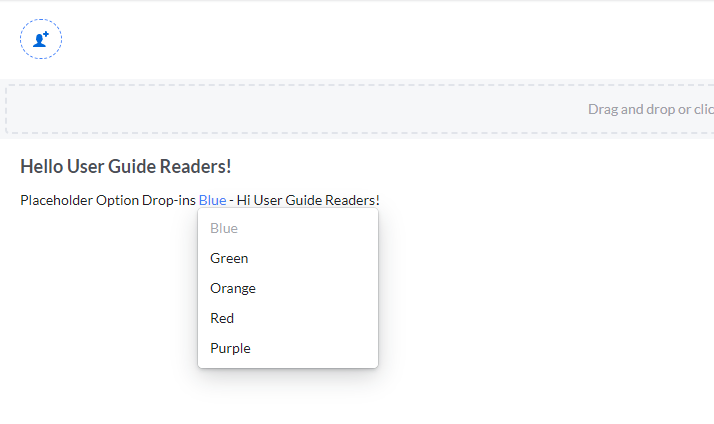
Drop-In Import Library

Clicking the " Import from Library" button under the + New button will open a new display to choose drop-ins to import and use for Scribbles or Progress Notes in Bells.
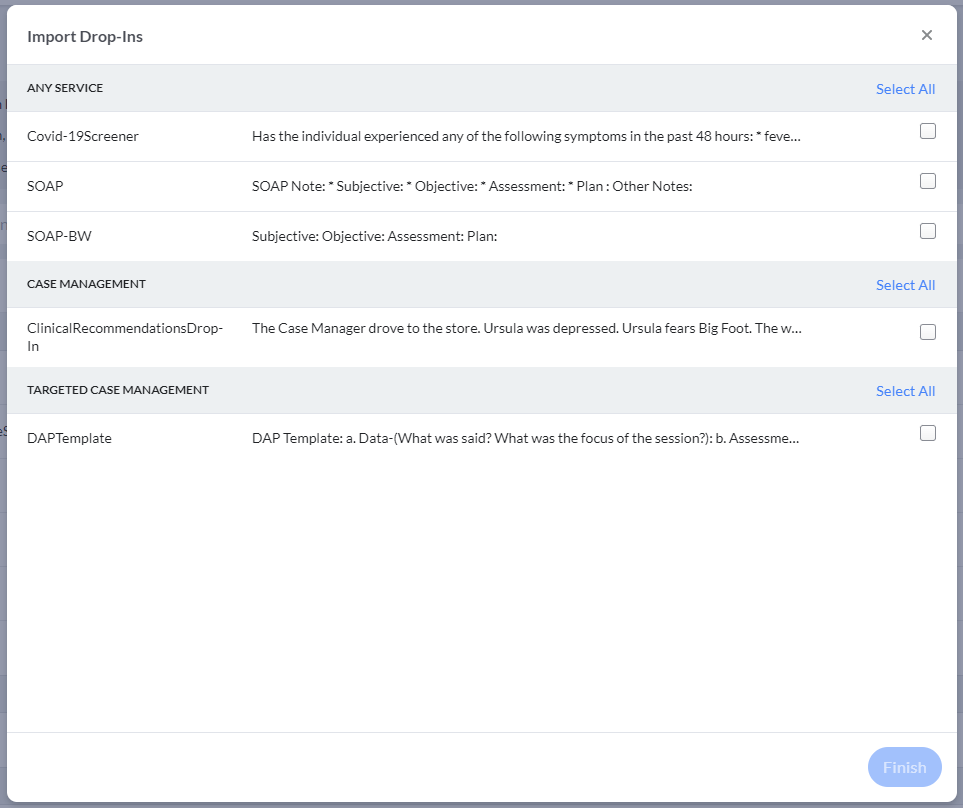
In the Import Drop-Ins display you see available drop-ins grouped by categories (headers in gray), followed by the drop-ins for each of those categories. You can select all the drop-ins in a category or select any number of drop-ins to import across multiple categories. The categories are examples of the types of services the drop-ins might be associated with and the "Any Service" category can be associated across all the services.
Once a drop-in is imported, it will show with the other drop-ins for your organization and can be further edited for use in progress notes or Scribbles just like any other drop-in. Imported Drop-Ins import as a user-level drop-in. If you're an administrator, you can convert the imported user-level drop-in to an organization-level drop-in.
Editing a Drop-In
When you find you need to tweak the wording in a Drop-In, making changes is very simple.
-
From your Drop-Ins list, click on the drop-in in the list or click the pencil icon on the right side of the Drop-In in the list:

- Edit the Drop-In name.
- Edit the Full Text of the Drop-In.
-
Click Save Drop-In to save your changes or click Cancel to discard your changes.

Organization Level Drop-Ins
When an administrator creates an Organization Level Drop-In, they can set the drop-in to allow user override or not. Setting the Drop-In to allow user override allows users to have a user-level drop-in with the same name as the organization-level drop-in. If the drop-in is not set to allow override, then only the organization-level drop-in with that name will be used.
Organization Level Drop-Ins are usable by all users across the organization.

Administrator Review
Bells Administrators, Supervisors and Quality Assurance roles can review user drop-ins to have oversight that they're appropriate for the organization and allow drop-ins to be copied to be used by the whole organization. Bells administrators will have a toggle at the top of the display to switch between Manage and Review. The Manage view is the original drop-in display, the Review view shows the user level drop-ins for the organization. Administrators can also export the drop-ins that show in the display.


Drop-In Sharing
Personal Drop-Ins can be shared with other Bells users.
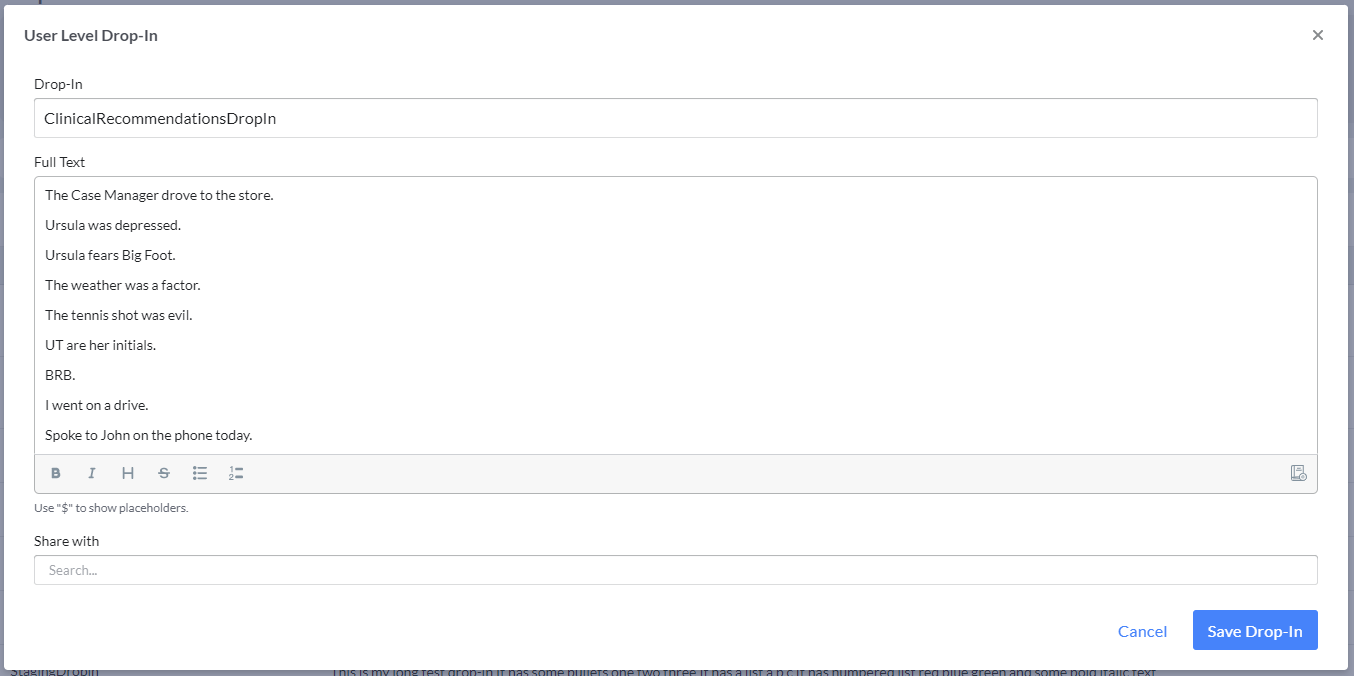
When the drop-in is clicked in the list, the drop-in editor will display. There is a new field at the bottom of the editor for "Share with".
You can search for the Bells users to share the drop-in with and then save the drop-in. The drop-in will be shared with the selected users.
When a drop-in is shared, a notification will display at the top right of the Bells application.

Clicking the notification bell icon will open your list of notifications. Notifications will show for shared Scribbles or shared Drop-Ins.
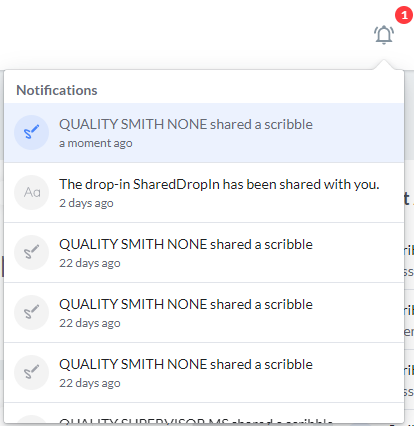
The drop-in display is grouped by categories for Personal-, Shared- with and Organization-level drop-ins.

Shared Drop-Ins can also be utilized on the mobile application.
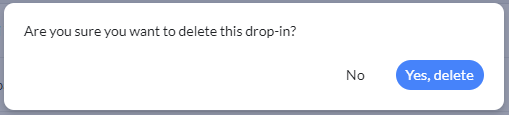
Deleting a Drop-In
When you no longer need a Drop-In and want to remove it,
-
From your Drop-Ins list, click the trash can icon on the right side of the Drop-In in the list:

-
At the prompt, click Yes to delete your Drop-In or No to keep your Drop-In.
Additional Drop-In Examples
| This session was provided by Telephone due to the COVID-19 crisis which was agreed to by this provider and client due to CDC/KDHE/KDAD's recommendations. Services may continue to be provided this way until the CDC/KDHE/KDAD's rescinds its recommendation |
| This session was provided by Televideo due to the COVID-19 crisis which was agreed to by this provider and client due to CDC/KDHE/KDAD's recommendations. Services may continue to be provided this way until the CDC/KDHE/KDAD's rescinds its recommendation |
|
|
CT continues to struggle with managing symptoms CM observed CT's behaviors/ interactions in a school setting CM provided active listening and used open-ended questioning while communicating with the client CM modeled appropriate behaviors/ interactions CM provided support/ guidance |
|
|
|
| Service was provided via Zoom due to current COVID-19 risk and agency precautions to maintain staff and client safety. |
| Services may continue to be delivered in this way until CDC/KDHE/local public health officials rescind the public health emergency. |
| Ongoing support is necessary at this time to build upon current success toward further recovery goals. |
| Consumer presents with ... as evidenced by ... which has impacted functionality over the last two weeks in .... |
| Factors that may have precipitated the current problem include .... |
| Predisposing factors include .... |
| The problem persists despite efforts to remedy the situation including ... and may be maintained by ..... |
| Strengths and protective factors include ... |
| Consumer goals are stated as ... |
| A safety plan was developed and reviewed with consumer and referrals were given for crisis supports. |
| Clinician utilized intake documents to create an initial treatment plan to guide the consumer's orientation to case management services. The assigned case manager will make contact to complete a strengths assessment and pursue work toward recovery goals. |
| Staff will remain available to provide support to the Client while he continues to works on his goal of identifying and using his coping skills to manage his MH symptoms while maintaining his ADL's. |
| The client was present at the crisis group home during this time with an acceptable appearance. The client was alert, positive, and behavior was cooperative with an illogical thought process. |
| Staff was available to provide support and assistance to the Client while he works towards his goals of identifying and using coping skills to manage MH symptoms. Staff completed regular wellness checks on the client to ensure safety. |
| Provider reviewed the client rights, fee agreement, and informed consent. Ct gave verbal consent for treatment and reported understanding all consents. Ct completed the WHODAS, AUDIT and DAST questionnaires whose baseline measures were reviewed. CT participated in the assessment with diagnostic evaluation (see assessment/diagnosis documents). |
|
The following services are recommended as part of the initial plan:
|
| The nature, extent and purpose of the recommended services outlined in the mutually agreed upon initial plan, as well as the risks of not following were reviewed. A verbal understanding was demonstrated and the safety plan was reviewed and agreed upon with resources given. |
Configuring Text Expansions
Configuring Text Expansions Text Expansions are a way to automatically expand a f...
Configuring Expansions
Expansions are a way to automatically expand a few letters into longer text. Some examples:
- IPO = In the presence of
- BP = biological parent
- RH = Remarkable Health
- FH = Foster Home
More examples follow at the end of this topic.
Key features:
- Automatic
- Can be enabled/disabled
- Administrators can set up Organization-Level Expansions
- Can be used in the Bells Mobile Application (even without connectivity!)
Differences between Expansions and Drop-Ins
- Expansions: Automatic, can be enabled/disabled
- Drop-Ins: Access via the / command or via typing the ~, can be multiple lines, can include formatting
Viewing your Expansions
-
Click the Settings Gear in the left Navbar:

-
Click Expansions in the left navbar:

- You now see a list all of the Expansions you have configured:

Adding an Expansion
To add an Expansion.
- From your Expansions list, click

- Non-Admins will have the ability to
- Create user-level expansions
- Import expansions to their personal expansion set
- Admins will have the ability to
- Create organization-level expansions
- Create user-level expansions
- Import expansions to their personal expansion set
-
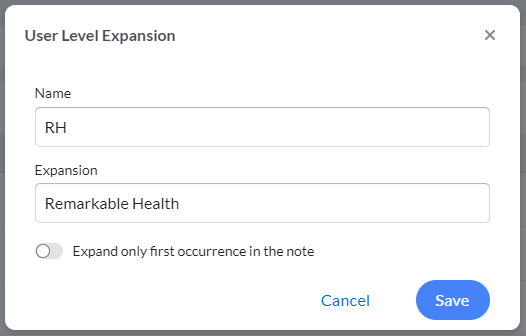
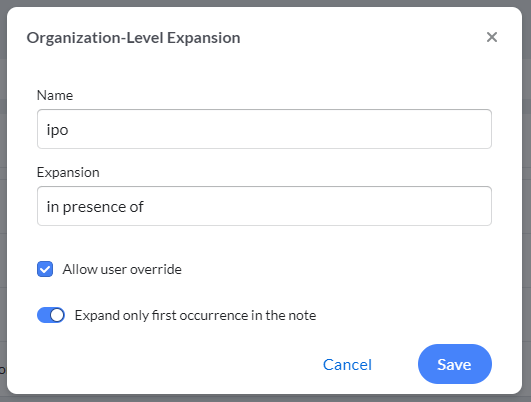
Type a name for your Expansion in the Name field:

-
Type your Expansion in the Expansion Field:

- If you'd like the expansion to only expand on the first occurrence in the note, toggle the setting on

-
Click Save to save or click Cancel to discard your changes:

A couple of notes about your Expansions
- The name must be unique
- The name is limited to 10 characters
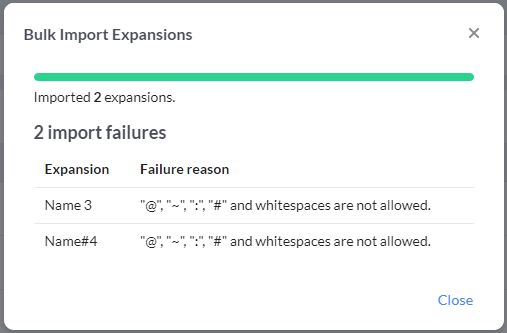
- The name cannot include a space or any of these symbols: @ ~ : #
- The name is not case-sensitive
- Try to avoid names that are also a word on their own so that you don't have expansions popping in unexpectedly.
- Expansion text cannot exceed 300 characters.
- Expansions can be configured to expand each time or only once in the note.
That's it! Your new Expansion looks like this:
 Expansions can also be created while writing Scribbles or Progress Notes by highlighting text you wish to configure as an expansion. A pop up menu will occur. Select Make expansion to add it to your expansions.
Expansion Import Library

Clicking the "Import from Library" button under the + Expansion button will open a new display to choose expansions to import and use for Scribbles or Progress Notes in Bells.
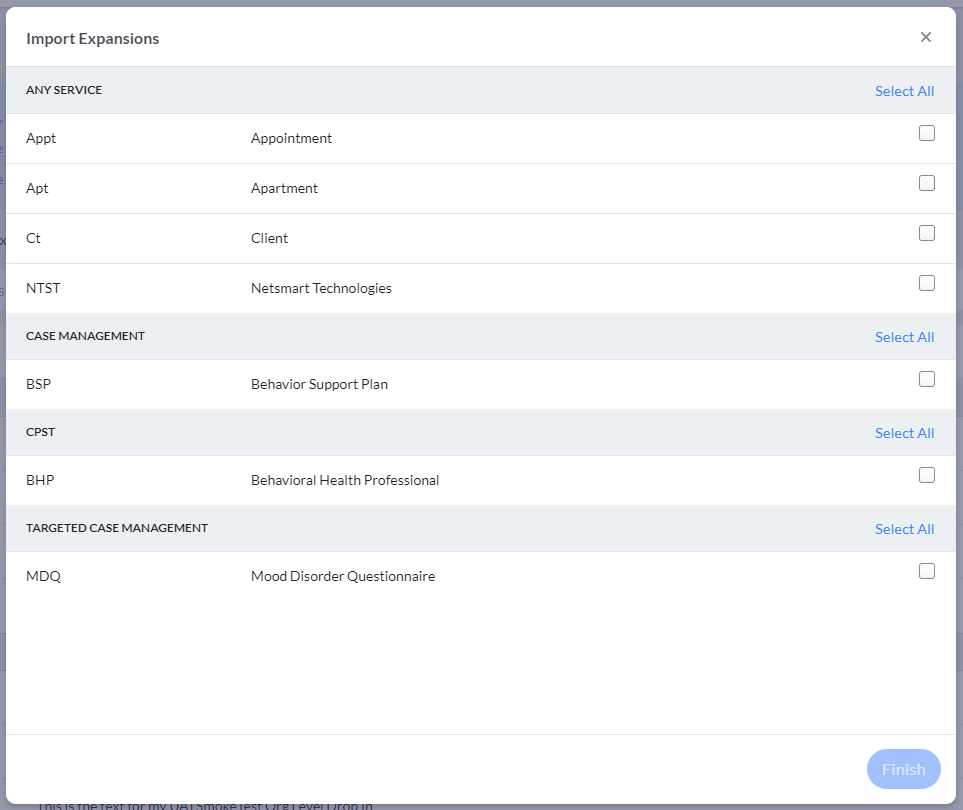
In the new display - Import Expansions you will see available expansions grouped by categories (headers in gray) followed by the expansions for each of those categories. You can select all the expansions in the category or select one or many expansions to import across multiple categories. The categories are examples of types of services the expansions might be associated with and the "Any Service" category can be associated across all the services.
Once an expansion is imported, it will show amongst the other configured expansions for your organization and can be further edited for use in progress notes or Scribbles just like any other expansion. Imported Expansions will import as a user-level expansion. If you're an administrator you can convert the imported user-level expansion to an organization-level expansion.
Editing an Expansion
When you find you need to tweak the wording in an Expansion, making changes is very simple.
-
From your Expansions list, click on the Expansion in the list or click the pencil icon on the right side of the Expansion in the list:
- Edit the Expansion Name.
- Edit the Expansion Text.
- Click Save to save your changes or click Cancel to discard your changes.
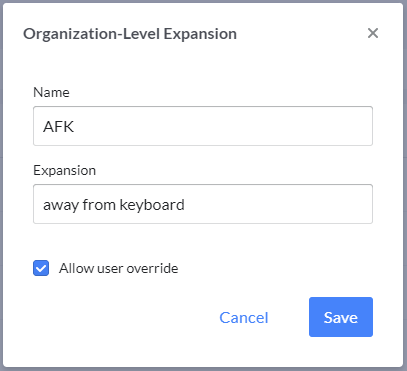
Organization Level Expansion
When an administrator creates an Organization-Level Expansion, they can set the expansion to allow user override or not. Setting the Expansion to allow user override allows users to have a user-level Expansion with the same name as the organization-level Expansion. If the expansion is not set to allow override, then only the organization-level expansion with that name will be used.
Organization-Level Expansions are usable by all users across the organization.
Administrator Review
Bells Administrators, Supervisors and Quality Assurance roles can review user expansions to have oversight that they're appropriate for the organization and allow expansions to be copied to be used by the whole organization. Bells administrators will have a toggle at the top of the display to switch between Manage and Review. The Manage view is the original expansion display, the Review view shows the user level expansions for the organization. Administrators can also export the display.


Deleting an Expansion
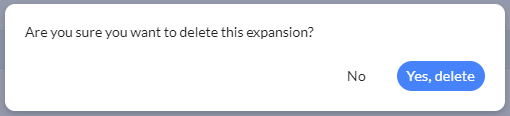
When you no longer need an Expansion and want to remove it,
-
From your Expansions list, click the trash can icon on the right side of the Expansion in the list:
- At the prompt, click Yes to delete your Expansion or No to keep your Expansion.
Bulk Import
If you already have a list of expansions that are commonly used, your Bells administrator can import them in Bulk. Administrators will see the bulk import option under Add Expansion:

Clicking Bulk Import opens the import display: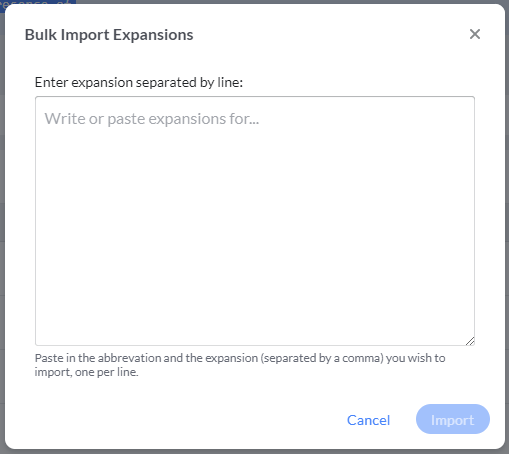
The Bulk import uses the following comma-separated convention:
Name,Expansion text <Enter>
Name2, Expansion text 2 <Enter>
Where <Enter> represents pressing the enter key
Keep in mind that the same rules as far as expansion name and length apply in bulk that apply to individual expansions.
After you click Import, you will get a confirmation of how many expansions were loaded. Any expansions that are unable to import will show in a list. You will need to review and correct them.
Example Import and resulting success/error display: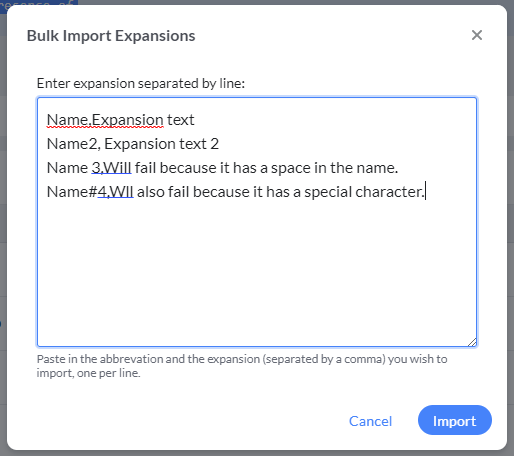
Using Expansions
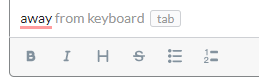
Once an Expansion is set up, all you have to do to use it is to type the name of the expansion in your progress note or scribble and hit your space key. The text will expand and show the full expansion text.
Additionally, expansions can auto-complete when used in a scribble or progress note. When you start typing the text of the expansion (not the name but the text for the expansion and a minimum of 4 characters), placeholder text will appear in the display for the remaining expansion text. Hitting your Tab key will auto-complete the expansion for you. Please refer to the example below.
Configured Expansion:
Behavior in the Scribble or Progress Note:
Additional Examples
| Appt | Appointment |
| Apt | Apartment |
| BHP | Behavioral Health Professional |
| bx | behavior |
| CM | Case Manager |
| CO | Creative Options |
| Comm | Communication skills |
| comp | Comprehensive Assessment |
| CS | Community Services |
| CS | Coping Skills |
| Ct | Client |
| DHH | DHHS/OADS |
| dx | Diagnoses |
| FB | Food Bank |
| FCFH | First Call For Help |
| FM | Foster Mom |
| FSP | Family support partner |
| HS | Home Services |
| HV | home visit |
| LI | Living Innovations |
| mtp | medical treatment plan |
| neuro | neuropsych |
| PCP | primary care physician |
| PS | Peer Support |
| RC | Resource Coordinator |
| ROI | Release of Information |
| Skills | Writer arrived at client's foster home for a skills session |
Preferences
There are three personal preferences you can set to personalize how Bells displays.
- Time Format
- Theme
- Font Size
To access your Personal Preferences:
-
Click the Settings Gear in the left Navbar:

- Click Preferences in the left navbar section
-
Configure your settings
-
Time Format
-
Select whether you prefer times in Bells to show in a 12-hour (AM/PM) format or 24-hour (military) time:

-
Select whether you prefer times in Bells to show in a 12-hour (AM/PM) format or 24-hour (military) time:
-
Theme
- Use the toggle to enable Dark Mode if you prefer it. Dark mode bases the screens on dark backgrounds, reducing the amount of white displayed. Some people feel this reduces eye strain.
-
Dark theme off:

-
Dark theme on:

-
Font Size
- Font size controls whether Bells displays text in Normal font size or Large.
-
Select Normal or Large

- NOTE: You can also use your browser's zoom setting to adjust how Bells looks in a Browser. The advantage of the large font size preference is that elements of the Bells' displays are designed to fit the screen better in large font size than you may see by simply adjusting your browser's zoom setting.
-
Time Format
Personal Dictionary
The personal dictionary allows you to add words to your own personal dictionary for use when writing Progress Notes. This dictionary is only for you. You cannot add words to any other Bells user's personal dictionary, nor can they add to yours.

Type a word in the text box and hit enter or click the +Add button to add the word to your personal dictionary. The added word will no longer be flagged with a spelling/grammar alert while writing progress notes.
When you hover on the row in the personal dictionary word list, you can remove words that are no longer needed by clicking the trash can icon on the right side of the row.