
Goal Tracking
 Goal Tracking is only available to CT|One users at this time.
Goal Tracking sessions are used when a practitioner needs to track behaviors or progress towards a goal or objective for multiple patients at a time, then add those tracking details to a progress note.
A Goal Tracking note section can also be added to a note type to be included in the note-writing process.
Configuring Goal Tracking
Before you can start a goal tracking note, Note Types must have the “Available for Goal Tracking” setting turned on. Without this crucial piece of configuration (performed by your administrator), there will not be note types available when going from a goal tracking session to a note. When toggled on, a Goal Tracking note type section can also be added to the note type. Note: only one Goals or Goal Tracking section can be in a note type.
Configuration is done under the Organization Settings that can only be accessed by Bells Administrators. For more details on configuring Goal Tracking, refer to Configuring Note Types.
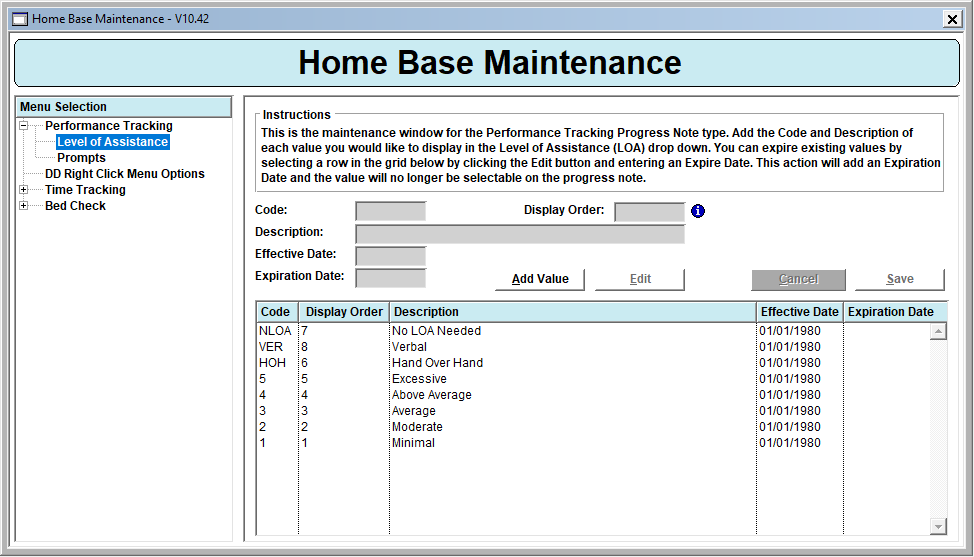
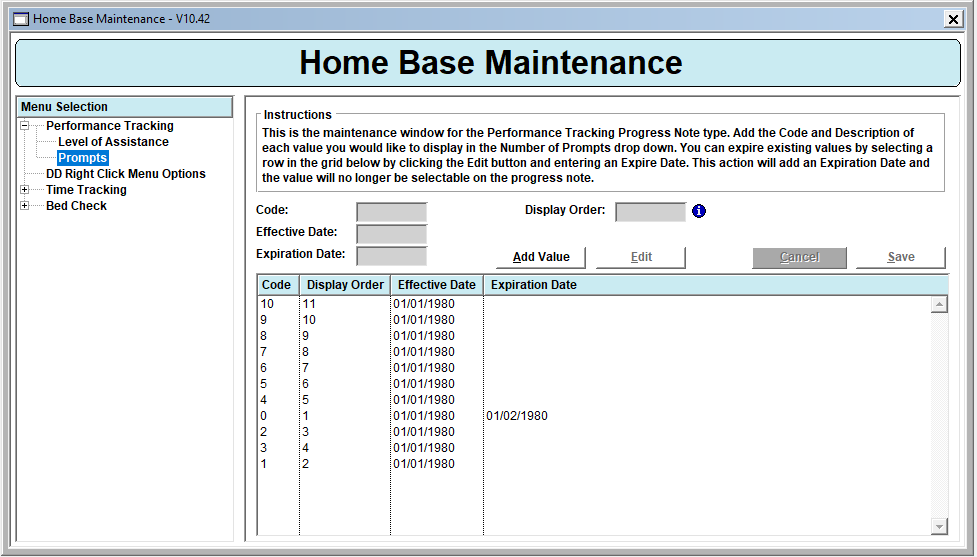
The values used in Goal Tracking for Bells are configured in CT|One via the Home Base Maintenance Performance Tracking section, Level of Assistance and Prompts sections.
Level of Assistance example from CT|One
Prompts Example from CT|One
Goal Tracking Sessions
Goal Tracking sessions can be started in the mobile or web Bells applications.
For more information on Mobile - check out our Bell Mobile article here.
On the Goal Tracking tab of the chart section, there is a button for +Goal Tracking. Clicking the button will start a goal tracking session.
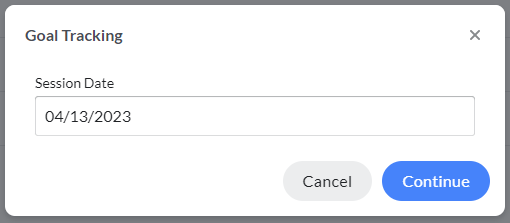
Step 1 - Select the Session Date for the goal tracking session.
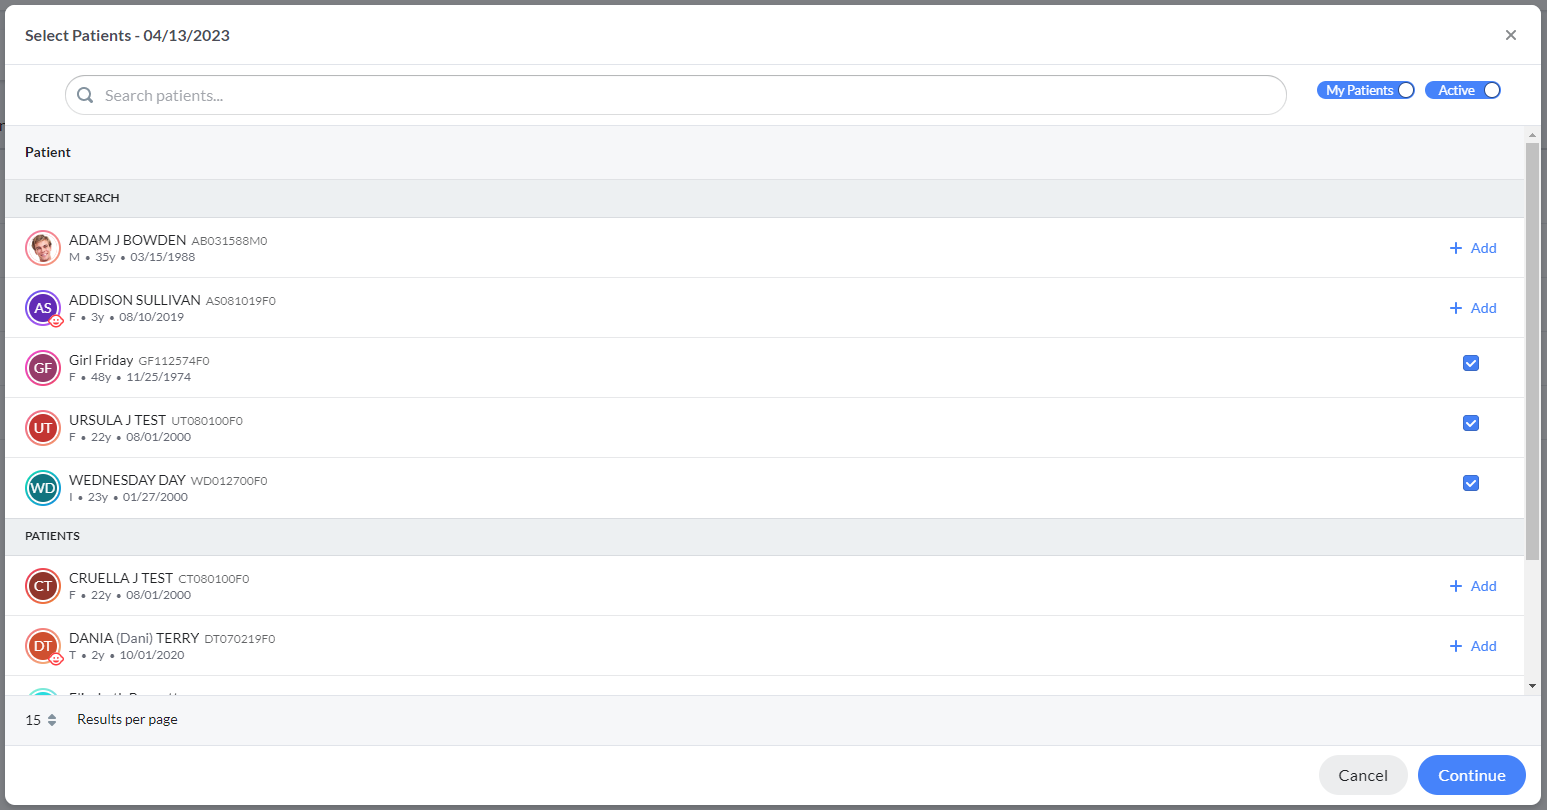
Step 2 - Select the patient(s) for the goal tracking session. This can be one or many patients. The Select Patients display includes the Search patient functionality and filtering for My Patients and Active/Inactive. The display is divided into a Recent Search patient section and the Patients that fit the search and filter toggle criteria. The Recent Search patient section shows the last 6 patients you've accessed. This display allows you to add and remove patients from goal tracking. To add a patient, click on the patient row. To remove a patient, click on the patient row again. Once all the patients for the goal tracking session are added, click Continue.
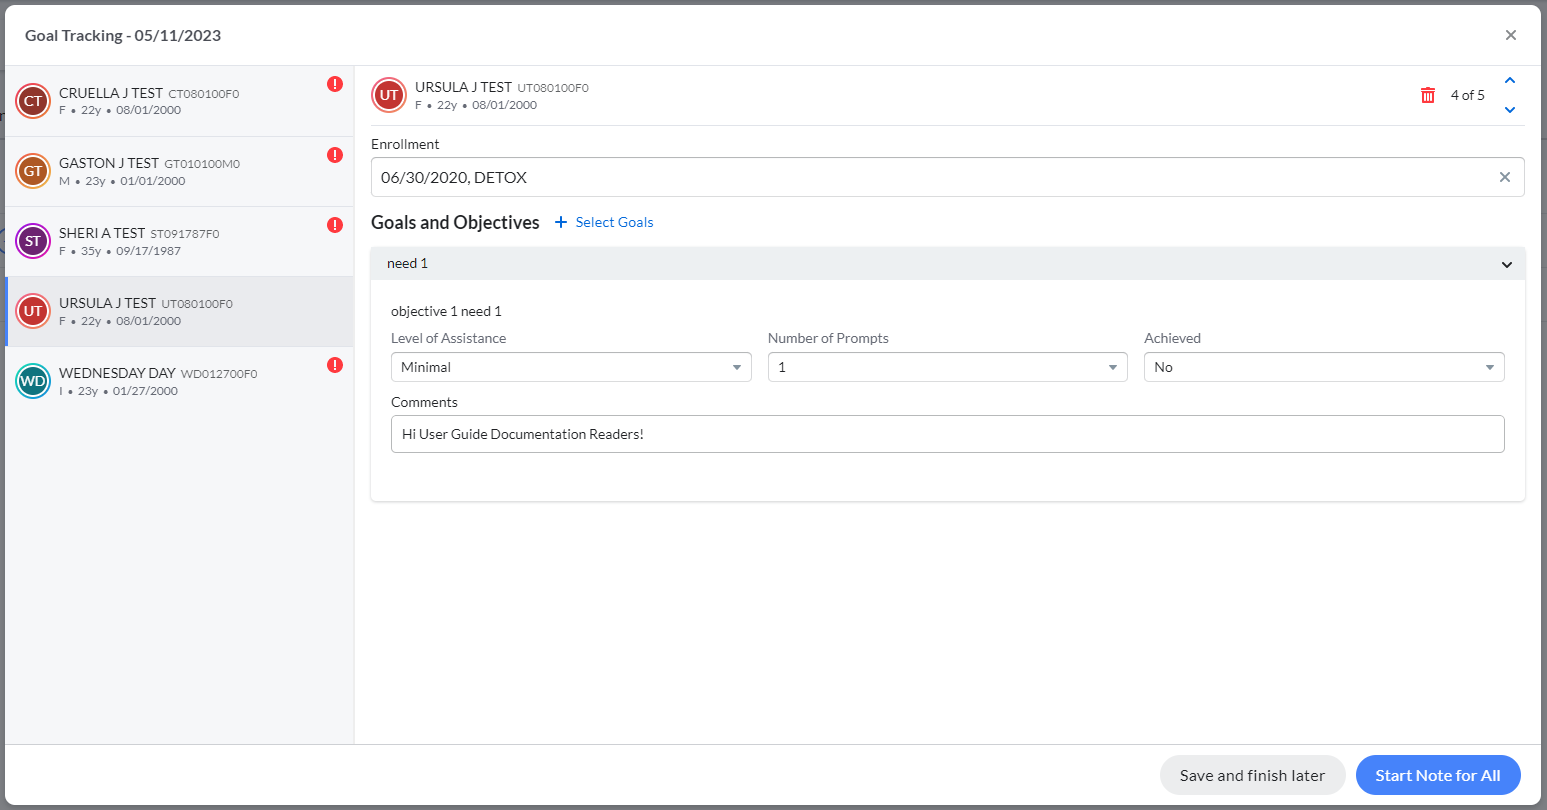
Step 3 - The next display is very similar to the group note display. A list of the patients for the session is in the left pane, and the goal tracking selections/details for the selected patient will be on the right. You can move between patients via the list on the left or via the arrow buttons on the right of the header.
Goal Tracking details for each patient include
- Selecting the enrollment
- Selecting the goals/objectives for each patient
-
For each goal,
- The level of assistance
- The number of prompts
- Whether the selected goal/objective was achieved
- Any comments about the tracking.
The values for Level of Assistance and Prompts come from the CT|One Home Base Maintenance configuration.
Once you've added all the tracking details to each patient. Click Start Note for All to begin the Goal Tracking note process. Clicking Save and finish later will save all the entered goal tracking details for you to come back to continue later.
For organizations that utilize the long-term goals/short-term goals, the goal tracking display will look slightly different. The long-term goal shows in the gray header with the short-term goal included with it, and the objective shows in the white space before the level of assistance and other tracking fields.
Writing Goal Tracking Notes
Goal Tracking notes can be started from the Start Note for All button in the Goal Tracking session or through the start note button throughout the application and select a note type that includes the Goal Tracking note section.
This button is in the bottom right corner of the tracking entry display.
Note: All patients in the goal tracking session must include goal tracking details before starting the note. You may to delete the patient from the session before starting the note if needed.
Starting the Goal Tracking Note
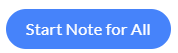
When you click start note, the Goal Tracking display opens.
Session Date/Time will default to the date for the goal tracking session and the current time when the note is started. This is editable.
Session date/time is required to start the goal tracking note.
Location is a drop-down to select the location for the note. This value will not default.
Location is required to start the goal tracking note.
Service Type is a drop-down to select the service for the note. This selection filters the available note types to select for the Goal Tracking note.
Service Type is required to start the goal tracking note.
Once the location and service type fields are set, the available note types will show under the patients section.
Choose patients
The patients from the goal tracking session will show in the Needs note section of the display.
If the patient needs a goal tracking note - leave their patient card in the Needs note section.
If the patient doesn't need a goal tracking note, their patient card can be dragged to the No note needed section in the display. No note needed goal tracking sessions can still be viewed from the patient's goal tracking display in the patient chart.
Select Note Type
Once the location and service type fields are set, the available note types will show under the patients section.
Select the applicable note type for your goal tracking note; this is required before starting the note.
Starting the Goal Tracking note
Once the location and service type are set and all patients are assigned as note needed or no note needed, you are ready to start the note.

Clicking the Start Note button creates notes for all patients in the Note needed section of goal tracking note.
Clicking Save and finish later will bring you back to the goal tracking tab of the chart display.
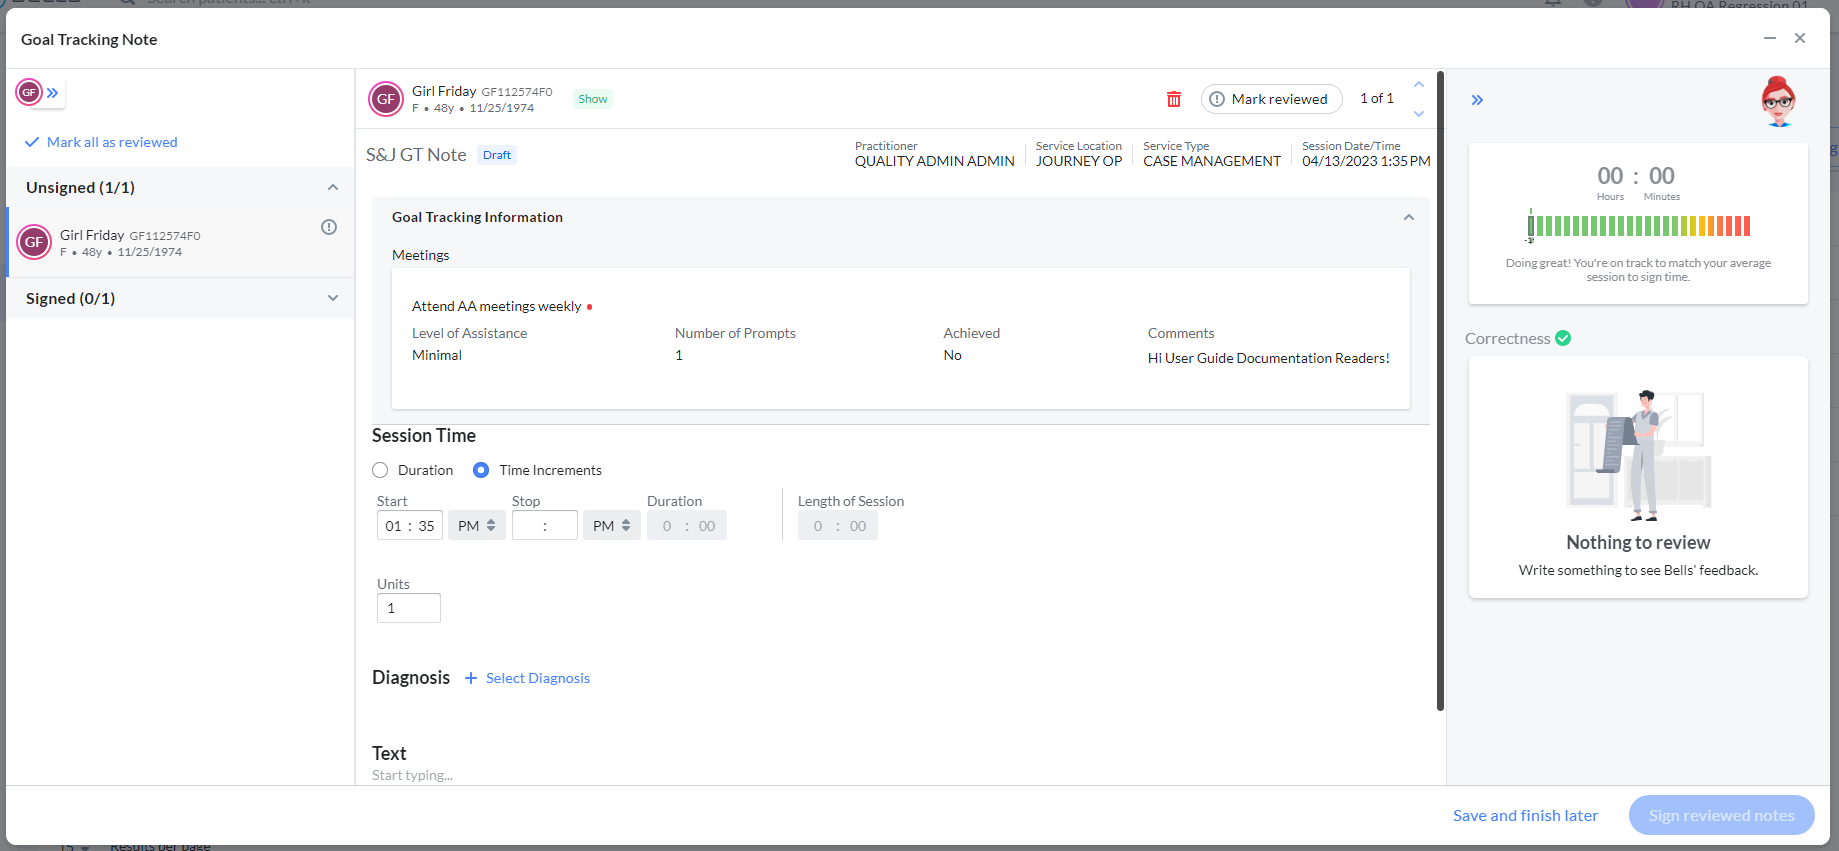
The Goal Tracking note is very similar to the Group note editor.
The display is split into three sections.
The left pane shows the patients for the goal tracking note. This pane is further broken down to display notes that are signed and unsigned, each category will show a counter for the number of notes that are signed relative to the total number of notes for the show status and all the notes that are unsigned relative to the total number of notes for the show status .
The middle pane shows the session information header and goal tracking information for the selected patient at the top, then the note editor for the patient note.
The right pane shows the standard Bells pane including the session to sign display and the correctness and grammar suggestions, plus recommendations and validations (if configured by your Bells administrator).
Goal Tracking Information
The Goal Tracking Information will be included in every patient's progress note. It includes the Goal/objective being tracked, the level of assistance and prompt selected, if the goal/objective was achieved and any comments added. This header can be collapsed or expanded.
Filling out the Goal Tracking note
The note pane in the middle displays the session information header including the Note type name, if the note is in draft, the Practitioner, Location, Service Type and Session Date/Time. Then the Goal Tracking information shows, including the Goal/objective being tracked, the level of assistance and prompt selected, if the goal/objective was achieved and any comments added.
Finally, the Note Type configured for the goal tracking note is shown, determined by the Location and Service Type.
The same field requirements and behavior that are used for the note type will be respected in the goal tracking note.
Just like in the standard progress note, the Bells pane will display on the right side. The Bells pane displays your session to sign metric and any corrections and grammar suggestions as well as Clinical Recommendations and Validations (if configured for your organization).
Signing Goal Tracking Notes
Once the note is complete and all required fields are supplied, you can mark the note as reviewed. This functionality mimics the behavior of Bulk Sign. If there are missing required patient/guardian/additional signatures the red ! will show. These signatures must be included mjn,k the author signature.
You can sign goal tracking notes for one patient at a time or you can sign several patients in the session at once.
When one or more notes are Marked as reviewed, you can click the Sign reviewed notes button.
Goal tracking notes can also be saved and finished later by clicking the button "Save and finish later".
Deleting a Goal Tracking Note
Users can delete individual patient notes as part of a goal tracking note. This can be useful when a patient's note is accidentally created, or the patient doesn't have criteria that meet the note requirements such as diagnosis, this will allow the user a workaround to correct the note.
Within the note editor, there is a delete icon in the top header that follows the same note delete functionality as a standard progress note.
You may delete any of the notes where you are the author and that are in Draft status. Deleting a draft removes it completely from the goal tracking session and the system; the draft record will no longer be present in the chart or any of the other draft locations such as the Chart section or the Dashboard.
When you click to delete the progress note, you will be prompted to make sure you want to delete the session.
Click Yes to permanently delete the note.
Click No will keep the progress note, canceling the delete.