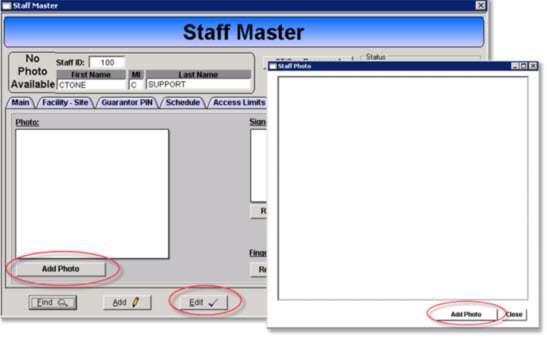
A .jpg photo can be uploaded to the Staff Master record providing visual identification of staff. If no photo is uploaded the text “No Photo Available” will present on the Staff Master record.
Photo Requirements:
- .jpg format only
- No transparency
Add a Photo
Access: Core > Staff > Staff Master
1. Open the staff member’s Staff Master record.
2. Click the Edit button.
3. Click the thumbnail to open the Staff Photo window or open the Identity tab and click the Add Photo button.
4. The file location window presents.
5. Locate and select the staff member’s .jpg photo.
6. Once the photo is uploaded click the Close button.
7. Click the Save button on the Staff Master record.
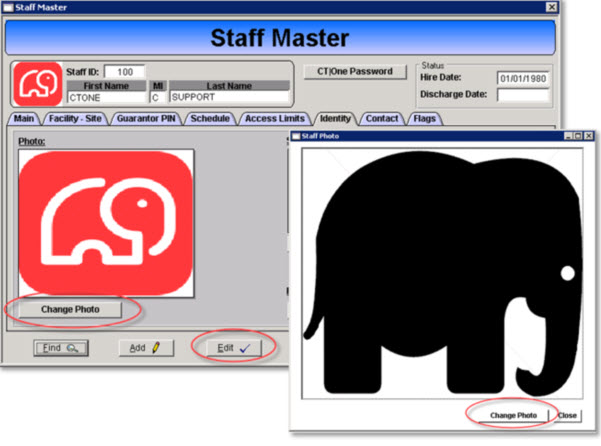
Change Staff Photo
Access: Core > Staff > Staff Master
A staff member’s photo can be changed however the original photo will not be saved the new photo simply replaces the current photo.
1. Open the staff member’s Staff Master record.
2. Click the Edit button.
3. Click the thumbnail to open the Staff Photo window or open the Identity tab and click the Change Photo button.
4. Click Change Photo button on the Staff Photo window.
5. The file location window presents.
6. Locate and select the staff’s .jpg photo.
7. Once the photo is uploaded click the Close button.
8. Click the Save button on the Staff Master record.