
Explanation
Creating claims for progress notes consists of three steps; Progress Note Pull, Posting Charge Batch and Claims Submit. At each step the billing information is reviewed and errors presented. This three step process ensures the cleanest claims are created.

Step 1 - Progress Note Pull
1. Open the Progress Note Pull window: Billing > Claims Generate > Pull Progress Note.
2. Complete the required fields:
From Date
Enter the oldest date of the date range to be pulled, typically the date used is a date that allows for capturing services as far back as timely filing limits allow.
Note: Using a large date range can impact system performance and take a long time to process.
Thru Date
Enter the most recent date of the date range to be pulled.
3. Enter any additional parameters needed to pull the desired progress notes by selecting from the drop down list.
Staff: The primary staff member on the progress note.
Guarantor: The client’s primary guarantor.
Facility: The facility selected on the progress note.
Service: The type of service on the progress note.
Site Code: Where the staff was logged in when the progress note was written.
RBHA: The RBHA of the enrollment that the progress note was written in.
Guarantor Category: The client’s primary guarantor if it is included in the selected Guarantor category.
Tip: If pulling progress notes by parameters other than the date range it is best practice to run an additional pull with all parameters blank to capture any notes or client accounts that might have errors that prevent being captured using parameters.
4. Click OK.
5. Two possible reports may present. If there are no progress notes for the entered parameters an error presents.
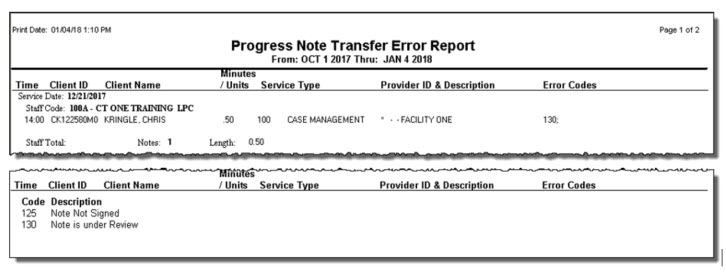
Progress Note Transfer Error Report
If there are progress notes with errors the Progress Note Transfer Error report will present first. This report provides a list of progress notes that could not be pulled into a charge batch along with the error code. A list of the error codes and a description of the error present at the bottom of the report. Print this report to work the errors.
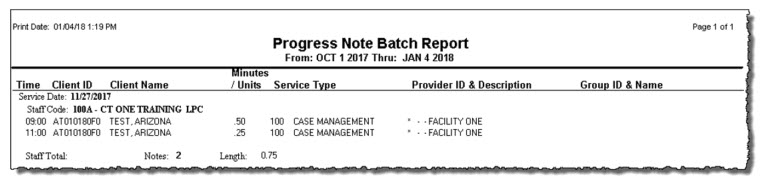
Progress Note Batch Report
This report provides a list of progress notes that will be transferred into a charge batch and presents after the Progress Note Transfer Error report is closed. If there are no progress note errors this report will present immediately. This report does not need to be printed as all information will be visible electronically in the charge batch.
6. Click OK on the Update Session prompt to complete the process of creating the Charge Batch with the services listed on the Progress Note Batch Report.
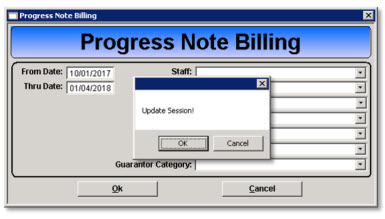
Note: Clicking Cancel terminates the process and a charge batch will not be created. Any services listed on the Progress Note Batch report will be eligible for the next progress note pull.
Step 2 Post Charge Batch
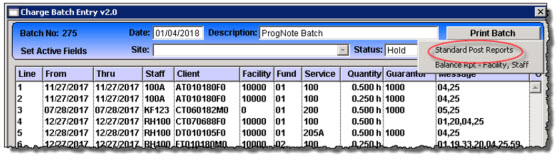
1. Open the Charge Batch Entry window. Billing > Claims Generate > Charge Batch > Charge Batch Entry (New Version)
2. Click the Find button.
3. Select the batch by double clicking the line or highlighting the line and clicking the Select button.
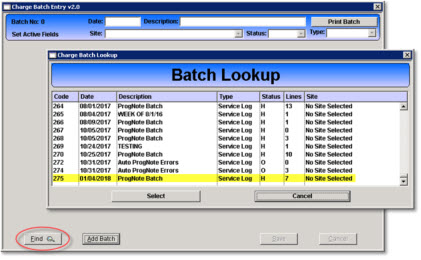
Code
System generated numerical identifier.
Date
The date the batch was created.
Description
Charge batches created using the Progress Note Pull process will be ProgNote Batch.
Type
Indicates how the services were added to the batch.
Status
The current status of the batch, the batch will be in a Hold status when created.
Lines
The number of service lines in the charge batch.
Site
Indicates the site selected in the progress note pull parameters if one was selected.
4. Click the Print Batch button and select Standard Post reports.
5. Two possible reports will present.
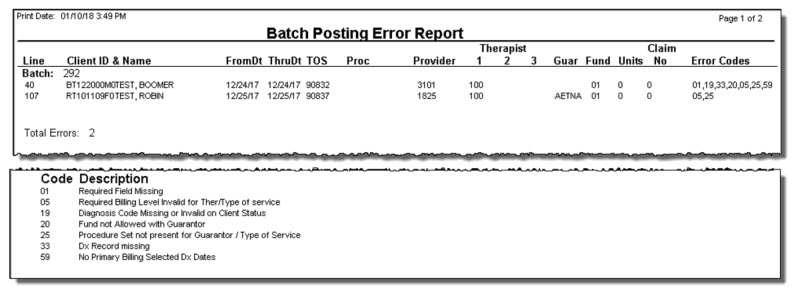
Batch Posting Error Report
This report provides a list of batch lines with errors and the error codes for the line. A list of the error codes and a description of the error present at the bottom of the report, the report can be printed. The errors and their description can also be viewed from within the batch.
**TEST** Batch Posting Report
This report presents when the batch is error free. The report lists the claim number that will be assigned once the batch is posted. It also includes a total number of units and dollars for the services in the batch.
6. Work any charge batch errors as the charge batch must be error free to be posted.
a. Refresh the batch to view the error codes.
- Right click on any batch line.
- Select Refresh Batch from the menu.
b. Right click on a batch line with errors.
c. Select Display Line Errors from the menu.
Note: The full list of CT|One Batch errors can be viewed by selecting Display Error List.
d. Follow the instructions in the Recommended Steps to Resolve the Issue.
Tip: Always work the errors from left to right, many times resolving the first error will resolve the additional errors.
7. Update the charge batch status to "Open"
a. Click Edit.
b. Select Open from the Status drop down.
c. Click Save.
8. Open the Batch Posting window. Billing > Claims Post > Post Charge Batch
9. Complete the required fields on the Post Batch Window.
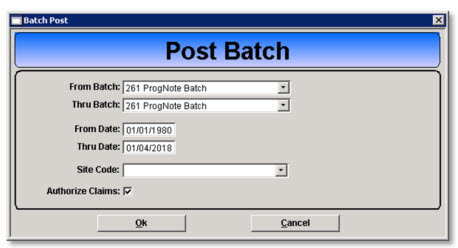
From and Thru Batch
Select the batch number of the batch to be posted.
From and Thru Date
Select the date range of services to be posted.
Site Code
This not a required field.
Authorize Claims
Leave this box checked to have authorizations attached to claims that require it.
Step 3 Submit Claims
1. Open the Claims Submit window. Billing > Claims Submit > Submit Claims
2. Complete the required fields.
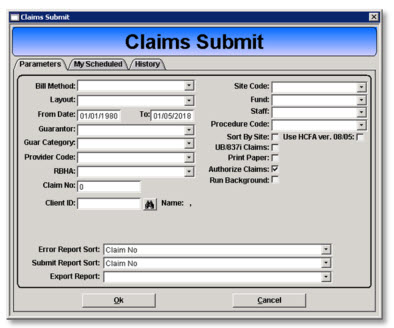
Bill Method
Select the desired bill method from the drop down. If the bill method selected is Print HCFA then a Layout must also be selected.
From Date and To
Enter the date range of claims to be included in the claim file.
3. Enter any additional parameters to filter the claims that will be included in the claim file.
4. Click OK.
5. Three possible reports will present. Print the reports as needed and close the report windows.
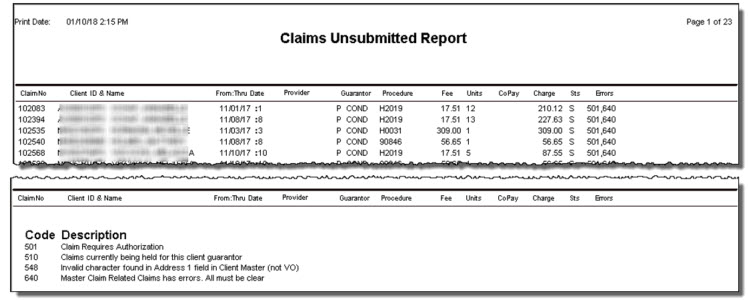
Claims Unsubmitted Report
This report provides a list of claims with errors and the error codes for the claim. A list of the error codes a description of the error present at the bottom of the report, the report should be printed as there is not a batch window from which to work the errors. The full list of error codes and their description can be viewed from within CT|One: Billing > Claims Submit > Claim Submit Error Codes
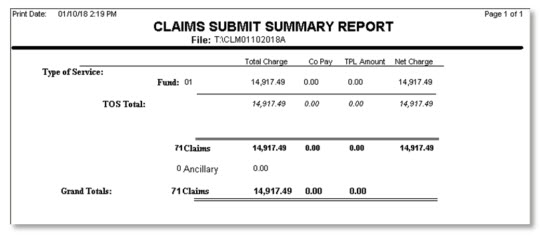
Claims Submit Summary Report
This report presents totals for the claims that are error free and will be included in the claim file. The location where the file will be saved when created is also present. This report can be printed and/or saved for future reference.
Claims Submit Report
This report provides a detailed account of all the claims that are error free and will be included in the claim file. The location where the file will be saved when created is also present. This report can be printed and/or saved for future reference. Many agencies choose to print this report as it can be very beneficial when claims research is needed.

6. The Update Session prompt presents when the Claims Submit Report is closed.
- Click OK to create a claim file; the claims on the Claims Submit Report will be included in the file.
- Click Cancel to terminate the process. A claim file will not be created.
7. Work the errors on the Claims Unsubmitted Report. Once the errors on a claim are resolved it will be included in the next Claims Submit process.
8. Upload the Claim File to the guarantor’s designated location such as a clearinghouse or online portal.