WRITE AN INDIVIDUAL PROGRESS NOTE
Click here for a downloadable pdf.
Explanation
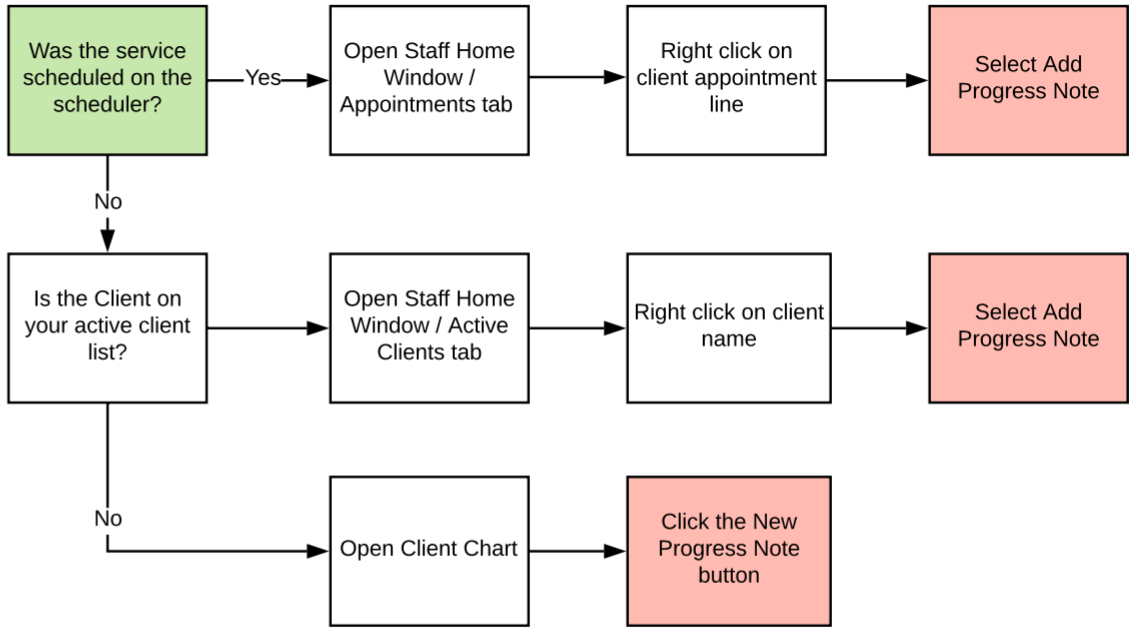
The writing of an individual progress note begins in one of two places; Staff Home window or the Client Chart. The correct workflow depends on the answer to the questions; was the service on the scheduler and is the client on your caseload? Review the workflow to determine where to initiate your progress note.
Step by Step Instructions
1. Open a new progress note from the correct location as indicated in the workflow above.
Scheduled Appointment
a. Open the Staff Home window.
b. Right click on the client's appointment from the Appointments Tab.
c. Select Add Progress Note from the action menu.
Client on Caseload
a. Open the Staff Home window.
b. Right click on the client's name from the Active Clients tab.
c. Select Add Progress Note from the action menu.
Unscheduled or Client not on caseload
a. Open the client's chart.
b. Click the New Progress Note button.
2. Complete the session information tab.
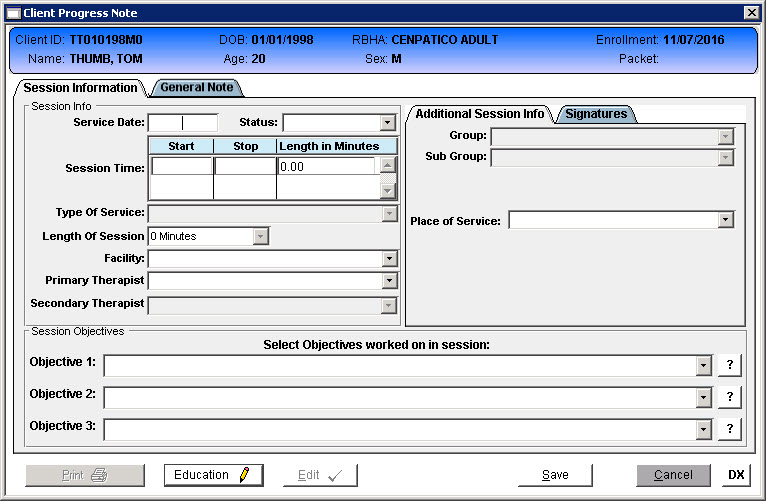
Service Date: Enter the date the service was provided. The date will auto-populate when written from an appointment. Tip: Tab through the date field to populate the current date.
Status: Select the correct status for the progress note.
- Show: Client was present or service was provided for the client.
- No Show: Client was not present for a scheduled service.
- Cancel: Client cancelled a scheduled service.
- No Show Charge: Client was not present for a scheduled service and can be billed a no show charge.
Session Time: Enter the beginning time in the Start field and the end time in the Stop field using military time or including the AM or PM. the times will auto-populate when written from a scheduled appointment. The Session Time grid allows for the entry of multiple start and stop times if needed, simply press Tab to present a new entry line.
Type of Service: Select the service provided from the drop down list.
Length of Session: This field will auto populate based on the Start and Stop times entered and system configuration.
Facility: Select the Facility where the service was provided. The facility will auto populate when written from the scheduled appointment and/or with the facility the staff member is logged into.
Primary Therapist: Tab through this field to populate with the staff member logged in.
Secondary Therapist: Select an additional staff member for the service if required.
Program: This field indicates for what program the service was provided. Select the program if required.
Codes: Select the diagnosis code for the service provided if required.
Place of Service: Select the place where the service was provided from the drop down.
Session Objectives: Select the objective(s) for the service if required.
3. Enter the clinical documentation on the progress note tab.
4. Click Save.
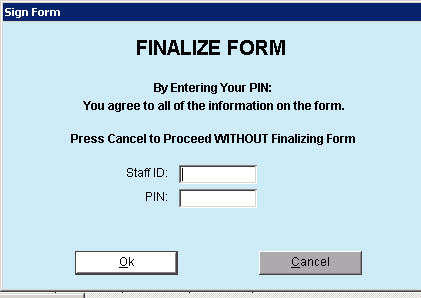
5. The Finalize Form window.
Progress Note is Complete
a. Enter Staff ID
b. Enter PIN
c. Note is signed
Progress Note is Incomplete
a. Click Cancel
b. Note is saved but unsigned