
All claim transactions use an action code, to adjust a claim use an adjustment action code. The workflow steps for an adjustment are standard but the value entry maybe different depending on the desired outcome. Questions to consider before entering a claim adjustment:
- Do you want to increase or decrease the claim balance?
- Is the action code configured to reverse sign on post?
The adjustment can be completed from the Claims Search Advance window or by adding a Payment & Adjustment batch.

Step by Step
1. Locate the claim using the Claim Search Advanced (Billing > Claims Search > Advanced).
2. Right click on the claim to open the action menu.
3. Choose Adjust Claim from the menu. Complete the Adjustment window.
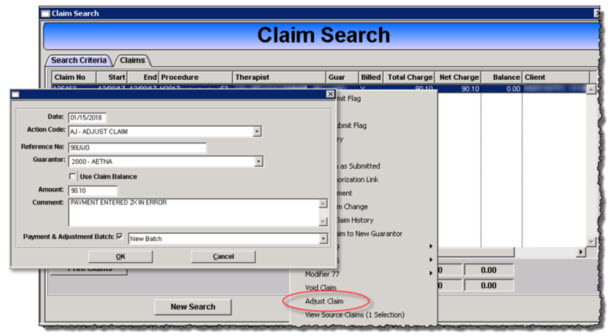
Date
The date of the adjustment or transactional date.
Action Code
Select the appropriate adjustment action code. Note to use an action code for an adjustment the Action Code Type must be “Adjustment” and Include Code in Claim Balance needs to be “Yes”
Reference No
Enter the most appropriate value that relates to the reason for the adjustment such as the original claim number, check number, etc.
Guarantor
Select the guarantor for the claim.
Use Claim Balance
Check this box if adjusting the complete claim balance.
Amount
Enter the dollar amount of the adjustment. The dollar amount entered is determined by the desired outcome of the adjustment and if the action code is configured to “Reverse Sign On Post”
Example
The claim balance is (-$90.10) because a payment was posted twice in error, to remove the duplicate payment or set the claim to a $0 balance:


Comment
Enter a reason or explanation of the adjustment.
Payment & Adjustment Batch
Click the checkbox and select an existing payment & adjustment batch or New Batch to create a batch.
5. Click OK.
6. The adjustment will be posted to the claim when the Payment & Adjustment batch containing the adjustment is posted.