EXPLANATION
CT|Tasks can be used as a stand-alone process or incorporated in processes such as ePrompts and ScoreTrak. Task category, priority and status options can be customized to fit clinical, medical, billing and administrative workflows.
CT|Task Configuration consists of three maintenance windows:
- Task Status
- Task Priority
- Task Category
Task Status
The Task Status is customizable. To create a new Status select the Add button and to modify an existing Status select the Edit button. The system default status options are Open, Completed, Canceled/Deleted these statuses should not be modified.
Access: Maintenance > Task Options > Task Status
- Click the Add button.
- Enter a description for the status this text will present in the status drop-down of the Task.
- Enter an effective date for the status.
- Select the status type:
Open: The task is in an editable state.
Completed: The task is in a non-editable state and removed from the open task list.
Canceled/Deleted: The task is in a non-editable state and not eligible to be added to the client chart.
5. When a new task is created will this status be the task’s initial status? Select Yes or No from the Default on Add drop-down.
6. Click Save.

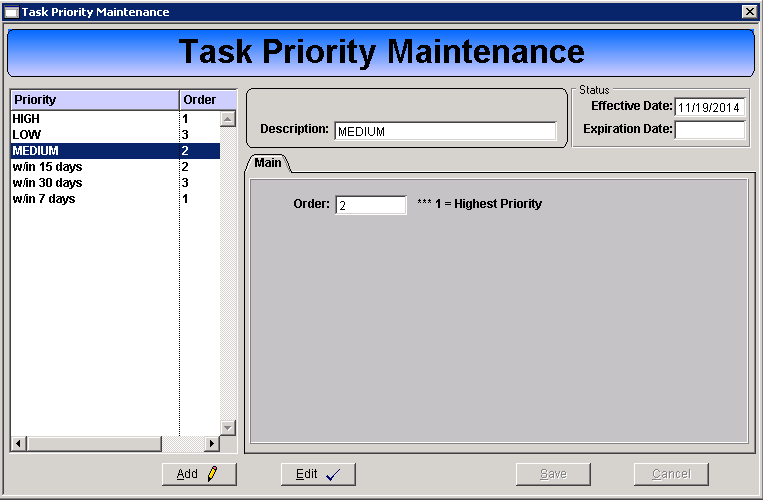
Task Priority
The Task Priority is customizable. To create a new priority select the Add button or to modify an existing priority select the Edit button.
Access: Maintenance > Task Options > Task Priority
- Click the Add button.
- Enter a description for the status this text will present Priority drop-down on the task.
- Enter an effective date for the priority.
- Enter a numerical value for the order. This value is used to determine the sort order of tasks.
- Click Save.
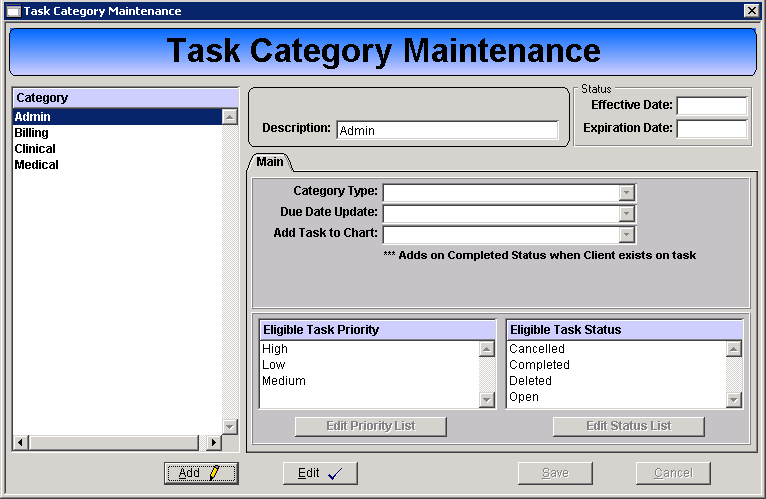
Task Category
The Category options are customizable to fit agency workflow. To create a new Category click the Add button or to modify an existing category select the Edit button.
Access: Maintenance > Task Options > Task Category
- Click Add to create a new category.
- Enter a Description for the category, the text entered will display in the Category drop-down on the task.
- Enter an effective date for the category.
- Category Type: Select “Generic Category”
-
Due Date Update: Select the appropriate option for this task category.
- No - Due Date cannot be changed, user cannot adjust the original task due date.
- Yes - Due Date can be adjusted, user can change the due date set on the task.
- Add Task to Chart: Select the appropriate option for this task category.
- Do not add to chart based on Category: The task cannot be added to the client chart.
- Automatically Insert to Chart: When the task is set to a complete status it is automatically added to the client chart.
- Allow User to Optionally Insert: The task recipient determines if the task is to be added to the client chart.
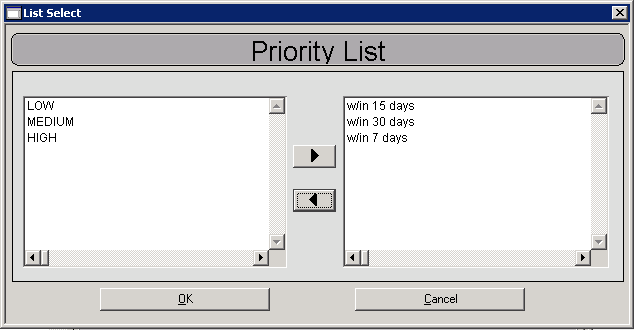
7. Add the Priorities that can be used with this Task Category.
- Click the Edit Priority List button.
- The Selection window presents.
- Move the allowed priorities for this category from the left column to the right column.
- Click OK.
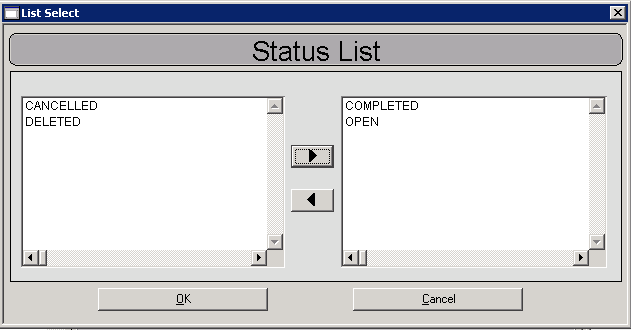
8. Add the Status that can be used with this Task Category.
- Click the Edit Status List button.
- The Selection window presents.
- Move the allowed statuses for this category from the left column to the right column.
- Click OK.
9. Click Save.