
We are happy to announce that we are working with a best-in-class eligibility vendor, Change Healthcare, to perform real-time and batch eligibility queries so that you can get up-to-date eligibility information. Below are instructions on how to configure and use the 270/271 Eligibility feature.
Configuring 270/271
Log into CT|One using your username and password.
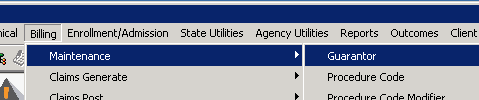
Navigate to the Billing menu and select Maintenance from the drop-down. Next select Guarantor to access the Guarantor Maintenance window.
Select the guarantor you would like to set up from the list of guarantors in the left-hand side of the Guarantor Maintenance window.
To the right of your window click on the Options tab and then the Option 3 sub-tab.
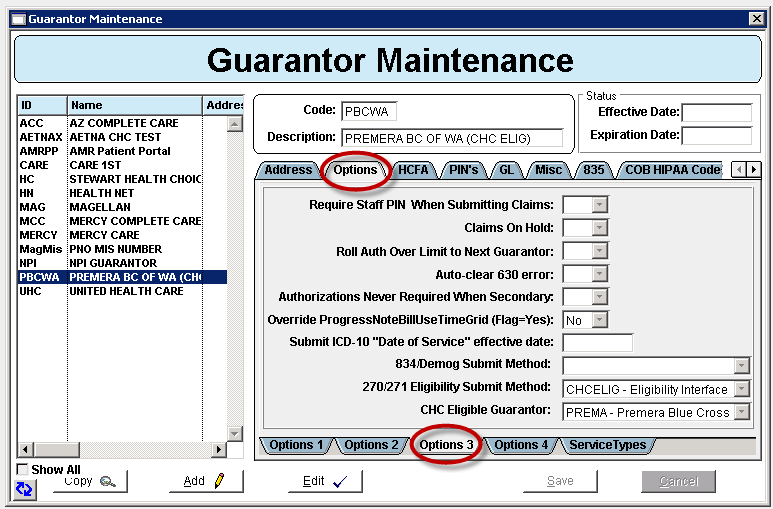
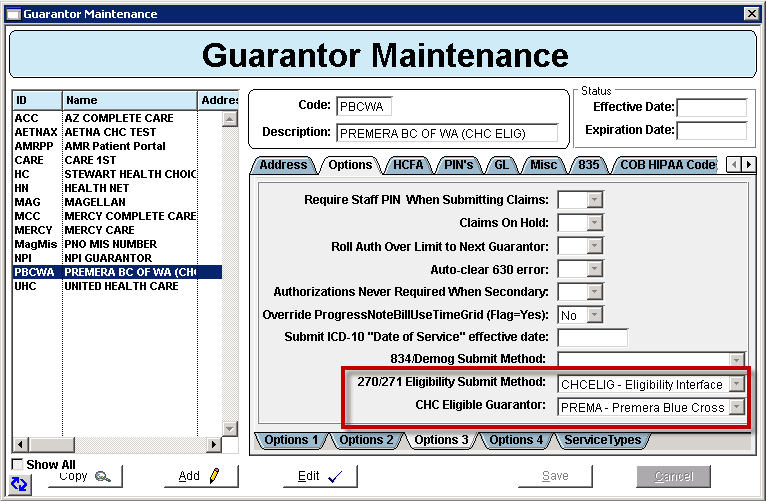
Click the Edit button and select CHCELIG – Eligibility Interface in the 270/271 Eligibility Submit Method field.
Next, populate the CHC Eligible Guarantor field with the associated guarantor by selecting them from the drop-down list.
Note: Best practice would be to choose a guarantor that has an 'x' at the end of the name. This selection will look at all affiliated guarantors through CHC.
Click Save.
Checking Eligibility
Let’s walk through how you will check eligibility on a client. You can check eligibility from the Client Master or from the Client Appointment.
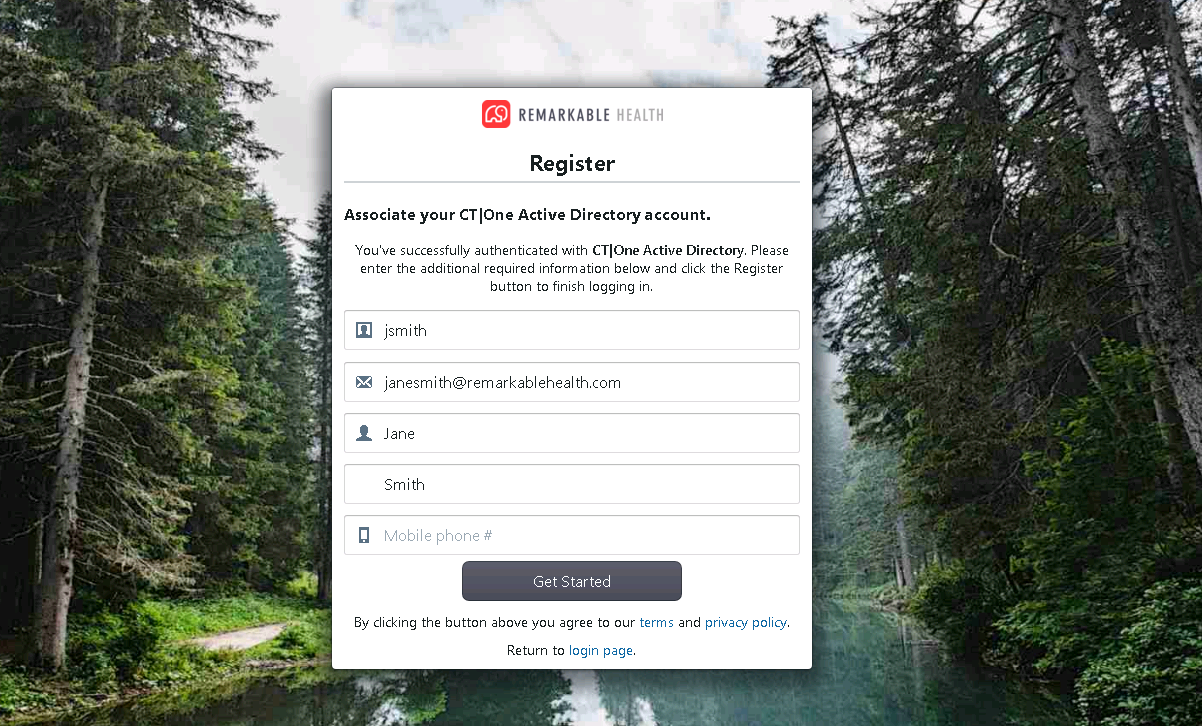
The first time you log in you will be asked to verify your login credentials. The below registration window will pop up and you will have 15 minutes to click the Get Started button before the window times out.
Checking Eligibility from the Client Master
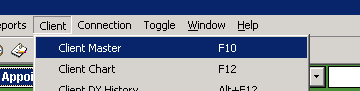
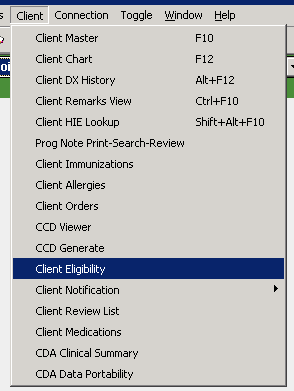
To check eligibility from the client master, click on the Client menu and select Client Master.
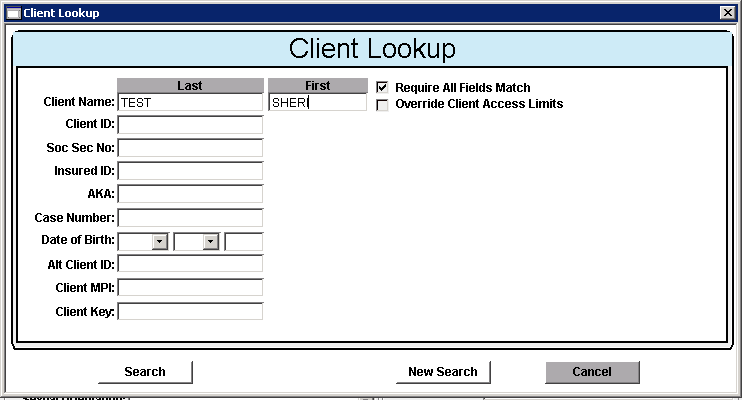
Search for your client by entering their first and/or last name in the Client Name field and then clicking the Search button in the lower left-hand corner of your window.
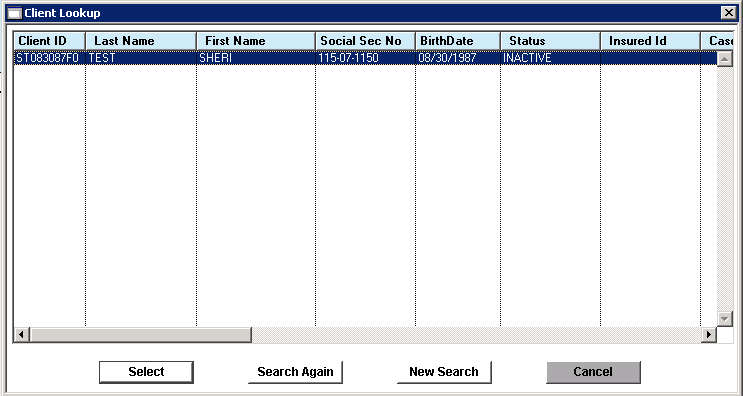
Once you locate your client in the list of client names, highlight them by clicking on their name and then click the Select button.
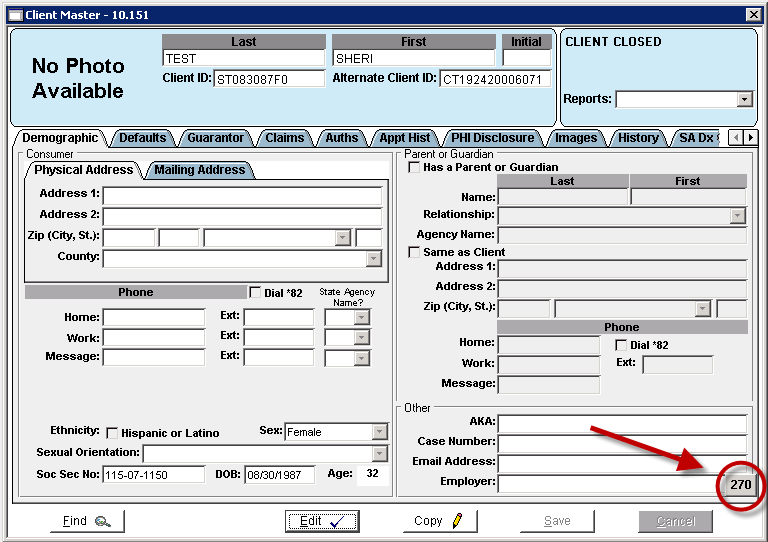
Once your client is pulled up, click the 270 button located in the bottom right-hand corner of your window.
This will open the Eligibility Check window.

- Source Type: This field indicates where the client information is pulling from in case you had a question about the information shown. It will default to Client Master.
- Eligibility From and Thru: The particular date range you would like to check eligibility for. For example, if you wanted to see if a client was eligible for services during a certain timeframe.
- Primary Demographic: All of the client’s information will pull from the Client Master and auto-populate in the fields under the Primary Demographic column.
- AKA Demographic: In these fields, you can override the information that is pre-populated under the Primary Demographics. An example would be if in the Client Master you have the client’s first name as Sheri but the name she has on file for her insurance is Sheryl.
When you are ready to check eligibility on the client, click the Check Eligibility button.
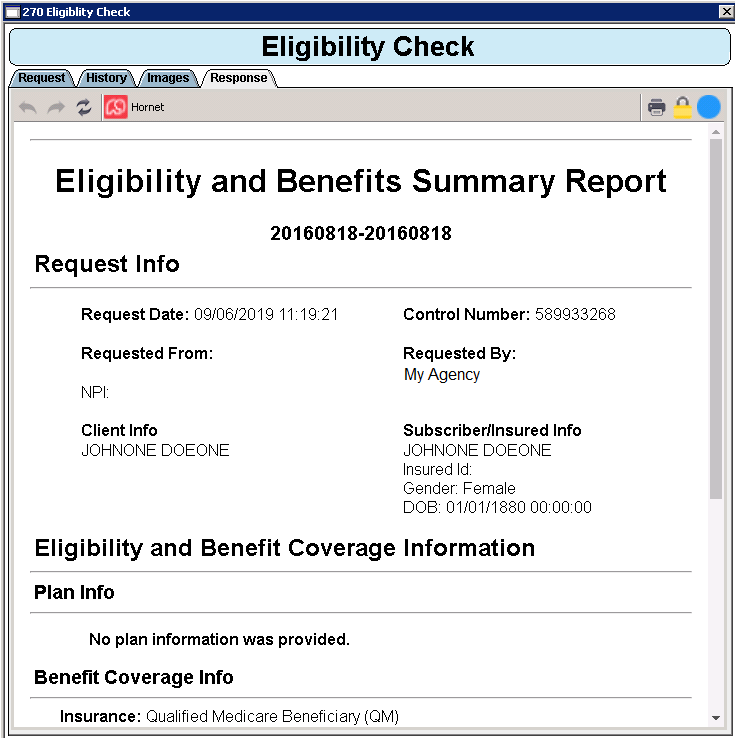
Once the eligibility report is retrieved, the report will open for you to review the results.
Checking Eligibility from the Client Appointment
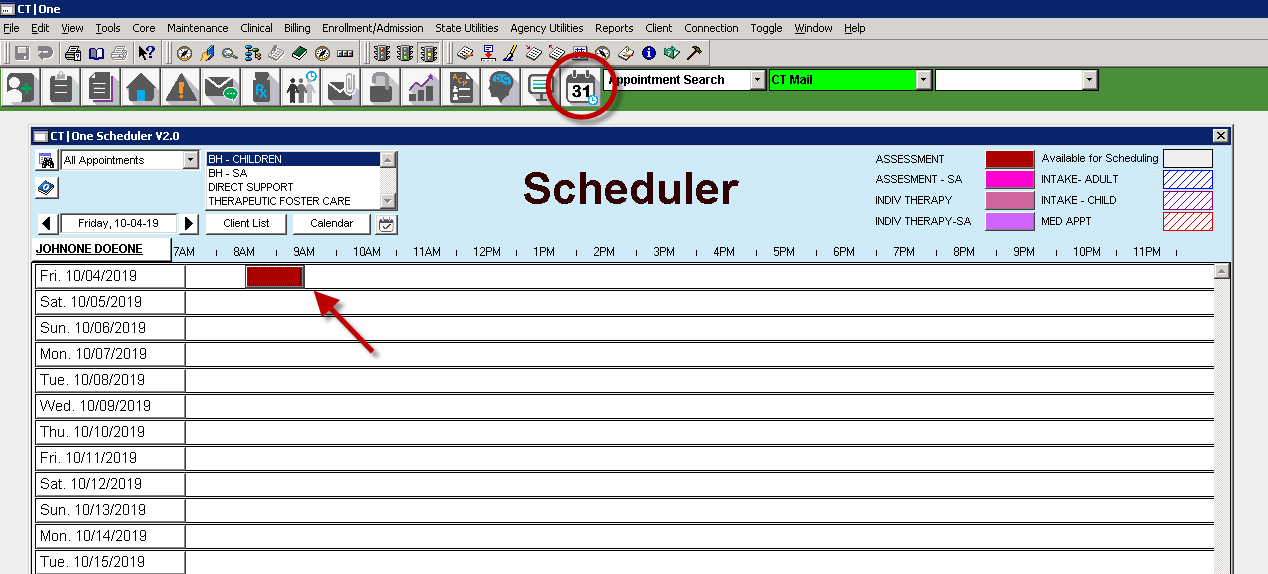
Navigate to your Scheduler by clicking on the calendar icon at the top of your screen.
Locate the client’s appointment on your schedule and double-click on the appointment.
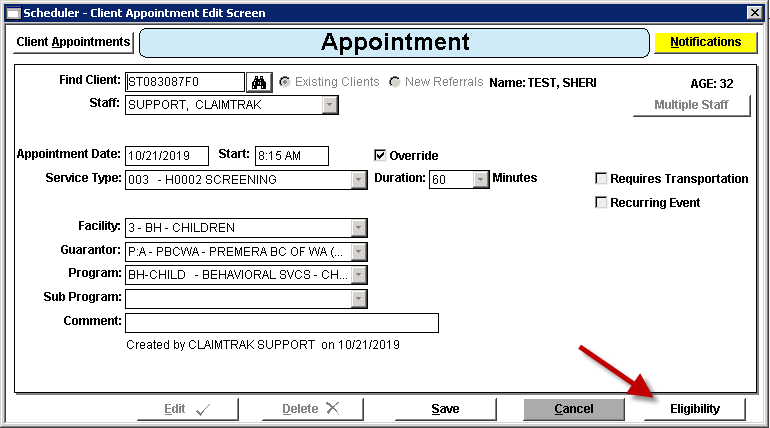
This will open the Appointment Window. Click the Edit button in the lower left-hand corner of your screen and then click the Eligibility button to the right.
This will open the Eligibility Check window.
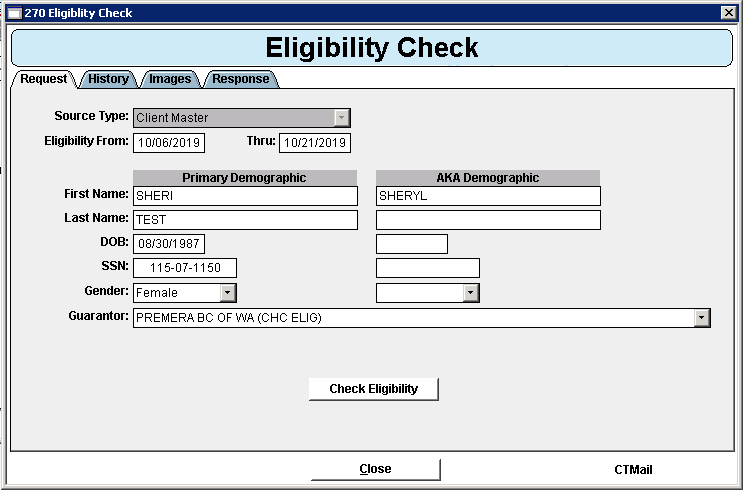
- Source Type: This field indicates where the client information is pulling from. It will default to Client Master.
- Eligibility From and Thru: The date range you would like to check eligibility for.
- Primary Demographic: All of the client’s information will pull from the Client Master and auto-populate in the fields under the Primary Demographic column.
- AKA Demographic: In these fields, you can override the information that is pre-populated under the Primary Demographics. An example would be if in the Client Master you have the client’s first name as Sheri but her legal name is Sheryl.
When you are ready to check eligibility on the client, click the Check Eligibility button.
Once the eligibility report is retrieved, the report will open for you to review the results.
Viewing Eligibility Reports
You also have the ability to view previously run eligibility reports if you need to! For example, if you are seeing a client tomorrow and want to check if their eligibility has been run recently. If is has, you do not have to I don’t have to run an additional request (saving you time and money)!
Checking this window avoids issuing unnecessary queries. For example, if you know the state only updates eligibility at the beginning of the month, if a query has already been run this month (either via real-time or batch), then you don’t have to run it again. I can just click the report and view it!
To view eligibility reports previous run, click on the Client menu and select Check Eligibility.
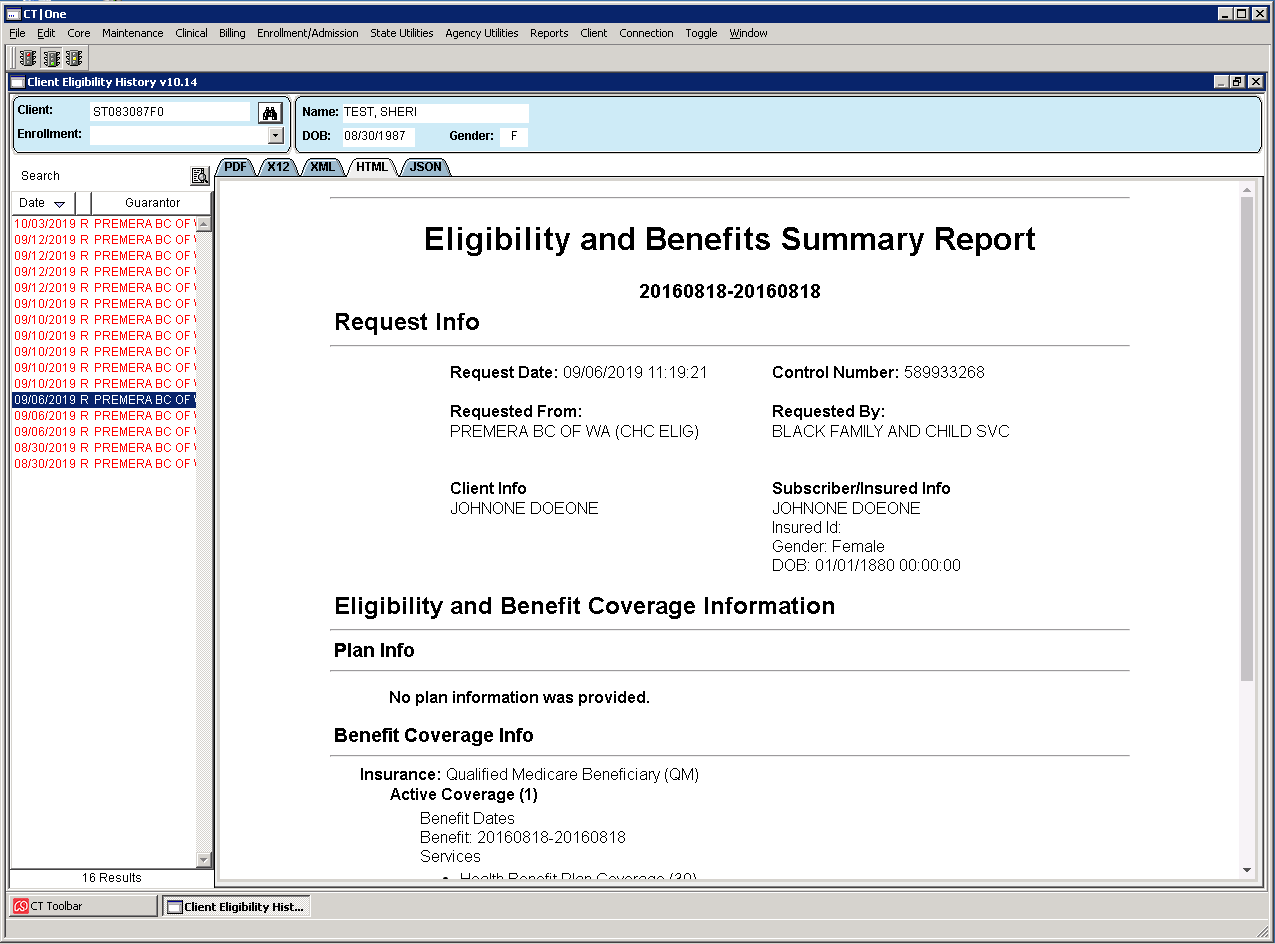
Click on the report you would like to view in the left-hand column and then click on the HTML tab. The report details will populate below.
Batch Eligibility
You also have the ability to check eligibility via a batch process. This process will retrieve eligibility a configurable number of days prior to your clients’ appointments.
You can also configure a group that receives a CTMail if the batch encounters any errors. When an error is encountered, the group gets a notice and can then look at the batch report to see the details of the error! An error might be something like ‘nobody with that name and dob’ or ‘invalid subscriber id’.
Note: Batches run daily at 9:00 PM AZ time.
Configuring Batch Eligibility
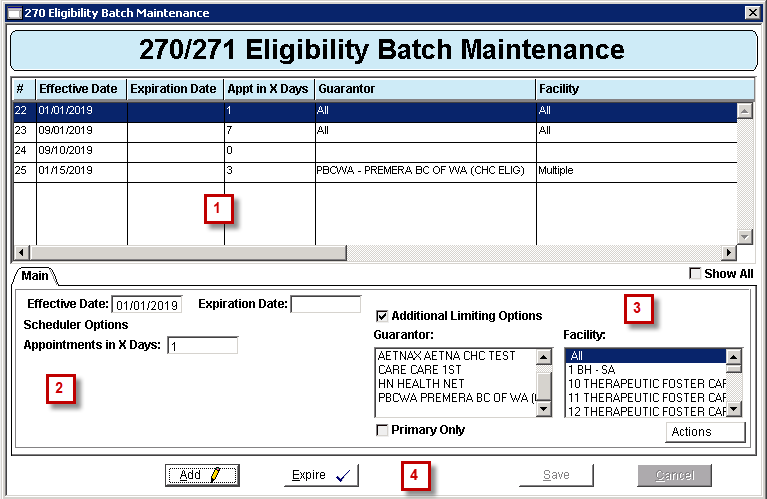
To configure the Batch Eligibility feature, click on the Maintenance menu items and select 270 Batch Maintenance. This will open the 270/271 Eligibility Batch Maintenance window.
-
Section
1
- The grid at the top of the window displays the different batch eligibility rules you have set up.
-
Section
2
- Effective Date: This is when you would like the batch eligibility to start running for the specific rule.
- Expiration Date: This is when you would like the batch eligibility to stop running for the specific rule.
- Appointment in X Days: You can set up the rule to run batch eligibility a certain amount of days before the client’s scheduled appointment.
-
Section
3
- Additional Limiting Options: By checking this box, the Guarantor and Facility fields will populate below allowing you to customize the rule by guarantor and facility.
- Primary Only: This will run batch eligibility for primary insurance only.
-
Section
4
- Add: This will allow you to add a new batch eligibility rule.
- Expire: If you have a rule highlighted in the grid above, you can click Expire to expire the rule immediately.
- Save: Clicking this will save all of the changes you have made.
- Cancel: Clicking this will cancel all of the change you have made.
Viewing the Batch
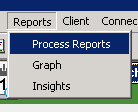
You can view your batch reports by clicking on the Reports menu item and select Process Reports.
Next, click on Core Production Reports to expand the list of reports and select 270/271 Eligibility Report.
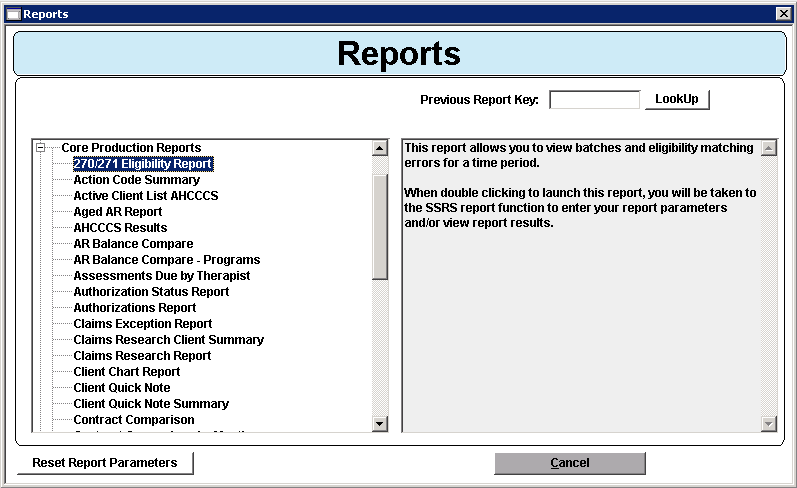
This will open the Report Viewer window. Populate the following fields:
- Report Type: Choose whether you would like to view the errors only or a batch report.
- Batch Type: If you select a Report Type of Batches, this field will become available to you. Select whether you would like to see the most recent batch or all batches.
- From/To Date: Select the timeframe you would like to search by.
Click the View Report button to run the report with the parameters you selected.
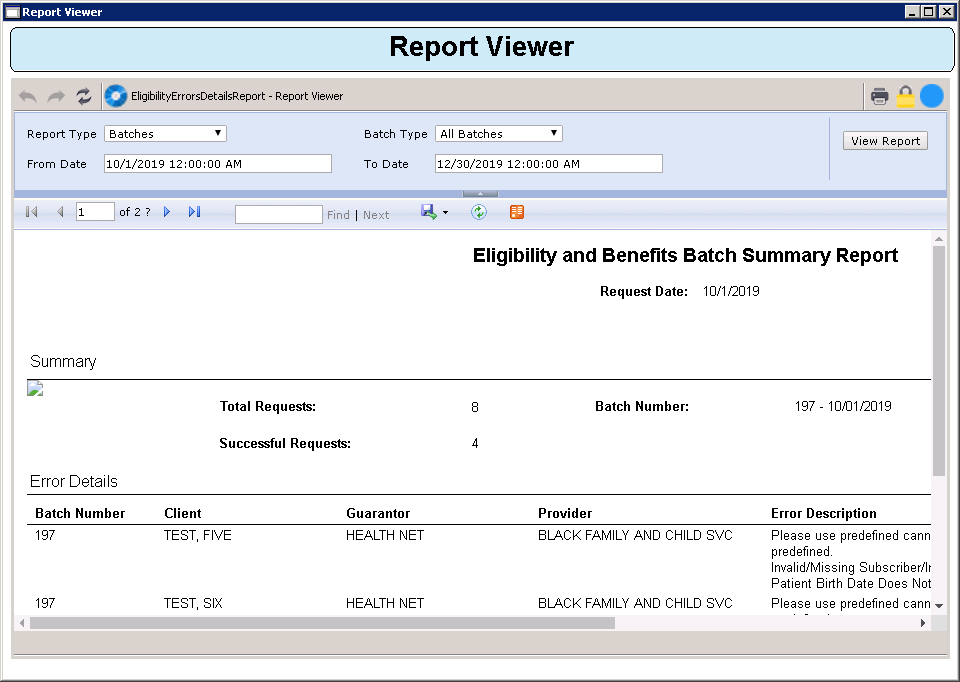
Example report:
Configuring CTMail group: Eligibility Group
You can set up a group of people to receive CT Mail when an eligibility report is available. Follow the instructions below to set this feature up!
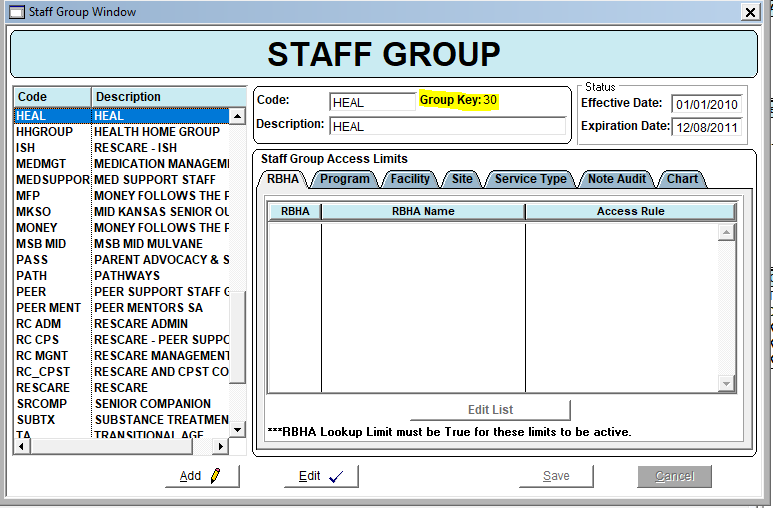
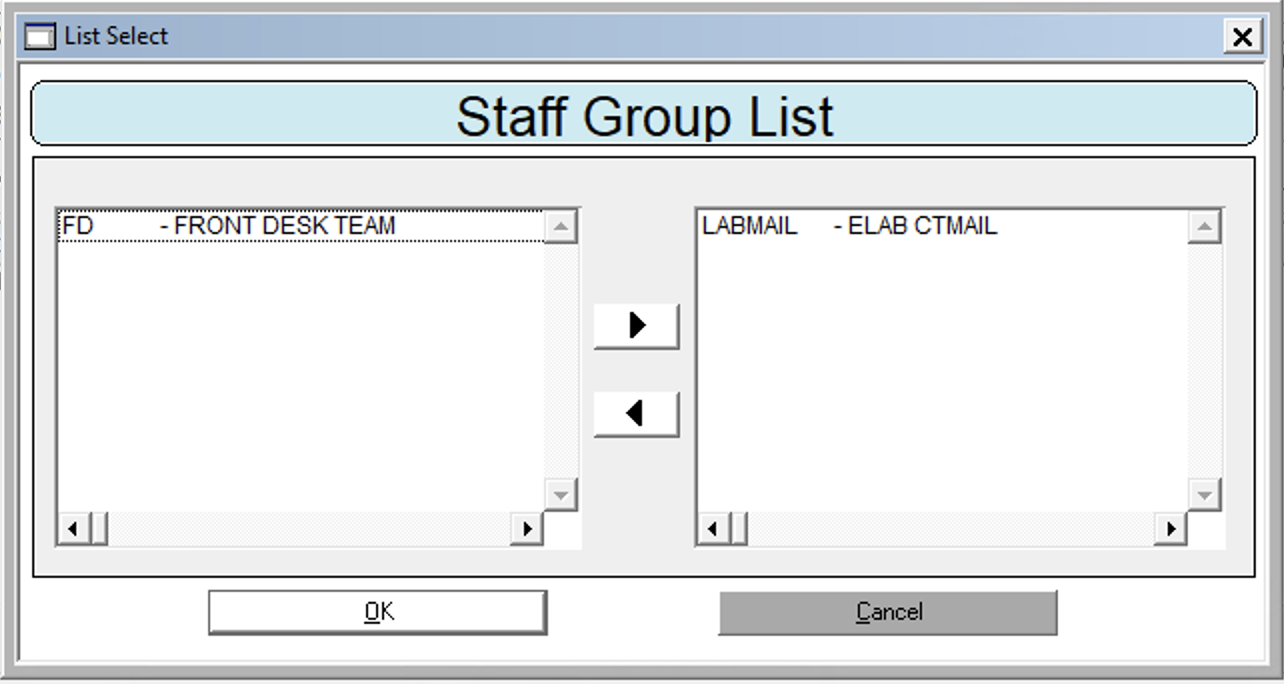
To do so, first we will need to get the group key for the group of staff members you would like to receive alerts.
Navigate to Core > Staff > Group and click on the group you would like to receive notifications.
If you do not have a group set, take a look at our on how to set up staff groups!
Locate the Group Key and jot it down because we will need this later!
Next, go to the Maintenance menu item and select Flags, click on the Search tab and look for EligAlertStaffGroupKey.
Enter the group key in the Flag Value field:

You can add additional staff to this group by going to the Core menu item and selecting Staff > Staff Master.
Locate the staff member you would like to be added to the group and click on the Facility - Site tab and then the Group Membership sub tab.
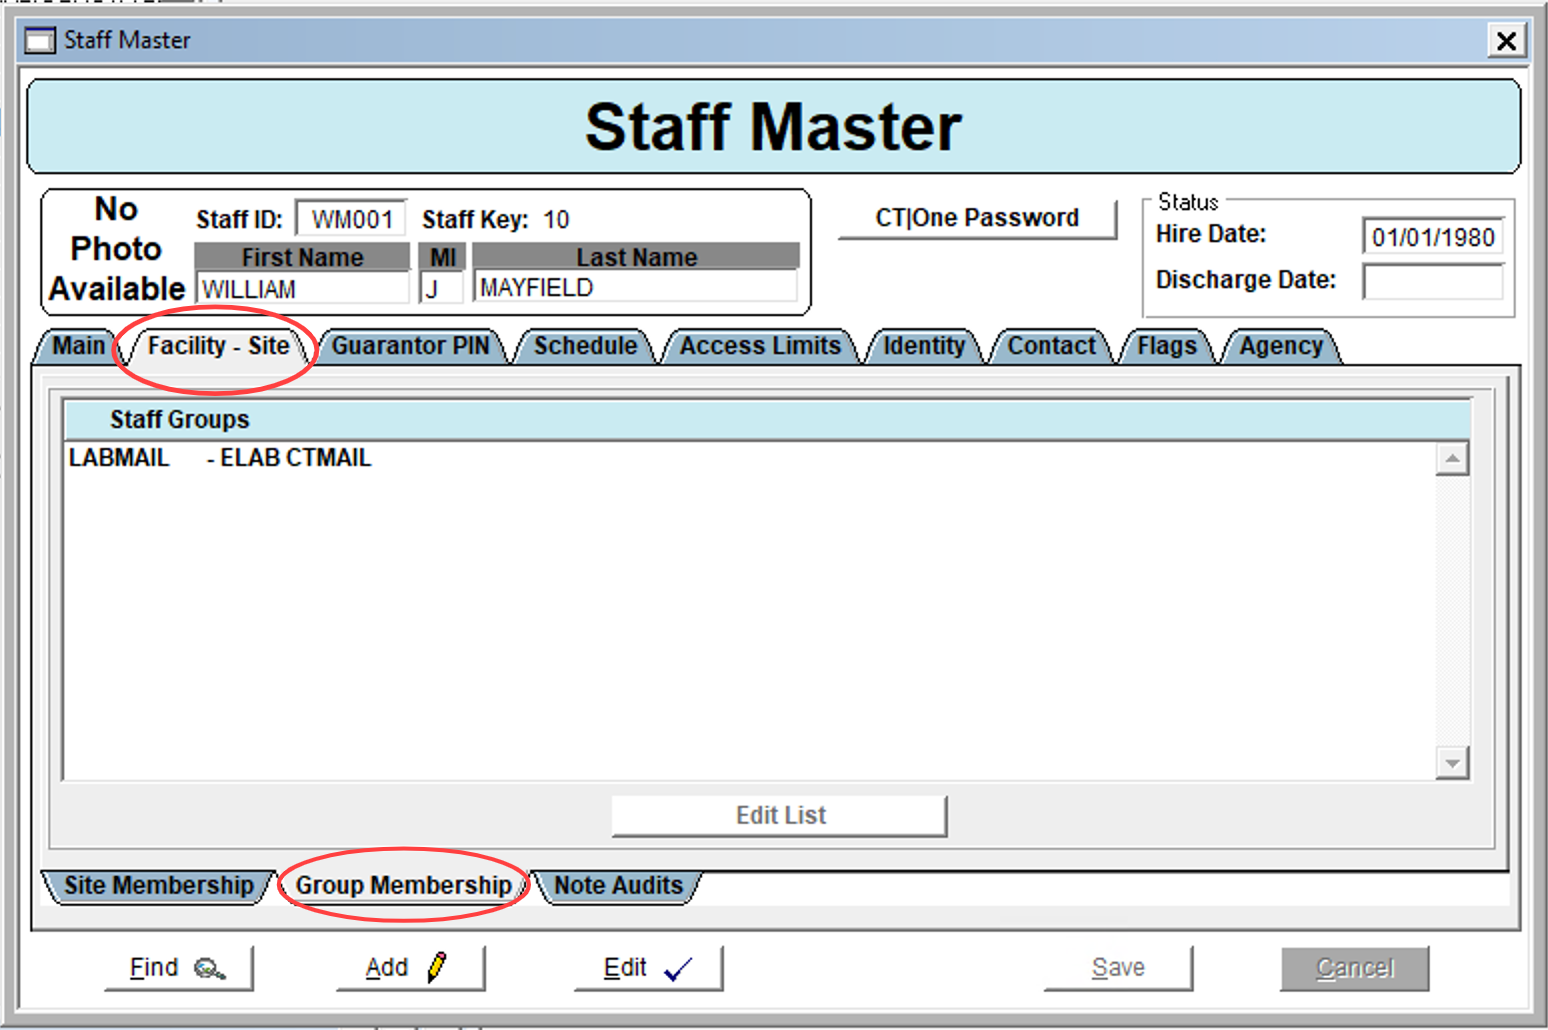
Click the Add or Edit button (as appropriate).
Click the Edit List button to add staff to the staff group and save.
Now the newly added staff member will receive the eligibility notifications!