ADD A NEW CLIENT DIAGNOSIS
Click here for a downloadable pdf.
Explanation
This guide provides the instructions for adding a new client diagnosis, if the client has an existing completed diagnosis form follow the workflow for editing client diagnoses.

Step by Step Instructions
1. Open the Client Chart using one of the three available methods.
- Click the Client Chart icon.
- Open the Client menu and select Chart.
- Press F12 on your keyboard.
2. Add a Packet that contains the Diagnosis Update Form.
Note: This form is often included in the Registration/Enrollment packet.
3. Open the Diagnosis Update form.
4. Click the Add Code button.
5. Complete the required fields.
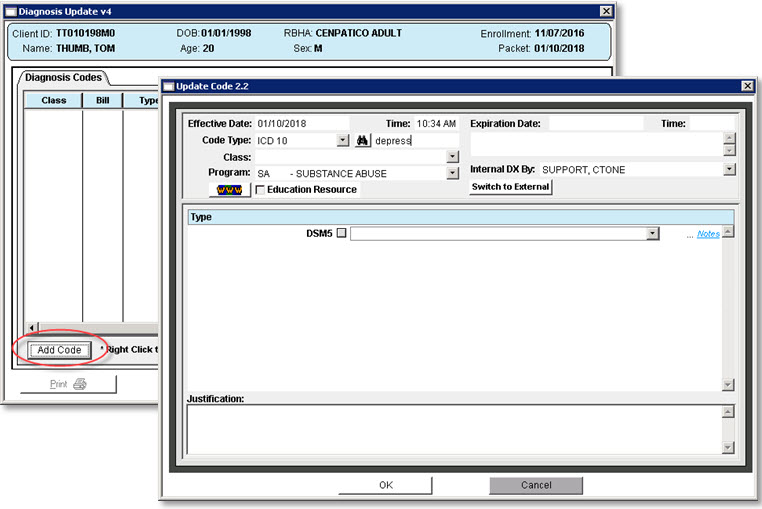
Effective Date and Time
These fields populate with the current date and time. To change these fields click in the field and type in the needed date and time.
Code Type
Select the diagnosis code type from the drop down list. Depending on the agency configuration this may auto populate with the field greyed out.
Diagnosis
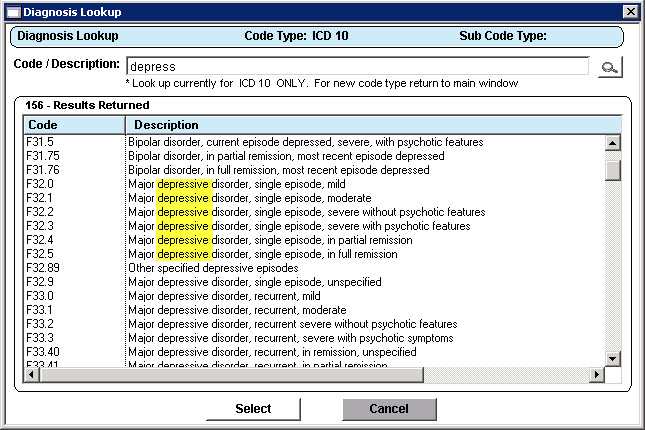
Enter the diagnosis or the alphanumeric code in the search field and click the binoculars. If the exact code is entered the search window will open, close and then populate the code.
Select from the diagnosis from the presenting Search window.
Double click the diagnosis or click the diagnosis to highlight it and click the Select button.
If the diagnosis is not in the Results Returned list edit the text in the Code / Description field and press the magnifying glass to complete a new search.
Tip: The Description is the exact verbiage from the official ICD documentation therefore searching “depression” will not present any results, use “depressive” to find the diagnosis of depression.
Class
Indicate if the client diagnosis is the client’s primary clinical diagnosis or a secondary diagnosis by select from the drop down. Complete the Program field if required by selecting the program from the drop down.
Program
Not all agencies will require this field and it may be greyed out. If required select the client’s program for the entered diagnosis.
Internal DX By
This field will auto-populate with the staff member currently logged in. The field can be updated to enter another staff member or an external provider.
Internal Staff Member: Select their name from the drop down list.
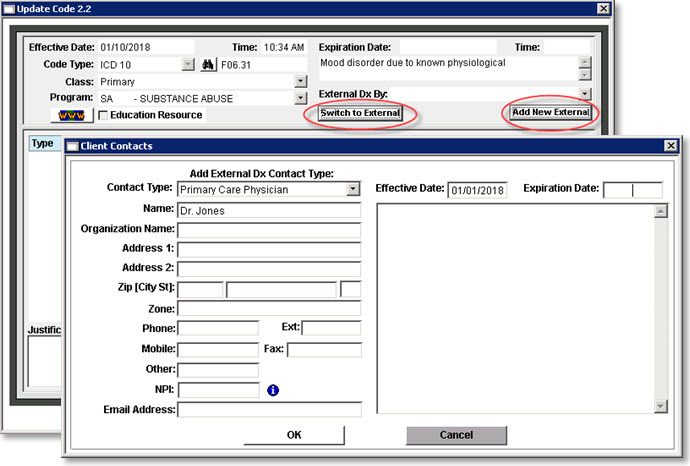
External Provider: Click the Switch to External button. This changes the drop down list to a list of the client’s contacts. If the provider is present select it from the list, if the provider is not present follow the Add External Provider steps.
www
Clicking this button will open a predefined web page for client education for the diagnosis if the agency administrator has completed the set up for this feature.
Education Resource
This checkbox is required for agencies that are submitting Meaningful Use, Clinical Quality Measures, MIPS and other predefined federal reporting. Please refer to the appropriate reporting set up guides.
Type
Depending on the agencies configuration this field may present with alternative diagnosis code types. If the alternative code types are present each field must be populated in order to save the diagnosis. To populate an alternative code type field select from the choices listed in the drop down.
Note: To select a diagnosis not present in the drop down list click the binoculars to open the search window.
6. Enter comments or notes as needed using the Notes hyperlink and Justification text box. Text entered in either place will present on the printed Client Diagnosis report.
7. Click OK to save the diagnosis
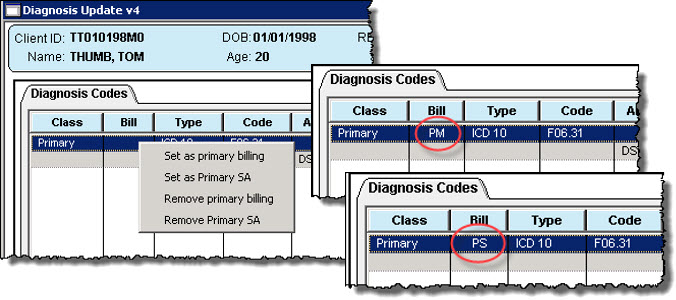
8. Add the primary billing/mental health (PM) and/or primary substance abuse (PS) billing indicator. Right click on the diagnosis and select the appropriate billing indicator from the list.
Note: Not all agencies will use both the primary billing/mental health and Primary SA options.
9. Click Save.
Add External Provider
1. Click the Add New External button.
2. Complete the required fields on the Client Contacts window.
Contact Type: Select from the drop down list.
Name: Enter the provider or clinician’s name.
Effective Date: The date this contact is active.
3. Complete any additional fields as needed.
4. Click OK.